
Mini Piñatas DIY Oct 12 Yea! It’s a piñata day! We miss Mexican food here in Paris since it isn’t as readily available as back home so we started having Taco Tuesdays where my friend Rubi makes amazing homemade tacos. Materials Needed: Cereal boxes, scissors, exacto knife, crepe paper in folds, tape, glue Step One: Draw a picture of the donkey on a cereal box and cut it out with scissors. Step Two: Once your armature is built its time to decorate. Step Three: When you are done cut a trap door at the bottom to fill with treats like small candies, gifts, party poppers, and confetti. I loved making these! You can find the other piñatas in my piñata series right here. All photos by Oh Happy Day Sorry, the comment form is closed at this time.
Lip balm Thanks for joining me for Day 8 of the 14 Days of Love project! If you have been following along you know that Dana from Wonder Forest and myself teamed up to shared 7 projects each (over the course of 2 weeks) with a sort of 'love' theme to them. What's great is that practically all of the projects we have shared, which you can view here and here, can be used for anytime of year! Today I'm sharing a little 2 ingredient beauty recipe for you that is so insanely easy, honestly the worst part about this project is the clean up.. like I'm talking greasy ass clean up so either use disposable supplies or get ready for some dish washing fun.. This tutorial is the most popular post on my blog with thousands of page views and pins from Pinterest (thanks so much!). Vaseline or a petroleum free alternative (if you want something more natural) kool-aid or crystal light microwave safe bowl spatula (spoon) lip gloss containers (I purchased 4 for $1 at michaels)
The Hipster Home & Blog Archive & How to Make a Tiny Terrarium in... - StumbleUpon Ahoy there Hipster Homers! I’m Julie and I’m the very first guest blogger on this fine site. Today’s project involves breaking stuff, plants, found objects, and miniatures. Fun, right? Let’s get started! Dos and Don’ts: Do use sand or small pebbles; these are good because water drains through them easily. How To: You’ll need a few tools to make a tiny terrarium but nothing complicated to get started. Needle-nose pliersScissorsLong tweezers or chopsticksFlathead screwdriverGlasses or goggles Let’s start with the light bulb. We will be removing the inside parts of the lightbulb. First, remove the metal tip from the bottom of the bulb. Then, when enough of the sides are raised to get a good grip on them, hold one of the sides with your pliers and yank out the metal tip. Next remove the black glass. Now you will be able to see the interior parts of the light bulb. Using the flathead screwdriver as a sort of lever, snap the interior tube from the side. And now you have an empty light bulb!
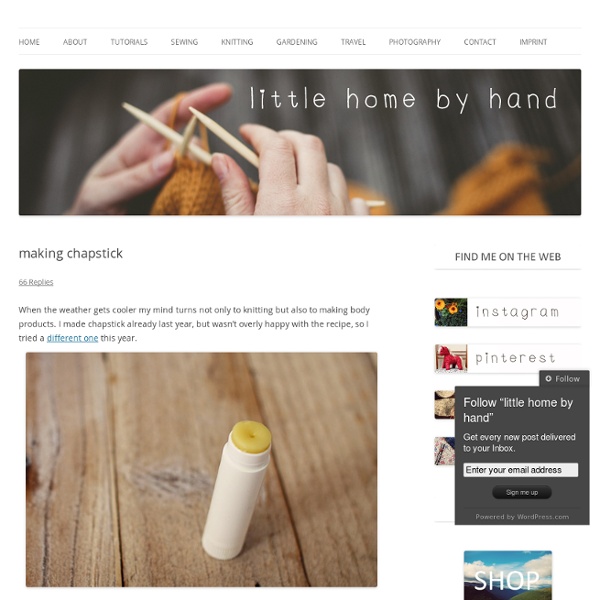
Homemade Hand Scrub Winter is here and if the cold, dry air has turned your hands into sandpaper like it has mine, you`ll appreciate this hand scrub that leaves your hands soft, smooth and smelling delicious! Turn your old jars into thoughtful, homemade gifts (& keep one for yourself!) I suggest using small jars, since all the ingredients are edible (and therefore spoilable) and should be used within a month. Ingredients: Small sized mason or other jars you want to use Sugar Olive oil (or any other oil you may have in your pantry) Lemon juice & zest Few drops of vanilla *The amount of ingredients that you need depends on the amount of scrub that you want to make. Natural Chapstick After searching FAR AND WIDE for an awesome Christmas gift for my girlfriends this year... I finally landed on the best gift project I'm made thus far. I mean, this is way better than painted frames, decorated mugs and puff painted totes. Introducing the gift that's inexpensive, fun to make, and is actually useful in real life! Homemade Natural Chapstick (because who needs another crocheted tissue box cover?) 1.5 oz beeswax (1 and a half tablets) 6 vitamin E capsules 2-3 tablespoons of olive oil (2=more rigid, 3=softer) 2-3 teaspoons of coconut oil 2-3 teaspoons of cocoa butter 25-30 empty chap stick tubes OR 15 lip balm containers DIRECTIONS 1. Where I found my ingredients: Organic olive oil (local health food store) Organic coconut oil (local health food store) Vitamin E tablets (local health food store) Empty chap stick tubes (ebay and a few pill boxes) clear printer labels (walmart) Aren't they adorable? Be Brave and EXPERIMENT! Dress 'em Up!
Tutorial: Homemade Sidewalk Chalk by Michelle Vackar, Modern Handmade Child One of our favorite outside activities at our home is drawing with chalk on the driveway. You can play hopscotch, four-square, and of course draw and create silly stories. What you will need: • Toilet paper or paper towel tubes • Scissors • Duct tape • Wax paper • Small bucket or disposable container to make the recipe • ¾ cup of warm water • 1 ½ cups Plaster of Paris • 2-3 tablespoons of tempera paint • Paper bag or a “mess mat” ** we made six tubes of chalk – we simply doubled the above recipe Step 1: If you are using paper towel tubes, cut each tube in half, so it is roughly the length of a toilet paper roll tube. Step 2: Cover one end of each tube with duct table to hold the contents within. Step 3: Cut as many pieces of wax paper as you have tubes. Step 4: Pour the warm water into your bucket. Step 5: Next you will want to pour the tempera paint into the Plaster of Paris mixture and stir so that it is mixed thoroughly.
return on creativity: paint sample coasters I've had this map coaster tutorial in my inspiration file for awhile. I wanted to make a set of map coasters for my brother; one coaster for each city he has lived in. The plan was to use an old atlas I had lying around, but all the cities were in the middle of the state, right where the atlas folded in two. Sigh. So I decided to make paint sample coasters instead... All you need is tiles, Mod Podge, spray acrylic, paint samples, and cork or felt. Would you believe that this project was the first time I ever used Mod Podge in my life! My paint samples had rounded corners, so I first squared them off. Then I measured the samples to fit the tiles and cut them into squares. Don't you just love a project where even the scraps are pretty? I used Mod Podge to apply the samples to the coasters and then applied about five coats of Mod Podge over the top. Finally I applied some spray acrylic. That's it. I think these would make a great gift.
Make Your Own Lip Gloss Living in Florida, I've ended up melting my favorite chap stick (Burt's Bees) in the car too many times to count. Usually I try to set it upright to cool, and hope it resettles the right way, but somehow it's never the same. So when I saw this DIY lip gloss tutorial, I thought it would be a great use for my melted chap stick. What you need: 1. A metal ladle or measuring cup (You could also use a small glass measuring cup) 2. Your favorite chap stick (melted or brand new) 3. What you do: 1. 2. 3. 4. 5. 6. The BEST Play-Dough Recipe Have you ever made play dough and it just fell apart?? Well… not this time. This recipe will make play dough that is seriously the closest thing to store-bought you’ll ever make. No falling apart or drying out (as long as stored in a sealed container). It will last up to 6 months.The secret to this recipe?? Two things: First, Cream of Tarter… it’s what helps the dough stay together. and Second, not a lot of salt… all that salt dries out your dough! Ready to make it? Ingredients: 1 C Flour 1 C Water 1/4 C Salt 1 TBSP Vegetable Oil 2 tsp Cream of Tarter Food Coloring (actual coloring or a kool-aid packet will do) Sparkles (If you wanna be a fun mom!) Pour in all ingredients. Stir until everything is mixed well. Once the mixture is (mostly) clump free. Stir. Stir, Stir Stir.Just keep stirring until the Play Dough is formed. Remove from heat, and knead by hand. Once cooled it’s ready to go. What a fun thing to do on a rainy day! # kristanlynn xoxo UPDATE- answering your questions:
freezer paper stenciled reverse applique hand stitched pillow - artsy-crafty babe Now there's a title for ya! Totally inspired by Alabama Chanin, here's my spin on it. What you'll need is: 2 (two) 1/2 yard pieces of jersey knit + 1” strip of the under-layer piece long enough to go around the perimeter of the finished pillow coverfreezer papercraft paintspongeironsafety pinsneedle & buttonhole threadscissors For a 16” pillow cover, I start with an 18” square. This gives you some wiggle room with pattern placement, especially if you’re like me and end up cutting the square wonky and don’t quite manage to get the stencil in the middle of the square. Cut two pieces of freezer paper 18” square (pretty convenient that freezer paper is 18” wide), then cut two pieces of jersey 18” x 18”. Using one piece of freezer paper, fold it in half, then quarters, then diagonally if you choose – cut out shapes as you would if you were making a paper snowflake. With your design unfolded, place it plastic side down on the front of the jersey square that you plan to use as the outer layer.