
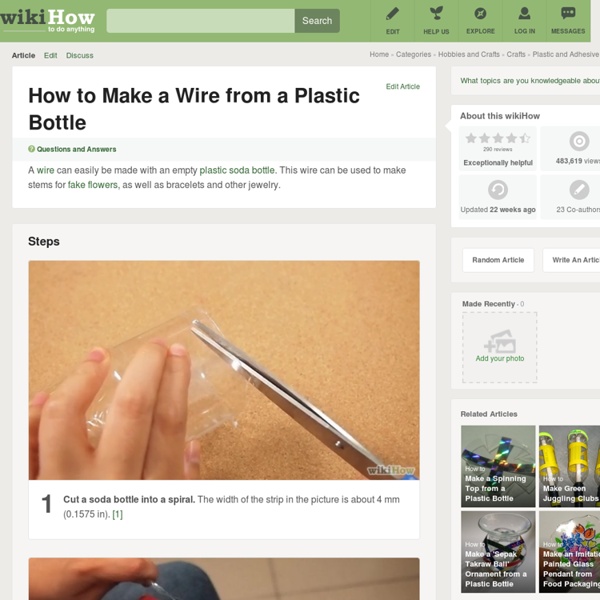
It's doable... Crafts, food and life - Blog - It's doable...the flower wall art What started it all... This was inspired by another Pinterest viewer, of which I've tried desperately to track down, I'm in the works though!-- The search comes to an end!! This is quite an easy project and it cost me a total of $13! -1 12x16 inch canvas $5.99 (with 40% off coupon, originally $9.99) -1 Artist's Loft 4 oz acrylic grey paint $3.99 (I used the excess on this project) -5 pieces of scrap book paper $3 total I had the following: -Mini hot glue gun and glue sticks (Michael's has these for about $3) -Foam paint brushes (Michael's has these for about $1.50) -Mod Podge (Please read reader comments before using) 1) Paint your canvas. 2) While your first coat is drying, cut a 2 inch wide strip off the bottom of each of your scrap book papers. 3) Then cut that strip into 2-3 inch rectangles. 4) Starting at one corner of the square make a curved cut to the opposite corner. 5) And back again. 6) Ta-da you have a leaf now! 8) Let your canvas dry completely (I watched a movie). That's it!
How to Weave on a Cardboard Loom June 25th, 2008 Email 1323 users recommend Weaving like this can be the basis for so many projects: place mats, coasters, bags, hats—use your imagination. All photos by Diane Gilleland Keep your edges a little loose, and they'll stay nice and straight. An ordinary salad fork makes a great tool for keeping your weaving snug. Photo: All photos by Diane Gilleland Time to string your loom! Next, draw the yarn across the surface of the cardboard, and then wedge it into the first slit on the opposite side. On the back side of the cardboard, wrap the yarn around and wedge it into the second slit, as shown. On the front side, draw the yarn over the cardboard and then wedge it into the second slit on the opposite side. Continue like this, stringing the yarn back and forth over the cardboard, using those slits you cut to anchor it. View 1 member project gallery
Drink Can Tinwork Tinwork Embossed tinwork is sometimes used to decorate rustic style photo or mirror frames, or just to make decorative items such as Christmas tree decorations. The metal used is usually thicker (tinplate) and is normally worked with hammered tools - I wanted to try to get a similar effect, but with a bit less effort. The Most Popular ArticleOn Atomic Shrimp No, really! I created this page towards the end of October 2008. More Metalwork If this project interested you, you might also like Lost Wax Casting Safety This project makes use of very thin sheet metal that is likely to have sharp, jagged edges and is prone to springing back. Great care should be taken to avoid injury. This project probably isn't suitable for children - and certainly not without supervision. Updated Autumn 2010 - now with Video Goodness! Soft drink cans are easily recyclable as scrap metal, but I fancied trying something a little more direct - a simplified form of tinwork. Materials Finished And Better... And Better Still
DIY Roman Shades « It always feels great when you have your mind set on how you want something to look and then it all comes together. This is exactly what has happened with my entry way/porch area. I knew I wanted to put stripes on the wall but it was a matter of finally getting around to it. Once that was done and the porch was all cleared out I knew I had to make it something that was worth having. Waverly Chippendale Fretw Quartz Premier Prints Gotcha White/Candy Pink Waverly Cross Section Raspberry I knew I wanted a geometric pattern so that almost immediately eliminated the second fabric (Waverly Chippendale) and I wasn’t too sure about that first print because of the whole papaya part. Fabric, Measuring Tape, Scissors, Fabric Glue, Mini Blinds. 1. 2. Should look like this when it’s all done. 3. 4. 5. 6. 7. 8. 9. I know it seemed like a lot of steps but trust me it is so simple and quick! Like this: Like Loading... Related {Flashback Friday} DIY No Sew Roman Shades With 12 comments Painting Stripes
Search Results glitter eggs Apr 7 Glitzy Easter Placecards By Ashley Page Norton Easter is right around the around and these egg and nest placecards come together super fast. The supplies are easy to pick up or if you’re like me you probably have most of them on hand – I love pipe cleaners and always have some around! I’m also total sucker for good alphabet stickers so I pick them up whenever I see them, but you could always handwrite the names instead. Click through for materials & instructions… (more…) Apr 18 DIY Party: Confetti Egg Game This post is by my friend Rebecca Wright who will now be doing a column on Oh Happy Day. I love parties that involve surprises. DIY Party: Glitter Confetti Eggs Confetti eggs (aka Cascarones) are like mini pinatas for your head. We decided to shake things up in our hunt this year by turning it into more of a game. Party Rules How to Make Confetti Eggs: Pin/NeedleScissors Step by Step: 1. 5. 7. 9. Have fun out there, kids. All photos by Robyn Kessler for Oh Happy Day.
Beginners Crochet Stitches How To Today I’ll be showing you how to get started with crocheting. You’ll learn the what tools you need as well as three basic crochet stitches that will get you started creating! More instructions on different stitches coming up in future blog entries, but these will enable you to crochet a lot of things to get some practice. Supplies Checklist: Crochet Hook – Sizes vary based on the size of the gaps you want, however a standard 1/9-5.50MM needle will work well. Another good needle is the N-9.00MMYarn – The choices are limitless, but for this tutorial I will be using a very basic black yarn. Part 1: Making a Slip Knot When starting off any crochet project, you’ll need to make a slip knot. Part 2: Creating the Starting Chain Once you have your slip knot created and on your hook, you need to create the starting chain, which will be the sae in any crochet project. Part 3: Single Stitch Part 4: Half-Double Stitch Part 5: Double Stitch That’s how you get started with your crocheting hobby.
Kindle Cover Tutorial We are baking, sewing & crafting up a storm, preparing handmade gifts for this holiday season. I am sharing 30 wonderful sewn gifts from 30 amazing bloggers! Head on over to According to Kelly for 30 fabulous crafty gifts. Hello friends! I am so blessed to be married to an amazing man, mom to two beautiful little girls and part time nurse at a remarkable hospital. I am so excited to be a part of this Holiday Bake, Craft and Sew Along and to be bringing you a full tutorial on how to make your own Kindle Cover. Materials: *Fabric (preferably two different patterns that go together) *Matting (like the kind used in quilting) *Elastic *Iron on velcro *Fabric button *Basic sewing supplies *Sewing machine Getting Started My cover is made for the Amazon Kindle with dimensions as follows: Length x Width x Height 7.5 in x 4.8 in x 0.335 in I used this formula for measuring and cutting all my material (L + H +1) x (W + H + 1) This formula will help you make your measurements than your two main pieces 1 and 2
Shrink! Shrank! Shrunk! bonus project: Cathe Holden's Blooming Flowers Bracelet! « Lark Crafts Lark Crafts Cathe Holden's Blooming Flowers Bracelet in the book Shrink! Shrank! Shrunk! Shrink! We’re pleased to present Cathe Holden’s Blooming Flowers Bracelet project as a PDF: download it by clicking here. Intrigued? How to sew a zippered pouch I hope you are enjoying all of these wonderful sewn gift tutorials. We have been baking, sewing & crafting up a storm, preparing handmade gifts for this holiday season. Don’t forget to head on over to According to Kelly for 30 fabulous crafty gifts. A Southern Fairytale has 30 edible yummies & holiday-inspired recipes for you to try. You definitely don’t want to miss a day! You might have seen this pleated pouch here before, but I think it is worth posting again because it makes a perfect handmade gift! Download pattern pieces and print with no scaling selected on your printer. Pleated Pouch Pattern Download Mark fabric from pattern where it should be pleated. Place outer top piece face down on pleated piece, line up edges and stitch across 1/4 inch from the edge. Make a zipper sandwich. With a zipper foot sew across the top between the edge of your zipper sandwich and the zipper teeth (closer to the zipper feet). Bring lining and outer fabric to the same side. Turn right side out.
DIY Chic Custom Camera Strap Cameras are awesome, but most camera straps are boring. While we love browsing online stores like Photojojo, Etsy, and Amazon for unique camera accoutrements (see: 20 Must-Haves for the Modern Photog), its hard to find that perfect strap for every outfit and it's really hard to justify spending big bucks on more than one strap. So, naturally, it's time to hack! Each strap took us about 5 minutes and cost less than 5 dollars. The best thing about this how-to is that once you know a few simple tricks, you can create a whole bunch of camera straps that are easy to swap out depending on what you're wearing and where you're headed. Materials: – scarves, belts, purse straps, fabric trim – sewing machine or needle and thread – large key rings – super small key rings – carabiners with key ring attachments – scissors – camera with strap hooks! We recommend grabbing underused scarves from your closet, or heading to a local thrift shop to find some cheap gems. Next, prepare your strap.
Origami box in Crafts for home stationery and paper for birthdays, anniversaries or dinners Fabulous origami box which we can make it in a moment, and it's great to keep the gifts we want to give as a present or just to store our little treasures. It's as simple as with a pencil mark the diagonals of the square paper (about 20 cm to the base and 14,5 cm for the top) chosen for the box. Then fold the opposite sides toward the center helping a pencil to mark well the fold (the wrong side). To make the base, fold the opposite sides parallel to the midpoint and toward the inside and should measure about 3,5 cm. Folding and unfolding and repeat for the other two sides. For the lid, fold the opposite sides (should measure 1,4 cm each), folding and unfolding and repeating the process with the other side. If we pay attention, a little wrinkle has been created in the folds of the corners of the base and lid. Finally, displays the opposite sides of both the base and lid and return to fold inward. To clarify any doubts, here's a great video overview:
zenstones | sand between my toes zenstones Before we came to live at the beach, my idea of heaven was lying under a shady umbrella somewhere hot and sunny, listening to waves lapping on the shore, doing absolutely nothing apart from raising a glass of something icy cold to my lips. So for the past 14 years I’ve been able to do just that for 8 months of the year but – though I hate to admit it – it bores the pants off me now! Which is how I began walking on the tide-line, thinking how chalky and insipid the pebbles looked as soon as they dried out and wondered if they had a coat of varnish added to them, it might preserve their hues. A particularly gorgeous one had a blob of tar on it, so I decided to cover it with an ink doodle – and I had a eureka moment! Imagine my surprise when yesterday I came across Zentangles on the net – so very similar to these but on paper. Just goes to show that there’s nothing new under the sun! Even under my umbrella…ella…ella! Like this: Like Loading... About artyjudy