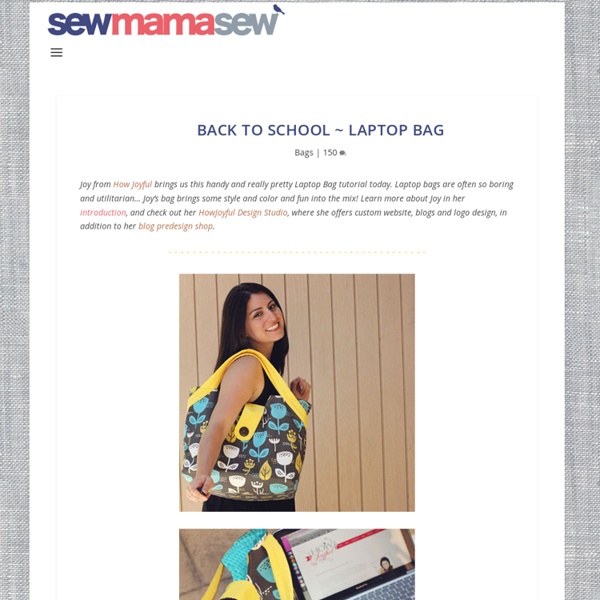
Back to School ~ Laptop Bag
Mini Cosmetics Bag | The Late Afternoon
As promised, here is the result of my new fabrics – a mini cosmetic bag! Not only was I excited to actually make something out of my new fabrics, this project also gave me a chance to practice sewing with zippers (something I’ve never done before). I followed this tutorial, but made mine a bit smaller and more rectangular, rather than square shaped. Related Posts MINI Variety, mini matchbox cards, Mini Instax Books, castle
Piped + Pocketed Canvas Tote Bag Tutorial
Try This: Piped + Pocketed Canvas Tote Bag I like tote bags, and I cannot lie. [How I hope that you got the beat on that right.] Seriously, I am loving myself some bag projects lately. This one is a winner for sure. Read on for the full tutorial. Materials: (1) Magnetic Snap ClosureNatural Canvas in the following cuts:(2) 12" x 16" (i.e. canvas front/back panels)(2) 7" x 16" (i.e. canvas side panels)(2) 7" x 11" (i.e. canvas pocket panels)(6) 2" x 22" (i.e. canvas braid strips)Bold Patterned Cotton in the following cuts:(2) 12" x 16" (i.e. lining front/back panels)(2) 7" x 16" (i.e. lining side panels)(2) 7" x 11" (i.e. lining pocket panels)(6) 2" x 22" (i.e. lining braid strips)plus extra for a pocket (optional) Medium-Weight Sew-In Stabilizer in the following cuts:(2) 12" x 16" (i.e. front/back panel stabilizers)(2) 7" x 16" (i.e. side panel stabilizers)Heavy-Weight Sew-In Stabilizer in the following cuts:(2) 2.5" x 11"Piping in the following cuts:(4) 16" find me elsewhere
All wrapped up: Double Flap Pouch Tutorial Translation
The last few weeks have been pretty busy. I've had two weeks of back to base teaching, basically all day lectures. After having a year and a half of clinical placement, it really makes me wonder how we managed to sit still all day during those first years of medical school. It was probably all the more painful because I'm enjoying women's health. I spent the last week before the back to base teaching with an infertility specialist, and it was equal measures amazing and awful because of some of the patient's stories. Women's health has reminded me why I wanted to do medicine in the first place, as cliche as it sounds. Everytime you start a new clinical rotation you always get asked what you want to do, and I always used to say I wanted to do O&G but I'd wait till I saw my first natural birth. Anyways back to the craft. So before you start a few quick pointers: 2) I can't read Chinese so I wasn't too sure how to use the template. What you'll need Copies of the template. Happy Crafting! Mel
Related:
Related:
