
Upcycled Skirts: Umbrellas Converted into Colorful Clothes | Designs &I... Like designing your own styles to dress in but not skilled with complex stitching or comfortable with creating new patterns? From their shapes and size to their scale and appearance, skirts and umbrellas have a lot in common – except, perhaps, that when it comes to an umbrella the interior is designed to be seen publicly and thus is as carefully considered and crafted as the exterior … whereas, well, looking up a skirt … that might get you in trouble. But seriously: used umbrella material is a perfect choice in many regards to upcycle into a skirt, dress, other easily-planned piece of refab clothing, as designer Cecilia Felli discovered during her creative umbrella-to-skirt upcycling experiments. Moreover, since umbrellas are well known for breaking down, this provides a simple do-it-yourself way to take advantage of something that frequently falls apart. Umbrellas come in all kinds of colorful, creative and unique patterns that convert readily into skirt material for women or girls.
DIY Cake Stand It seems as though all sorts of cute party decorating items are “all the rage” these days–cake stands, tiered plates, apothecary jars, hurricane lamps, etc. I love these items, but there is often one big problem! The price tag. Well, thanks to one of the crafty moms in my MOPS group, I now can make my own cake stands for less than $3! Now that is a price that I like. And, not only is the price fantastic, but this might just be the easiest DIY project on the planet. A candle holder, a plate, and some glue! To construct your stand, glue around the rim of the candle holder. You can add a little circle of glue on the underneath side of the plate for good measure. Stick the two together and let dry. Then, voila, an adorable cake stand for next to nothing! How great would these be for a Mother’s Day luncheon/tea?! In addition to the fantastic price & ease of construction, I love that the possibilities are nearly endless! This post may contain a link to an affiliate.
Fairyland May 14, 2010 A happy Home Tour Friday to you! Before we begin today, I need you to SIT DOWN and take several deep breaths. Because this is incredible. Friends, Kidtropolis has done it again. Somewhere in Mississippi, there is a VERY lucky little girl who gets to sleep here every night: Shall I send the paramedics – did you just faint? Here’s another look at the gorgeousness. This room took 4 months to create and 5 14-hour-long days to install. I can see why! This tree is the perfect touch. With stones on the floor and mushrooms scattered about, this really is a fairy’s home. Can you stand it?? Parker,you lucky little adorable. These “tattered” curtains are just perfect, in my opinion. Now we’ll take a closer look at the details… Mossy flowers and grass, A pinch-me-too-cute bookcase, Petal lights (!) And this door that can be half-open. The details are just remarkable to me. The motif even continues into her bathroom… I know, I know… A merry weekend to you all! Share this post You might like...
Tutorial: Scrap Buster Fall Pillow This is my favorite thing to do with my little scraps, and since its Scrap Buster month over at Sew, Mama, Sew, I made a quick tutorial so you can make your own. This pillow cover is 16" square with an envelope back & the design possibilities are endless! I added some pillows I’ve previously made with this same method at the end of this post. You’ll Need: 1. 2. 3. 4. Iron your fabric scraps onto your appliqué material according to the directions on the appliqué material. Now with scissors cut out your trunk and leaf shapes. When you get all your leaves cut out, tear the backing appliqué paper off the leaves and trunk. Then you can arrange them how you want on your pillow front. Once your design is how you like it, press with an iron over each spot for a few seconds making sure not to bump anything out of place. Now you can sew either along the inside edges of your leaves, or you can do a zig zag stitch or blanket stitch around the edges if you prefer. Pin around the edges well.
Made By Lex & Blog Archive & Anthropologie Pratia Tank Top Tutorial February 6, 2010 1:59 pm Per popular demand, here is the Pratia tank tutorial! Start off with a t-shirt or tank top. Measure your neckline and get a piece of chiffon that length and fold it in half. Pin it to the inside of your neckline with it peeking out. Since I cut the sleeves off my T, I wanted to finish the edges. Stitch it. I highly recommend interfacing where you are going to be adding the embellishments, otherwise it’s going to sag. For the flower pieces, here is the shape and dimensions I used. Fold your pieces in half and cut that petal shape out. I used the extra sleeve pieces, cream chiffon(the kind that won’t fray) and another grey jersey I had. How many do you need? Lay two petals on top of one another, as shown. I did a small ‘X’ shape to stitch them so they stay in place. Just add more, and more, and more, and more………(It’s time consuming. I really liked the bottom gathered feature of this top. Measure how much elastic you will need to be comfortable around your waist.
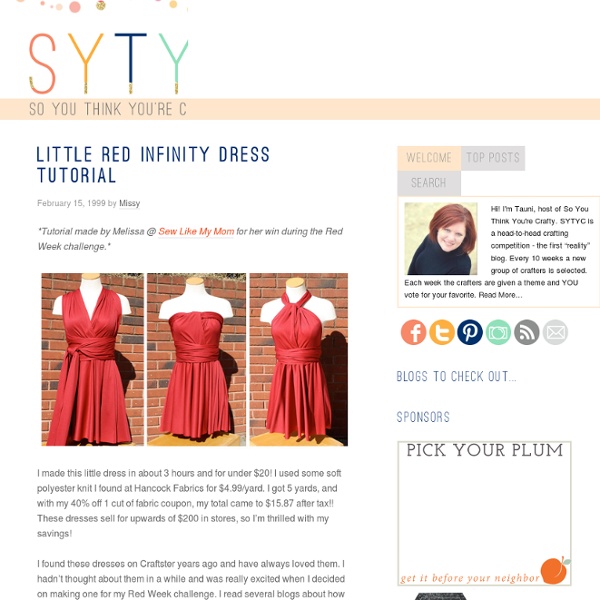
A Herd of Snugglesauruses I recently made some new dinos for the shop! They are similar to an item I used to make, but these are even better... they have an improved design, stand up by themselves, and have two rows of adorable ruffles down their back! Just the right size for babies, and super cute too! And here is the whole herd lined up for a group photo: Fun stuff :) WhatTheCraft.com – Your one-stop destination for D.I.Y. tutorials, tips, and supplies guest blogger tutorial: allison of cluck cluck sew Hey there fellow V & Co. readers! Allison here from the site Cluck. Cluck. Sew. While Vanessa is on a plane heading to quilt market (jealous!) Today we’re going to make a Petal Pillow. First you’ll need: -a little over a 1/2 yard of fabric….19 inches to be exact. - 1/4 yard felt. - a large and small cup (or other circles) for tracing, a large bowl for tracing, a pen, scissors, and cardstock to make your template. Trace the rims of your cups onto your cardstock and cut out. Pin the templates to your felt and cut out circles. Cut out roughly 30 large circles, and 20 small circles. Now cut your circles in half. Now your going to cut your fabric into three pieces. 1 large square 19 inches x 19 in. , 1 rectangle 19 in. x 15 in. , and 1 rectangle 19 in. x 12 in. On the right side of the 19 in. by 19 in. square, trace a bowl or large plate marking a large circle in the middle. Line up the edge of a large petal along the line you just traced. Your done with the hard part…now lets make your pillow.
how to make a staple-free matchbook notepad. In an effort to use up the damaged & small surplus of 2010 calendars I have on-hand, I've been experimenting with ways to repurpose them. These matchbook notepads were this week's project. They are easy to make .... and adorable ... and completely practical. I'll be making these to drop into my customers' packages as a token of thanks. The paper is from the offcuts of my shipping labels. You could use any scrap paper with at least one blank side for this project.- - - - - - - - - - - - - - - - - - - -To make these staple-free matchbook notepads, you'll need:- a piece of cardstock / coverstock for the outside- 2 or 3 sheets of paper- sewing machine or needle & thread Cut cardstock into 9" lengths and whatever width you desire. Cut sheets of paper into 4-1/4" lengths and the same width as you chose for your cardstock. Make a 5/8 - 3/4" creased fold on one end of your cardstock. Tuck a stack of 10 pieces of paper into the fold. These are so simple and fun - try it out!
Sex And The City Half Scoop Gloves LEATHER-SEWING TIPS: Use a longer stitch than you normally would when it comes to leather...and a good tip when sewing leather is to crank the needle forward manually so that it has pierced the leather completely...BEFORE pressing with the presser foot of the machine to sew your line of stitching. Start sewing with the needle already in the leather to say it another way. Also, you can't go super-fast or super-slow...there's a happy medium where your machine's feed dogs advance the leather at the right speed, the needle punches through the leather without jarring and hitting the needle plate, and the needle goes in vertically and doesn't hit the bobbin case. Too fast and the aforementioned problems will crop up; too slow and the needle won't punch through the leather. It's different for every machine - just something you need to experiment with. When starting your line of sewing, DO NOT BACKSTITCH. Also, do not start stitching directly on a seamline. Happy DIY'ing!
An Altered Obsession