
Useful Photoshop Tools and Techniques For Your Workflow - Smashing Magazine untitled Design Maze - 2008 February Entries The soar of digital technology has revolutionised art by increasing the possibilities an artist may have for expressing and communicating messages that cannot be otherwise articulated with words. Adobe Photoshop is a unique fantastic tool that comes with a set of filters that assist in creating art by using photographs. These filters bundled with layers and masks and an infinite possibility to use existing brushes and patterns as well as creating new ones opens a world of magic to any graphic artist. I have created the art work here by using an original picture of a red rose and a combination of filters and adjustment layers. My plan is to update this site with some of my Photoshop work as well as creating simple entries that can be followed for fun as well as learning that extra Photoshop trick. Feel free to download my "Dark Rose" and send it to your Valentine.
Visiting Student Program Admission | Columbia University Office of Undergraduate Admissions While we request that the volume of supplementary credentials be kept to a minimum, there may be occasions where such credentials provide valuable information that the standard application does not. If you plan to submit supplementary credentials, please follow the instructions below. Please note that we specifically ask that you do not send collections of award certificates and the like, and we explicitly direct that you refrain from submitting your application in binders or folders. Additionally, we encourage you to try to convey the breadth and depth of your extra-curricular pursuits within the Activities section of the admissions application, including the full name of each organization and, if appropriate, a brief description of your involvement. Science and Engineering Creative and Performing Arts Please follow the directions below depending on your area of interest: Musical Performance Please note that musical supplements are not a required part of our admissions process. Visual Arts
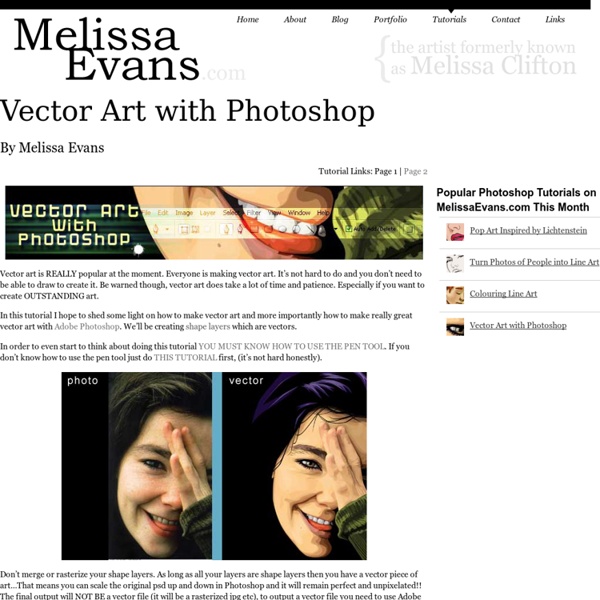
photoshop sand writing Nov 20 Posted by on Under Photoshop A colleague from the office asked me some time ago about writing on sand in photoshop. I came up with a quick solution at that time which wasn’t very realistic but did the job. This morning I was fooling around with my tablet when I remembered about this and decided to check how far you can go in Photoshop to achieve photo-realistic sand drawing effect. For this tutorial you will need a beach or desert sand photo in a perpendicular view angle similar to the below. Once you have the photo ready you can begin drawing the shape or just import it in Photoshop. After you draw the shape double-click the layer or right-click on layer and choose Blending Options. To make this more realistic we need to use a texture for the Bevel effect. Now activate Inner Shadow option and add the values as in the image. To make the drawing background transparent and in our case make it look like actual sand and not a plain color we need to make the following setting.
30 Chilling Winter Photoshop Tutorials In mid winter, we decided to help you enhance your Photoshop skills and pump up your inspiration, by presenting a showcase of 30 awesome Photoshop tutorials related to this time of year. Learn how to create snow, ice, candles, Christmas trees and decorations, blog themes, snowmen and even animations. Some people prefer video tutorial, while some will go for the written ones. We covered that too. Apply Awesome Realistic Snow Effects to Your Photos This tutorial will show you in detail how to add realistic looking snow to your photos. We will be using a house in a sunny green environment to apply our snow effects to. Ice, Snow, Winter Time In this tutorial we’ll teach you a very simple and basic approach on how to add snow and ice to any object(s) or surface(s) using just photoshop with its default brushes and settings. Create a Grunge Snowboard Poster for the Winter Olympics In this tutorial we’re going to put together a cool grungy poster design for the upcoming Vancouver Winter Olympics.
Please, sweat the small stuff This is one of those “allow me to vent” write-ups that I hope isn’t too harsh but ultimately does the greater design community a favor. Some of you are likely already practicing what I’ll preach, but I see it missed frequently enough that it’s in need of a gentle reprimand. It involves two things: 1) images that are transformed to a size, say, 75% or smaller from the original size, and 2) the Unsharp Mask filter. Here’s the setting: You receive a large image from a client, probably a 300 dpi shot of their building. Some of us stop there and post to the site. Here’s a sample shot, with the original resized photo at left, and the same resized photo with Unsharp Mask at right: Notice the difference? You lose some clarity in the original image when you resize to a smaller state, and the Unsharp Mask helps restore some of that clarity. And it’s a snap to use. I generally choose a range between 35% and 50%, and I rarely choose a value over 75%. Here’s another example: End of class.
40 Online Design Blogs To Turn You Into a Photoshop Guru I think everyone is aware of the fact that Photoshop is one of most powerfulest graphic design applications around. Photoshop has so many features and functions so in order to learn how to master each little feature its essential to do Photoshop tutorials which will teach you specific techniques in order to master photoshop. This article we have decided to collect good and also popular design blogs which offer high quality Photoshop tutorials, there’s hundreds of Photoshop blogs but these are some design blog which are consistently pump out good content and potentially following their tutorials could turn you into a Photoshop guru. 1. Design Chair is a design blog which ran by the Creative Nerds team. 2. PSD Tuts is the best online design Photoshop resource for designers looking to learn Photoshop or even master Photoshop. 3. 4. As you may have guessed from the name PSDFAN provides Photoshop tutorials. 5. 6. 10Steps 7. 8. 9. 10. 11. 12. 13. 14. 15. 16. 17. 18. 19. 20. 21. 22. 23. 24. 25.
Photoshop Tutorials & Adobe Photoshop Plugins Design A Surreal, Ancient Fantasy Scene In Photoshop Tutorial Overview In this tutorial, I will show you the steps I took to create this Surreal, Ancient Fantasy Scene in Photoshop. We will take several real world objects and seamlessly blend them together to form this artwork. We will also use a number of Photoshop brushes to spice up the effect. Together we will explore the power of Photoshop image adjustment options, filter effects and layer blending modes. Have a try! The Files To complete this tutorial, you will need the following stocks: Stock Images: Photoshop Brushes Step 1 Create a new document sized at 1400px by 800px (in fact size doesn’t really matter here, I chose this size because it fits my screen the best). Load the Moutain in the Mist by ~ Momotte2stocks in Photoshop, copy and paste the entire image onto your document, use free-tranform (ctrl + t) to fit it to the canvas size. Name this layer “misty moutain”. Add a layer mask to each of the duplicated layers. Step 2 Now, let’s add some lighting contrast to the mountain. Step 3
33 Creative Photoshop Tutorials for Manipulating Photos Photo manipulation, nowadays, is widely-used in the net to create artistic and inspired images. Several ordinary photos are edited and given a new concept- illustrating an innovative and original piece of art. The combination of imagination and skills in using available tools are handy in Photo manipulation. With the aid of Photoshop, you can also create an outstanding print. Listed below are 33 Truly Creative Photoshop Tutorials in Manipulating Photos you can look into for tips on photo manipulation. How to Create a Flaming Photo Manipulation This tutorial will guide you to manipulate a photo and make it look like the image is burning in flames. Creative Photoshop Animal King Photo Manipulation Tutorial A tutorial on combing several photos to create a highly artistic poster based on a famous painting is discussed above. How to Create a Cute Green Apple Photo Manipulation Making of a Sexy Humanoid In this tutorial you will create a humanoid image using Photoshop. Midnight Magic
PSD Files: 60+ Must Have Photoshop Files For Designers PSD files can be very useful and save you lots of time with your design projects. If you are looking to create certain types of works such as clean and simple image slider, creative resume or even metal toggle switch, these free PSD files are right for you. Today I have assembled 60+ must have PSD files from around the web. Please feel free to download them. I am confident that these files will save you lots of time in your next graphic design project. Enjoy this post, and come back soon to check out the second installment of must have PSD files for designers. Want more articles on free PSD files? PSD Website Templates: Free High Quality Designs PSD Files: Free High Quality Photoshop Files (Part2) PSD Files: Free High Quality Photoshop Files (Part1) Free PSD Files: Collection of 50+ psd files from around the web Photoshop PSD files: Free files for you to download Clean and Simple Image Slider Sexy Sign-up Form Blue cloudy sky business card template (PSD) Free PSD Chalkboard Lined Paper Free PSD
60 Outstanding Free PSD Buttons advertisement If you are searching for an editable version of a particular icon or button for your current web design project, then look no further. In this post we have 60 individual icons and buttons, all in PSD format, covering almost every possible web design style and function. In this post, we have came up with pretty useful resources that you can use for your designs or websites. 1. 2. 3. 4. 5. 4 Web buttons 6. 7. 8. 9. 10. 11. 12. 13. 14. 15. 16. 17. 18. 19. 20. 21. 2 button 22. 23. 24. 25. 26. 27. 28. 29. 30. advertisement 31. 10 Simple Web Buttons (PSD) 32. 33. 22 Clean Web Buttons 34. 35. 36. 37. 38. 39. 40. 41. 42. 43. 44. 45. 39 Free Web 2.0 Buttons 46. 47. 48. 49. 50. 51. 52. 53. 54. 55. 56. 57. 58. 59. 59. You can check out our latest actualtests ged test onlineand realtests ccna dumps exams written by our certified teams to help you pass certkiller ccna syllabus dumps.