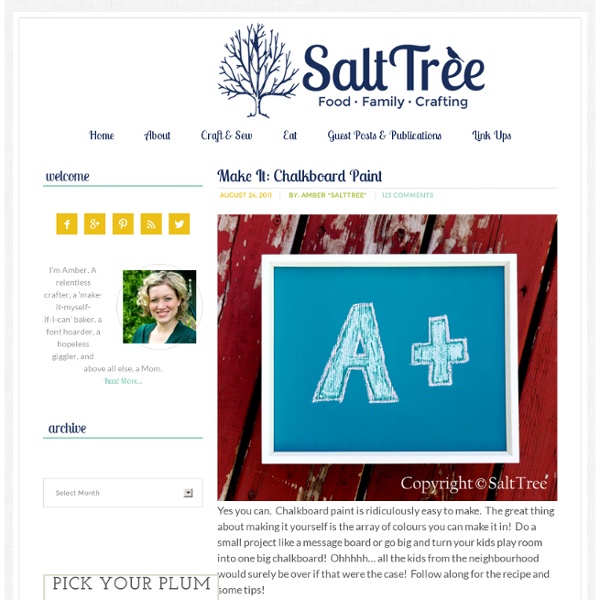
Make It: Chalkboard Paint
Adventures In Acetone: Flowery Water Marble!
Good morning, readers! It's been a long time since I've done a water marble and I decided to try again last night. It's pretty time consuming, at least 30 minutes a hand for me including clean up, which is why I don't do it that often. I have to admit, though, that I love the results of a successful water marble even taking the time into account. I need to figure out new designs to do with water marbling because this is my "default" design. I can't say enough good things about Milani White on the Spot. I used: Orly Nail Defense 1 coat of Milani White On The Spot Watermarbled with: OPI Alpine Snow China Glaze Custom Kicks China Glaze Traffic Jam China Glaze Secret Peri-wink-le Top coat of Cult Nails Wicked Fast I love how the Secret Peri-wink-le turned more purple toned because it was marbled next to the pink!
Into the Glitterverse: Galaxy Nails
I've only done galaxy nails once, and they were WAAAY back in September as part of the 31 Day Challenge! I thought I'd like to do them again; they have a really awesome effect. I started with a base of OPI Black Onyx. Then, once that was dry, I tore off bits of a triangle makeup sponge. After I was done sponging on the layers of colors, I painted China Glaze Fairy Dust in the black spaces where I hadn't sponged anything. Finally, I added larger white spots with a dotting tool to represent the stars that are "closer" to the viewer. As an awesome celestial bonus, when this manicure is in the sun, the holographic glitter in Fairy Dust twinkles like distant starts. I am very pleased with the way that these turned out. Have you tried galaxy nails before? Hope you enjoyed these!
Glittered Bottles
The next thing I wanted to do to the IZZE bottles was glitter them. You can check out how I drilled the holes in the back of the bottles here. I used Goo Gone to take off the sticky residue that was left over from the label. It also removes stamps that are on the bottles. Then I taped off the area I wanted to glitter. I taped it off where the neck of the bottle starts to get skinnier. I brushed mod podge on the bottom part of the bottle then sprinkled on the glitter. I left them dry a few minutes. Then carefully peeled the blue tape off. So how do you like the glittered bottles? Have a Wonderful Wintery Weekend!
cardboard letter
I was inspired by this post at Calamity Anne's Adventures last week, F is for Fleetwood. She altered a GIANT paper mache letter and it turned out really cool! I found some of those big paper mache letters at joann.com but being impatient (and crafty, hehe), I decided to make my own. I found a fun tutorial for making your own paper mache letters over on Me Like Stuff. But, I was thinking, that is alot of work for something I am just going to cover in paper anyway...like I said, impatient! I don't want to wait for paper mache to dry! So...I came up with my own design, using RECYCLED PRIORITY MAIL BOXES! First, I cut out 2 simple letter Ms, one for the front, one for the back. The hot glue was messy and squished out the sides. TaDa! I am loving black and white lately, so I chose this fab pattern from my scrapbooking stash: One sheet wasn't large enough to do both sides of the letter, so I covered the other side in black. I covered the sides with the remaining pattern paper: Linking up with:
Related:
Related:
