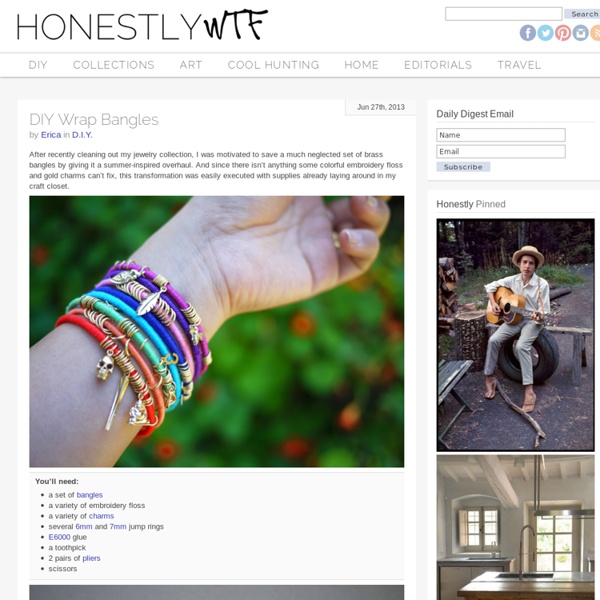
DIY Wrap Bracelet
You should all know by now that we are all about stacking bracelets on our wrists. The more, the better. In fact . . . the most, the best! With that being said, we’ll show you how to master a version of the ever so popular wrap bracelet. It’s so simple and addicting, you’ll soon be churning out these wristlets with your eyes closed. Clearly this arm party train isn’t stopping and it’s about time you get on board! You’ll need (for a double wrapped bracelet) :* Lengths will vary depending on the size of your wrist (see comments for suggestions). Fold the length of leather cording in half to form a loop. Place the ball chain along the leather cording with the end of the chain meeting the end of the wrap. Continue wrapping while checking it for fit around the wrist. When you have reached the end of the ball chain wrap the linen cording around the leather strands 2-3 more times. Thread the hex nut through the strands and tie a second knot. Trim with scissors and your wrap bracelet is finished!!
DIY Roundup: Top 10 Wickedly Clever & Simple DIY Projects
DIY & Crafts, Jewelry Tutorials Sometimes do-it-yourself projects are pure sweat and tears, but it doesn’t always have to be. This DIY roundup edition features the some of my favorite DIY projects & how-to craft tutorials that are not only clever, they’re also ingeniously simple! Here are my top 10 DIY wickedly clever & simple DIY projects. Enjoy! 1. source: fashionlushxx.com 2. source: 3. Source: passionsforfashion.dk 4. Source: abeautifulmess.typepad.com 5. 6. source: yourcreativejuices.blogspot.ca 7. source: 8. source: 9. source: thebeautydepartment.com 10. source: Brit + Co. Have some of your own favorite DIY craft, jewelry, or projects?
DIY Friendship Necklace
As soon as Lauren and I saw this editorial in Flare Magazine, we knew we had to recreate these awesome, friendship bracelet-like necklaces. We promise they are super easy to make and the perfect way to pass the time during those long summer roadtrips. To make a 2-tone necklace, cut a long piece of rope and wrap two different colors of embroidery thread around its own bobbin. Tie a starter knot along with the two colored threads you are using, leaving at least 3 inches of slack, Tape down the slack to a flat surface or safety pin it something that will help keep it in place (feeling nostalgic yet?). To alternate colors, simply put the inactive color (red) in your left hand and the new active color (purple) in your right. Once you’re done knotting, add a few nuts and/or washers to the necklace.
Dare to DIY: DIY: Personaliza tus tazas y objetos de porcelana
Hello mis DIYers!! Con el DIY de hoy me he quitado una espinita: ya puedo tachar la decoración de tazas con rotuladores de mi interminable lista de experimentos pendientes... Me parecía interesante dedicarle un vídeo a esta idea porque, a pesar de que es bastante popular entre quienes vivimos de cerca el "movimiento" Do It Yourself, mucha gente todavía no la conoce. Consiste en pintar objetos de porcelana (como tazas, jarrones, platos etc.) con rotuladores permanentes y luego meterlos en el horno para fijar el dibujo. ¡Creo que voy a empezar a regalar tazas decoradas compulsivamente a todo el mundo! Y ahora, los puntos a tener en cuenta: _Después de hornear, algunas líneas negras me han quedado un poco desvanecidas, aunque supongo que las podría repasar y volver a hornear. _He hecho la prueba de lavarlo a mano y no he tenido ningún problema, pero quiero ver qué pasa en el lavavajillas, porque no estoy muy segura de que aguante intacto. ¿Qué os parece el resultado? Un besazo!
DIY Braided Hex Nut Bracelet
We’re nuts for nuts. Is there a more versatile and inexpensive DIY component than a hex nut from the hardware store? You can imagine our excitement when we first discovered Philip Crangi’s Giles & Brother Hex Collection. Honestly, nuts braided into jewelry is WTF genius! With a few items that we always seem to have lying around, we tackled the technique and made our own spine-like braided hex nut wrap bracelet. You’ll need:3 strands of cotton butcher’s twine cut into one yard pieces18 small brass hex nutsa bit of dexterity! Gather the 3 strands of twine and tie a knot at the top, leaving about 2 inches of slack. Keep your thumb at the base of the braid, holding the nut in its place. Repeat the steps, by threading the rest of the nuts to the outer pieces of twine before they are crossed over. The bracelet should wrap around your wrist at least two or three times. Good luck!! (top image from here, rest of images by Honestly…WTF)
DIY Roundup: Valentine's Day Heart Crafts
DIY & Crafts, Jewelry Tutorials As a continuation of my heart-themed February. I’ve put together a collection of some of my favorite Valentine’s Day heart crafts. 1. Finally, something to do with all your old pencils! 1. 2. If you don’t happen to have an ink pad, I find that markers work well too! See the tutorial here. Source: 2. I love this dainty little heart bracelet! Source: 3: Beaded Heart Necklace This beaded necklace takes a little bit more work, but it’s well worth it. rrow one: 1 black, 2 white, 2 black, 9 white Read all the details and view the full tutorial here. Source: 4. Update your traditional friendship bracelet with this heart shaped pattern. 5. There’s no reason why you can’t make paper clip more fun. If you love unique, one of a kind accessories, make sure to check out my Yes Missy Etsy Shop as well!
DIY Woven Chain Bracelet
Chain link bracelets, with colorful threads woven through them, have been popping up here and there. We adore Aurèlie Bidermann‘s Do Brazil bracelets and thought it was about time we graduate to the ultimate “grown-up” friendship bracelet. With a curb chain bracelet and some embroidery thread, we’ll teach you how to make your own woven chain bracelet. You’ll need:a curb link braceletembroidery threadtwo bobby pinsa pair of scissors Cut 2 sets of 15 strands of embroidery thread, with each strand measuring four times the length of the bracelet. Lay the second color (blue) over the first color (coral). Repeat the steps until you reach the end of the bracelet. (top images from here and here, rest of images by Honestly…WTF)
Do-It-Yourself Decorating
Cool Copper Projects Warm metallic hues are easy to love but often pricey. When you create the look... Easy Doily Bowl Craft a decorative bowl from a doily picked up from a flea market, antique... Camper Birdhouse Encourage birds to stay awhile with an adorable vintage birdhouse.