
Blogging about tech, mostly.: The Raspberry Pi and Wireless RF (XRF) Temperature Loggers Remote Temperature Logging - Why? In our house one room has three exposed wall, as well as two double width windows fitted (one on each side of the room). In the winter, this is a cold room. We're in the process of getting the central heating and double glazing replaced (they're both over 15-20 years old respectively) and are very ineffecient - I was however wondering what improvement we'd see once this work had been done. A Pi, wireless communication, python, Linux, soldering...now this sounded like fun! First I searched for what I could use for this - what could I use that captured and could transmit temperature information - and most importantly, what could do this in a wireless way? I found the answer using a combination of 1 Slice of Pi, a 2 Temperature XRF Sensor's and 3 XRF Wireless RF Radios, all of which I got from CISECO. The documentation of the above is pretty decent, but there were still a number of threads you have to tie together to get all of this to work, so here we go: 1.
Plus de 50 idées pour votre Raspberry Pi Nous sommes nombreux à nous être procuré un petit ordinateur Raspberry Pi pour nous lancer dans des projets de ouf malade... C'est très cool, mais à part le classique Media Center XBMC, qu'avez-vous fait avec votre Raspberry Pi ? Si vous séchez niveau idées, voici une petite sélection que j'ai rassemblée au cours des derniers mois. En attendant, j'espère que ceux-ci vous donneront de l'inspiration... On peut donc en faire : Et si vous cherchez un moyen rapide et pas cher de faire un boitier de protection pour vos Raspberry Pi, pensez aux LEGO. Bon, je pourrai continuer comme ça toute la journée, mais va bien falloir que je m'arrête. Amusez-vous bien ! Rejoignez les 60492 korbenautes et réveillez le bidouilleur qui est en vous Suivez KorbenUn jour ça vous sauvera la vie..
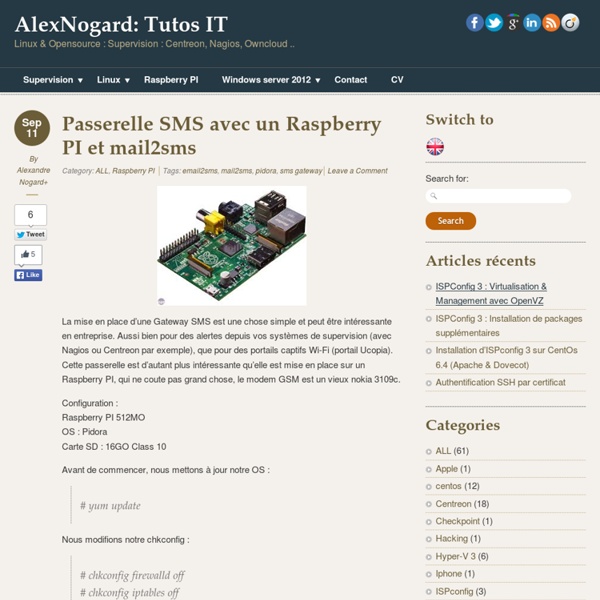
Random Geeky Ramblings: Raspberry Pi as a SMS Gateway using Gammu Today was one of those days where I thought I'd find something useful for my Raspberry Pi to do, rather than sit in a box unloved. I was thinking how we send a lot of monitoring notifications as emails and how bad email is as a single method notification, especially if what you are monitoring is your connection to the internet... Internet connection goes down, how do you send the notification out? I had a 3G USB dongle also sitting around doing nothing, so as a test I stuck a Pay+Go simcard in, made sure it had some credit and connected it to my Raspberry Pi. This is how I got it to send an SMS (Will likely expand this post as I add features). What library to use? First off I had to work out the best existing library to interact with the 3G dongle. I came across Gammu, which started as a fork of Gnokii. Thankfully Gammu provides packages so installing it on Raspbian was nice and simple: $ sudo apt-get update$ sudo apt-get install -y gammu-smsd gammu python-gammu usb-modeswitch vim $ lsusb $ id
Kano : un ordinateur en kit à base de Raspberry Pi Un succès extraordinaire pour ce kit à base de Raspberry Pi lancé hier sur KickStarter ! Une journée après son lancement, la cible de 100 000$ est déjà dépassée… Plus de 1000 promesses de financement ont explosé le compteur et ce sont déjà presque 120 000$ qui sont affichés. Je suis sur la page KickStarter de Kano et le compteur de promesses augmente régulièrement. Un ordinateur et un kit de codage pour tous âges, partout dans le monde. Simple comme un Lego, animé par un Raspberry Pi. Pour jouer, apprendre à programmer, créer l’avenir. On assemble Un ordinateur, à base de Raspberry PiDes jeux comme Pong, SnakeDe la musique et des sonsDe la vidéo HDUn haut-parleurTowers of dynamite (…) dans MinecraftUn serveur WIFIUn boîtier personnalisé, avec des autocollants, des décalcomanies, ou un motif impriméLa plupart des paquets de DebianN’importe quoi d’autre, parce que Kano est open source Pendant l’écriture de cet article, le compteur a augmenté de 100 personnes !
NotiPi Notifications via SMS Text or Twitter from the Pi Fred Sonnenwald and Hamish Cunningham, June 2013 The general idea of NotiPi, or notifications, is to let the Raspberry Pi interact with you in ways not tied to sitting in front of the monitor. Here we'll look at two options for texting (using the net or using a mobile phone handset) and finish up with the Twitter option. The general idea here is that there are loads of companies out there that offer what is called SMS gateway service. The webpage method is a sort of end-user thing that's friendly to you and I, but is a bit more complex to get the Pi talking to. BulkSMS Unfortunately we can't just use any company that provides this service. To understand the API (or really any programming concept or protocol) I find that you can approach it in two ways. To save you the tedium of working through either the API or the example code and here we'll provide you with a rough outline of how it works. The key-pairs A unique message ID (stop_dup_id).
Sensor - Temperature XRF development sensor - THERMISTOR Important note on XRF v2.0 As of 27th November 2013 we are now shipping XRF v2.0 modules, these are based on the SRF v1.2 module. Althouth they look diffrent from the v1.5 they are compatible with the expection on some LLAP personalites, for more details see this blog post XRF v2.0. llapThermistor is not affected Product description This sensor kit is for making a wireless temperature sensor. Monitor temperature remotely (with the XRF option everything you need for a self contain temperature sensor in one kit)Easy communication (just add an XRF to the board and an SRF-Stick to your PC for instant communication)Log data to the cloud (use one of the many cloud based loggers of information) The sensor is encased in a smart, strong black enclosure. Features: Compact and easily deployableFits in the matchbox size ABS box providedEach pin of the XRF is broken out onto the outer edge for easy access and developmentMade in the UK Kit contents: Cloud providers: Technical data Downloads Documentation
Wireless Projects - PrivateEyePi Project Wireless sensors and a RaspberryPi open up a world of possibilities. The Internet Of Things (IOT) is phenomenon sweeping the world at this moment where everyday things (cars, homes, household appliances, plants) are being connected to the IOT where we can monitor, control and alert in ways not possible before. RF communications can be a complex subject, but I have eliminated all the complexity by using pre-programmed devices that have the RF communication libraries already loaded. The components are plug and play ready to use. You do not need to know anything about RF communications or serial communications in order to do these projects. Although these projects do provide software to connect your wireless sensors to the PrivateEyePi alarm system, you can use them for any wireless application you have in mind. Follow the following steps:
Construct a wireless temperature sensor - PrivateEyePi Project This project assumes you already have a Model A or B Raspberry Pi, power supply, HD card, screen, keyboard, network etc. Raspbian Wheezy OS. In this project you will construct a wireless battery operated temperature sensor. The sensor communicates with the Raspberry Pi over radio frequency (RF) communications to a base station RF receiver. What you need The parts can be purchased from the PrivateEyePi Store 1 or many Wireless Temperature Sensor (RF02), which includes a 10K Precision Thermistor and a 10k resistor1 x Wireless Sensor Case Kit (RF04), shown on the right. How it works The wireless temperature sensor will transmit the temperature at 5 minute intervals to the base station. Construction Follow the following build guide for the wireless sensor kit (RF04) and plug the RF transmitter as shown in Figure 1. The RF transmitter looks exactly the same as the receiver units so be careful not to mix them up. Figure 1 - A wireless sensor case kit with a temperature sensor attached That's it!
Wireless Temperature Sensor Project - PrivateEyePi Project Software Now that you have your electronics built we can work on the software. Boot up your Raspberry Pi and navigate to the home directory from the command prompt. Download the rftherm.zip software by typing the following commends: At the command prompt type: Code: cd /home sudo wget -N www.privateeyepi.com/downloads/rftherm.zip The unzip command will look something like figure 3 where the three source code files are uncompressed and copied into the /home directory. Figure 3 - Unzip the three source code files As per Figure 4 edit the globals.py file in order to enter your user and password. Figure 4 - Enter your user (email address) and password To save type CTRL-X, followed by Y and then ENTER. Each RF transmitter is pre-configured with a unique sensor number. Go to www.privateeyepi.com, log in or if you are a new user click "new user" and enter your details. Figure 5 - Configure the new sensor using the unique number provided with the sensor Configure Serial Port on the RaspberryPi
Raspberry Pi and Wireless Sensor A few weeks ago, I blogged about at a 'shield' that plugs into the Raspberry Pi's GPIO port called the 'Slice of Pi'. This very low cost board also includes an X-Bee shaped socket into which RF modules can be plugged. The company behind the 'Slice of Pi' (Ciseco) is also behind a useful and low-cost range of RF devices. In this blog entry, I used one of their wireless sensor modules (in this case temperature) with a pair of XRF RF modems to add remote wireless temperature sensing to the Raspberry Pi using the serial connection on the GPIO pins. Here, a simple program (on the left) reads the temperature from the remote wireless sensor and displays it (in the right). Hardware Here is the Raspberry Pi, with a Slice of Pi and an XRF module all plugged together sandwich style. I plugged them together with the Pi turned off, as 'hot-swapping' makes me nervous. Software The temperature module sends the temperature as a string every 15 seconds. About the AuthorThese are my books.
rtl-sdr – OsmoSDR DVB-T dongles based on the Realtek RTL2832U can be used as a cheap SDR, since the chip allows transferring the raw I/Q samples to the host, which is officially used for DAB/DAB+/FM demodulation. The possibility of this has been discovered by Eric Fry (History and Discovery of RTLSDR). Antti Palosaari has not been involved in development of rtl-sdr. Specifications¶ The RTL2832U outputs 8-bit I/Q-samples, and the highest theoretically possible sample-rate is 3.2 MS/s, however, the highest sample-rate without lost samples that has been tested wit regular USB controllers so far is 2.4 MS/s. Supported Hardware¶ Note: Many devices with EEPROM have 0x2838 as PID and RTL2838 as product name, but in fact all of them have an RTL2832U inside.brRealtek never released a chip marked as RTL2838 so far.The following devices are known to work fine with RTLSDR software: People over at reddit are collecting a list of other devices that are compatible. This is the PCB of the ezcap-stick: Software¶ Binary Builds
PiTFT un écran tactile 2,8 pouces pour le Raspberry Pi chez Adafruit Adafruit propose un écran tactile de 2,8 pouces de diagonale (7,1 cm) : Oooh n’est-ce pas le plus mignon petit écran pour le Raspberry Pi ? Il dispose d’un écran de 2,8″, une définition de 320×240 pixels avec une définition de couleur sur 16 bits et il est équipé d’un film tactile résistif. La carte utilise utilise l’interface SPI à grande vitesse du Raspberry Pi et vous pouvez utiliser le mini-écran comme une console, un port X window, afficher des images ou de la vidéo, etc… L’écran utilise les broches SPI ( SCK, MOSI, MISO, CE0, CE1) ainsi que GPIO25 et GPIO24. Tous les autres broches GPIO sont inutilisés. Commutateur mince pour écran tactile Cet écran est livré sous forme de mini-kit, avec un connecteur femelle extra-haut 2×13 broches (pour connecter l’écran au Raspberry Pi) et connecteur mâle 2×13 broches qui peut être utilisé pour connecter un câble en nappe. Les photos montrent également les boutons tactiles minces installées. Bientôt en ligne !
Raspberry Pi Temperature Sensor In this tutorial, we will be building a circuit to connect a temperature sensor to our Raspberry Pi, and writing a program to read the sensor data. The circuit we will build is going to connect to the Raspberry Pi using the GPIO pins. GPIO stands for General Purpose Input/Output. However, this is not all that GPIO pins can be used for. Once we have built our circuit, the next step is to write a program to read the temperature, and give it to us in a nice format. Finally, we will put all these bits together to make a button controlled temperature logger—a program that will measure the temperature every second and put this in a file, which can be started and stopped by the press of a button. Step One: Updating the Kernel The first step is to change where our Pi updates from, by editing a text file. What we are doing here is making the Pi updte itself using the very latest kernel. Step Two: Connecting the Temperature Sensor Step Three (A): Reading the Sensor from the Terminal Turn on the Pi.