background preloader

Free pattern sewing : obi apron par Prudence Rabbit

Free pattern sewing : obi apron par Prudence Rabbit
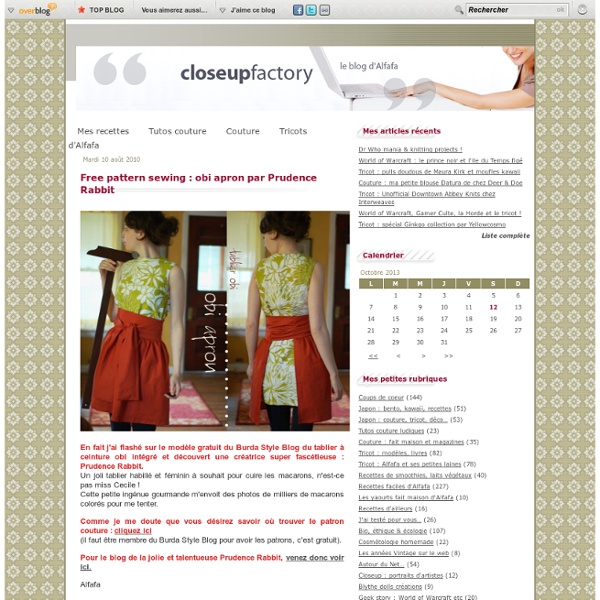
Mardi 10 août 2010 2 10 /08 /Août /2010 11:59 En fait j'ai flashé sur le modèle gratuit du Burda Style Blog du tablier à ceinture obi intégré et découvert une créatrice super fascétieuse : Prudence Rabbit. Un joli tablier habillé et féminin à souhait pour cuire les macarons, n'est-ce pas miss Cecile ! Cette petite ingénue gourmande m'envoit des photos de milliers de macarons colorés pour me tenter. Comme je me doute que vous désirez savoir où trouver le patron couture : cliquez ici (il faut être membre du Burda Style Blog pour avoir les patrons, c'est gratuit). Pour le blog de la jolie et talentueuse Prudence Rabbit, venez donc voir ici. Alfafa Partager l'article ! inShare Par Alfafa - Publié dans : Tutos couture ludiques

TUTORIAL and PATTERN: Kid Pants, the basic pants Welcome to our series on KID PANTS. All the styles that are shared are adaptable to any size pants….from babies up to adults; for boys and girls. We’ll show you the ins and outs of making pants and we’ve got a downloadable pattern for size 2-3 toddler. Today we’re starting with the Basic Pant, with an elastic casing waistband. And when you’re ready to mix it up, try out our other simple pants tutorials: But first, let’s talk about pants. Elastic waist-band pants/shorts are one of the easiest things to make. Pants are made of 4 pieces (2 different pattern pieces). If you’ve never made pants before and you’re drafting your own pattern (from an existing pair of pants), you may want to sew a trial pair first….just to see if you’re creating the pattern properly. And that’s all you need to understand about pants. First, you need a pattern. What I love about this pattern: * Style and comfort. Let’s talk about fabrics. There are various methods for sewing pants. Let’s make the waistband.

Tutos servant aux défis - Bidouilles, Chou et Epinards : La couture à ma sauce 1. Goutte d'eau Fente sans parmenture d'encolure Rajouter une fausse goutte d'eau Tuto de la goutte d'eau par Mu du blog des Etoiles et des Pois Tuto trous façon goutte d'eau 2. Fabriquer du biais Fabriquer son biais dans un minimum de tissu Faire du biais continu Fabriquer du passepoil Tuto 1 Tuto 2 Tuto 3 Coudre du passepoil Tuto 1 Tuto 2 Tuto 3 3. Ajouter un plastron Pose du plastron Zébulon de Citronille (qui guide pour n'importe quel plastron) Tuto 1 Tuto 2 Tuto 3 Je trouve ça bizarre de cranter avant assemblage... jamais fait comme ça. on m'a appris en cousant (bien suivre les crans de repères) et ensuite, on crante pour que le tissu prenne bien la forme de l'arrondi. puis surjet et repassage... et surpiqûre pour bien maintenir le tout. 4. 5. 6. 7. 8. 9. 10. 11. 12. 13. 14. Tutos 15. 16.

labo Pelzébourre Tuto de la trousse doublée, zippée et à jolis angles Il y a longtemps, je vous ai parlé des coins de mes trousses. Comme tout le monde je crois, j'ai commencé par des trousses basiques. J'ai mis du temps à me lancer, pensant que la pose du zip était une étape insurmontable alors qu'il n'y a rien de plus simple. Puis, j'ai obtenu de jolis angles : Alors comme je ne suis pas la seule à aimer les trousses, je vous ai fait un tuto complet. Matériel nécessaire :- tissu extérieur 23 x 13 cm (x 2) -> noir sur mon tuto- tissu intérieur 23 x 13 cm (x 2) -> rose sur mon tuto- pour les coins : tissu extérieur (noir) 5 x 3 cm (x 2) et tissu intérieur (rose) 5 x 3 cm (x 2)- fermeture à glissière de 20 cm 1 - Couture des tissus sur les bords de la fermeture Ouvrir la fermeture à la moitié. Puis poser l'endroit du petit morceau de tissu extérieur sur la glissière, qui se trouve prise entre les 2 morceaux de tissu. Faire la même chose de l'autre côté de la glissière. 2 - Montage du tissu extérieur et intérieur sur la fermeture 3 - Fermeture de la trousse

Leena's.com: PatternMaker Tutorial Web Site According to the instructions on this page patterns for basic bodice are drafted using the Scandinavian pattern drafting system. To keep the instructions simple, only centimeters are used. Have your measurements taken according to the instructions on pages and Here are some table measurements you need. Add ease to the measurements of the subject according to the table below. Do the following calculations to get some extra measurements. Draft a frame according to picture below. 1-2 = bust circumference divided by 2 2-3 = armscye height 2-4 = back length 4-5 = abdomen height 4-6 = hip height 1-7 = back width divided by 2 7-8 = armscye width Mark points from 9 to 18 4-19 = bust span divided by 2 19-20 = waist height minus bust height 2-21 = neck width (refer to calculations) Draft vertical lines upwards from points 2 and 21. 7-25 = back shoulder height; draft horizontal line from point 25 to the left; mark point 26 on the line

DIY My favorite dress! Pin It Hello ! Ce week-end mis à part m'être transformée en incubateur géant de la peste, je vous ai préparé un DIY atomique... vous m'en direz des nouvelles ! Si jamais vous paniquez en le faisant, s'il y avait le moindre souci de compréhension des explications, laissez-moi un petit commentaire et je viendrai à votre rescousse! Vous allez voir j'ai un sérieux problème avec cette robe, je l'aime tellement que je m'en suis fait 5... je sais c'est beaucoup... et j'ai aussi un sérieux problème avec les pois... quoiqu'il en soit je vous ai fait un patron simplifié de cette robe... (sympa) et des explications trop faciles (trop sympa!) Pin It Pin It Si vous avez aimé celui-ci, régalez-vous avec ceux-là :

Tutorials: Decayed Elegance Cuff Bracelet & tattered fabric supplies Each day this week I will be posting a different mixed media art tutorial and campaigning for your votes. I am in the running for a sponsorship from Prilosec OTC and if I get it I will be able to provide FREE Video Art Classes Online. Todays tutorials are two parts of the same project. First I want to tell you how to make the supplies for the cuff bracelet and then we'll move on to making the bracelet. Yummy! Decayed Elegance Cuff Bracelet: What you need: 1. strip of fabric long enough to wrap around your wrist with about 1 inch of overlap 2. tattered fabric scraps and strips as shown above 3. pieces of lace or hankies 4. old pearl necklace with clasp 5. beads or old rhinestones 6. needle and thread One of the good things about this cuff bracelet is that you don't need perfect sewing skills. 3. 4. When you have finished to can overlap the ends of the cuff and snap your clasp closed. Someday I hope to make a video art class out of this tutorial.

it's a 2 GIVEAWAY day... before we get to the 2 giveaways for today... I wanted to share what you can create with tim's new metallic stains... I'm still catching up from CHA & packing & kitting for next weekends event in Twin Falls, Idaho... so these aren't big tutorials... I'll get to those in the next few weeks... it's a promise! to create a really fun faux metal background... this is a variation of tim's wrinkle free technique... swipe both stains on your craft sheet & lay your tag over the stains... I like to run my hand over the back of the tag to pick up the stains... then lay your tag over the remaining inky dots & add those to your tag, by gently pressing the tag over the ink dots... and dry... here's the background you get... notice that I didn't ink the entire tag... the kraft color showing thru adds to the faux metal effect... I am in LOVE with these metallic stains... think about stamping a solid image in black & then clear embossing for a dramatic effect... this would also be a great technique to die cut... next...

La poudre de Perlinpinpin syko The winning suggestion this time was given by paperfish who said: i am seeing her with a bicycle in the picture, like she rode to the country on her bike and in the basket is her fabric stash and her sewing machine is magic and works anywhere! I hope you are satisfied with the result, it was VERY challenging, I have never sewn a bike before. Nor did I think I would be able to draw one. I am posting the rules here again if you want to play with me, next round is 6/10! I will:1. wait until I have got (at least) ten suggestions for the next motive2. draw one of them3. do my best to do as you wish using fabric and thread (and buttons?) Feel free to join in!

Related: