
Père Noël La majorité des pères noël en origami ne me plaisent pas. Celui-ci est la seule exception, il est drôle, détaillé. C'est une tête de père noël de John Smith, constituée de deux feuilles bicolores. FREE - Black Swan Necklace Jewelry Making Tutorial T118B (Item ID: 101906, End Time : N/A) - DIY Lessons - Learn Jewelry Making With Online Lessons, Videos and PDF Tutorials Another FREE jewelry making tutorial from XQDesigns, made from black pearls and faceted crystals, the elegant Black Swan Necklace. Created by continuously weaving in reverse patterns using 2 needles and beadweaving technique similar to RAW, you’ll be able to create the necklace in different colors. The pattern for the necklace can also be used on different sizes of beads. Elegant-looking, you can wear the necklace on formal occasions. We also have a Black Sunflower Pendant Jewelry Making Tutorial to match your necklace by clicking this link: Materials: 24 x 10mm Black pearls24 x 8mm Faceted crystals 48 x 6mm Faceted crystals20 x 6mm Black pearls (might need more depending on length of necklace)48 x 3mm Black pearls120 cm (47 inches) Nylon Thread Tools: Flat Nose PliersScissors2 Beading needles File format: PDF Number of steps: 13 Page count: 10 File size: 1.29 MB
Kreacus - Accueil - Bienvenue Bienvenue sur Kréacus, Nous sommes ravies de vous accueillir parmi nous. Pourquoi ce site ? Tout simplement parce que nous n'arrivions pas à trouver facilement certaines informations sur le web, de façon structurée. Pourquoi Kreacus ? Krea pour une contraction pas très orthodoxe de création, et de Acus, qui signifie aiguille en latin. Qui sommes-nous ? Comme vous des passionnées réunies en association, à qui il manque toujours du temps, entre le travail, les enfants ... Combien ? Rien, notre choix a été de chercher des solutions peu onéreuses et de travailler beaucoup afin de vous faire un site accessible et sympa (on l'espère ). Mettre une création sur le site, re-combien ? Re-rien, nous avons pensé qu'il était indispensable aux créatrices débutantes d'avoir un espace où proposer leurs créations sans que ça leur coûte quelque chose et d'être vues par tous. Pourquoi s'inscrire ? Nous vous avons concocté un espace perso. Nous espérons que ce site répondra à vos attentes. Bon surf sur Kreacus
Afternoon Lace Necklace There are currently no images from other crafters. close Terms & Conditions You must enter into this Agreement if you want to submit digital images or other content to Prime Publishing through Sharing Customer Images (the "Service"). As used in this Agreement, "we" or "Prime Publishing" means Prime Publishing, LLC. and "you" means the individual or entity submitting materials to Prime Publishing. Any individual or entity that wants to use the Service must accept the terms of this Agreement without change. 1) Eligibility. 2) Definitions. 3) License Grant for Materials. 4) Removal of Materials. 5) License for Name, Trademarks and Likenesses. 6) Specifications and Guidelines. 7) Representations, Warranties and Indemnities. 8) Restrictions. 9) No Obligation. 10) Changes to Agreement. 11) Prime Publishing Intellectual Property. 12) Communications. 13) Waiver. 14) Disclaimer. 15) Miscellaneous. Sharing Your Own Images Who can share images? You! What should I share? What shouldn't I share?
La chronique de Mélisande* Au cours des années, j'ai créé plusieurs dizaines de modèles. Pour certains d'entre eux, j'ai publié des instructions, accessibles via la rubrique diagrammes de ce blog. D'autres ne subsistent que par une photo sur flickr et quelques croquis dans mes archives manuscrites. Longtemps, j'ai attendu le prince charmant, un as du dessin vectoriel qui serait prêt à diagrammer toutes mes créations ; je ne vois toujours rien venir, et à mon âge, cela devient improbable. Mieux vaut profiter des quelques années qui me restent avant l'Alzheimer pour faire ce travail moi-même. Deux de mes modèles figurent dans le dernier livre de Meenakshi Mukerjee. Le premier résultat de mes efforts est présenté dans le billet précédent. Je partage toujours mes idées de création par des photos, CP, tutoriaux, sur flickr ou ailleurs, et cela ne va pas changer. J'envisage de publier mes futurs diagrammes dans des livrets de convention ou autres ouvrages collectifs.
diy: Braided Bead Necklace I couldn't have predicted so many jewelry posts. What can I say? I get on kicks. I saw a necklace like this in a store but it was shorter and the braid contained different kinds of beads. I wanted it longer with one type of bead. An amount of beads, it's hard to say how many, I used about 4 more beads than this jar holds. Next, take two strands of beads and thread the two threads through one bead tip. Repeat for each pair and then repeat on the opposite end, making sure to get the knot as close to the bead tip as possible. Clamp three of the ends to one large jump ring. The braiding part is a little tricky if you don't secure your beads strands to something. *Finally, the note about the clasp.
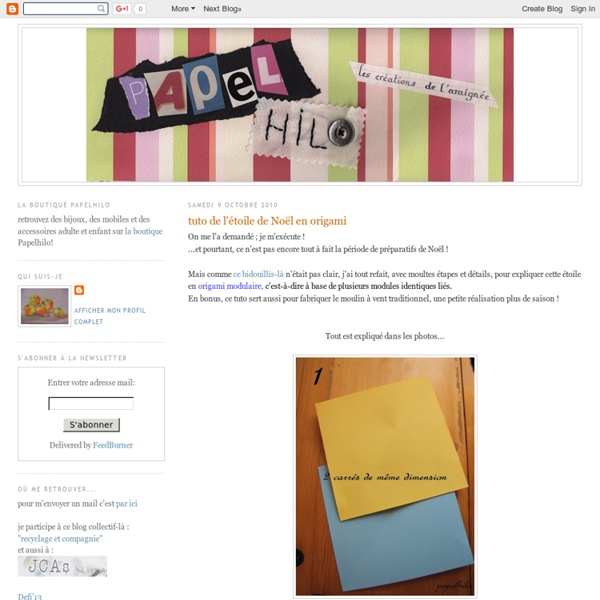
Robert J. Lang Origami Tutoriel fleurs en filtre à café *Merci à Ludi, membre de la Communauté de mariages.net, pour ce très joli tutoriel. Voici le matériel dont vous aurez besoin : Des filtres à café.Des piques à brochette ou autre objet en forme de tige.Du scotch de fleuriste.Un stylo.Une paire de ciseaux.Du colorant alimentaire liquide de la couleur de votre choix. Voici les étapes à suivre : Commencez par tracer les pétales sur vos filtres à café, de forme pointue, comme sur la photo par exemple, ou encore arrondie, en sachant qu’il vous faudra un minimum de 6 formes pour une fleur, puis découpez-les. Séparez vos pétales en dépliant le bas des filtres : cela vous fait donc 12 pétales, que vous devrez assembler en les enroulant sur une tige recouverte de scotch de fleuriste. Trempez ensuite votre fleur dans du colorant alimentaire liquide pour lui donner sa couleur, puis laissez sécher la tête en haut pour que le colorant descende. *Retrouvez tous nos tutoriels mariage dans notre section Fait Maison.
Coffee Filter Flowers Hello lovely readers, Apologies for the delayed post today. This post was originally one sweet little DIY tutorial all set to go live at 9am this morning then I got immersed in the intoxicating world of coffee filter flowers and ended up adding another and another until I was up to my eyeballs in coffee filter tutorials and inspiration! So it took waaay longer than expected but I do hope you’ll find it useful. If you’re looking for a cheap, simple and pretty DIY project for your wedding, coffee filter flowers could be just the thing! photo via Just Simple Designs Who knew coffee filters could look so pretty? The great thing about coffee filter flowers is that they can be used in so many different ways, from decor (they’d make a mean ceremony backdrop) to centerpieces, place settings, wreaths and, if done in miniature, they’d look so sweet attached to escort cards or favor boxes! You could even create a bunch of them, attach them to ribbon wrapped florist’s wire et voila! Dying Coffee Filters
DIY Paper Poppy Another one of my favorite paper flowers that I created last year is this orange paper poppy. I made two dozen of them to decorate my daughter’s 18th birthday party last year mixing it with a black and white French theme. As one of my favorites and loving the happy orange color, I have since used these poppies for paper brooches, to wear in my hair and of course to add that special touch on top of gifts. Origami Roses The sight of these classy chocolate roses got me into a serious mood to make roses, paperwise that is. And I ended up making 3 different kinds cos’ they look so beautiful that I couldn’t wait to learn to make them all! 1. Kawasaki rose I first tried the Kawasaki rose, named after its creator Toshikazu Kawasaki, by following this demo and cross referenced with another demo [part 2|3]. Notes: There were several steps I had no idea what to do, so after some struggling and hair-pulling, I finally figured out what was going on EXACTLY! 1. 2. 3. 4. 5. 6. 7. 8. 9. 10. 11. 12. 13. 14. 2. I watched this demo to make the Bird base rose created by James Sakoda. 3. 3. Followed this demo to make this rose bud. Both centre creases must be well-creased mountain folds, so that the folding up of each quarter will be easier. The real beauty of all these three roses is they are not too complicated to make once every step is laid out clearly and every intended fold well-creased.
Tissue Paper Carnations Today is the start of Flower Week on Folding Trees. Every weekday, I will be showcasing different types of paper flowers. You may be surprised at the variety of flowers you can make using different paper craft techniques! When I had the idea for Flower Week, I thought I would kick off the week with some flowers that I made myself. A vase of pretty tissue paper carnations! Want to make your own? This tutorial is Donationware – the instructions are available for free, but if you like it please consider sending me a donation (via my other website, PlanetJune) to show your appreciation: Send me a donation and receive the easy-to-print PDF version of the tutorial as a thank you! Donations of any size are much appreciated. The complete instructions are available below, regardless of whether or not you choose to pay for them You will need: Tissue paperScissors2 large paper clipsPipe cleaners (chenille stems) or floral wireColoured marker penOptional: floral wire, floral tape, wire cutters
Duct Tape Double: DIY Dressmaker's Form Rustybobn Makes a DTD (Duct Tape Double) I read about it, and wanted one for a long time. The whole process just seemed *icky* and I didn't think I'd be able to breath with all that tape on me. It ain't that bad... Mandatory reading: In fact, it was Neefer's web page that finally gave me the courage to try this thing. My supply list--most of this you will already have or can get cheap/free: A couple of rolls of duct tape (I only needed one, but YMMV). Procedure: Tear many, many strips of duct tape and stick them around the room so that you can grab them as needed. Don your disposable t-shirt or shopping bags Define the bust by wrapping a strip underneath and then crisscross. Wrap shoulders, then remaining areas horizontally Wrap a second layer vertically Mark your body landmarks--waist, hip, bust points with the Sharpie pen I think that you can see from these pictures that the process duplicates you perfectly--poor posture and everything Use the scissors to cut the form at the center back.