
NCWP (Non-Crappy Wedding Present) Tutorial NCWP (Non-Crappy Wedding Present) Tutorial Skill Level: Beginner by RobertC. | October 29, 2010 | 21 comments Overview: What exactly is the NCWP Scavenger Box anyways? Part of the project was inspired by Mikal Hart's reverse geocache box. I can honestly say I'm thrilled with how everything turned out. Story Behind the NCWP Scavenger Box: Here's how it all went down. Downstairs waiting for her was yet another present. The screen informed her that her wedding ring was inside the metal lock box and her quest was to find the key before our wedding, (which was only 2 days away). The clues were cryptic in nature and all pertained to vacations we took together or events we had experienced together. After several clues that continued in this fashion, I knew I would lose her interest. We already had a trip planned the next morning, and I'd planned all the locations all along the path of our trip. Beforehand, I had mailed out two RFID cards, one to each of our parents. The Hardware: Parts List: Power:
Arduino Tutorial - Learn electronics and microcontrollers using Arduino! So, I get two or three emails a day, all basically asking the same thing: "Where can I learn about electronics?" In general, most of these people have seen some of my projects and want to be able to build similar things. Unfortunately, I have never been able to point them to a good site that really takes the reader through a solid introduction to microcontrollers and basic electronics. I designed this tutorial course to accompany the Arduino starter pack sold at the Adafruit webshop. Follow these lessons for happiness and prosperity. Lesson 0 Pre-flight check...Is your Arduino and computer ready? Here are some recommended tools: If you need to get any soldering done, you may also want.... All of the content in the Arduino Tutorial is CC 2.5 Share-Alike Attrib. Love it? To some extent, the structure of the material borrows from: The impressively good "What's a microcontroller?" "Spooky Arduino" - Todbot's excellent (if fast-paced!)
Lessons In Electric Circuits A free series of textbooks on the subjects of electricity and electronics Copyright (C) 2000-2015, Tony R. Kuphaldt These books and all related files are published under the terms and conditions of the Design Science License. These terms and conditions allow for free copying, distribution, and/or modification of this document by the general public. A copy of the Design Science License is included at the end of each book volume. As an open and collaboratively developed text, this book is distributed in the hope that it will be useful, but WITHOUT ANY WARRANTY; without even the implied warranty of MERCHANTABILITY or FITNESS FOR A PARTICULAR PURPOSE. Access individual volumes, I through VI: Edition numbers reflect major structural changes to a book volume such as the addition of new chapters, the substantial expansion of existing chapters, or a change in markup language (source code formatting). "Last revised" dates reflect non-trivial changes only. Note to instructors: <--- Click Here!
Arduino Tutorial - Getting ready This lesson won't teach any electronics, really. Its more for making sure that everything is setup and ready for the future lessons. It will verify the Arduino is working as intended and that the computer you are using is compatible. For this lesson you will need some stuff! Take your Arduino out of its protective bag. Diecimila Arduino Or like this: NG Arduino If there's anything missing or really wrong, make sure to contact the store you bought it from. OK, now that you are satisfied that your Arduino looks good, put the rubber bumpers on the bottom of the board. Depending on which Arduino and which OS you have there are different instructions Now we are ready for the moment of truth, it's time to plug your Arduino in and power it up. The jumper-setting step is only for Diecimila and OLDER arduinos! You'll want it set as shown in the picture above. Make sure your cable is a A-B cable. Plug the thin end into your computer Plug the square end into your Arduino If not, double check:
PaperDimmerPCB. Regulador de potencia por triac para microcontrolador (compatible con Arduino) Conceptos preliminares Después de buscar un regulador de potencia para microcontrolador mediante triac, sólo he encontrado controles binarios (encendido/apagado), o mediante circuitos especializados. Es por eso que decidí hacer un control sencillo (sólo tiene 8 niveles de potencia). El circuito se basa en el expuesto en la web (muy buena por cierto). En este circuito sustituimos el potenciómetro de 470k por 3 resistencias fijas en serie que puentearemos según nos convenga. Esto lo hacemos mediante tres optoacopladores que a la vez de aislar la parte del micro de la parte de potencia, puentean las resistencias que están situadas en paralelo con el " foto interruptor bidireccional". NOTA: Este circuito funciona solo con motores de tipo universal (con escobillas), para regular la velocidad de motores de inducción (sin escobillas) es necesario realizar un variador de frecuencia. Características del circuito Descripción Y por el lado de las pistas: 1.
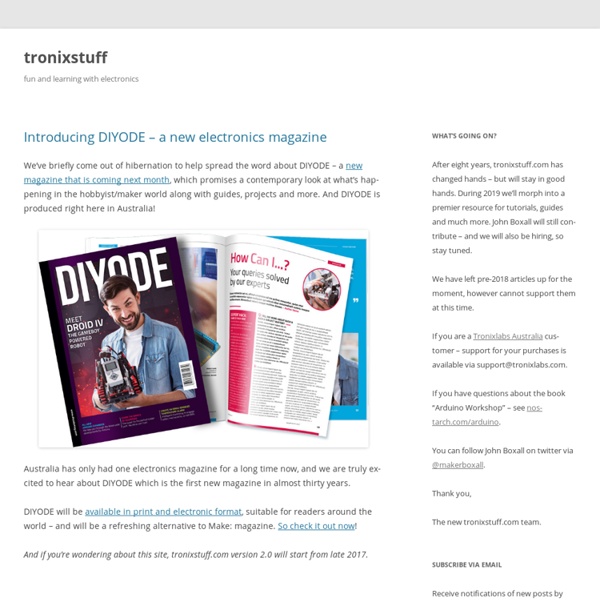
Resultados de la búsqueda de arduino Prmero tenemos Centipede un shield bastante bien diseñado que nos da 64 pines de entrada o salida, todo esto gracias al protocolo I2C. Tiene un precio de $17.99 USD y puedes comprarlos aquí. Otro multiplexor para arduino es el Mux shield, tiene capacidad hasta 48 entradas o salidas. Este shield hace uso de multiplexores analogicos lo cual hace posible tener hasta 48 entradas analogicas, una cualidad única. Además de todo esto solo hace uso de 4 pines digitales y 3 analogicos dejando libre los demás para hacer uso normal. Es tuyo por el precio de $21.99 USD aquí. El EZ-Exparder Shield, el más sencillo pero tambien más económico, con una expansión de tan solo 13 pones extra que además solo funcionan como salida y que tienen una corriente de salida limitada.
Talleres Arduino | Andres Duarte Marin Duración: 12 horas Próxima edición*: 5, 6, 12 y 13 de octubre de 2013 Horario*: S, D 16:00 – 19:00 Precio: 80 € Número de plazas: 15 Tipo de sesión: sesión teórico-práctica. Los días 5, 6, 12 y 13 de octubre de 2013 de 2013 en INTERVENTO RED MADRID. Duración: 3h Próxima edición*: 13 de julio de 2013 Horario*: S 16:00 – 19:00 Precio: 20 € Número de plazas: 15 Tipo de sesión: sesión teórico-práctica. Duración: 3h Próxima edición*: 29 de junio de 2013 Horario*: S 16:00 – 19:00 Precio: 20 € Número de plazas: 15 Tipo de sesión: sesión teórico-práctica. LOS DÍAS 25 y 26 DE MAYO, Y 1 Y 2 DE JUNIO DE 2013 EN INTERVENTO RED MADRID. Este taller muestra cómo programar y diseñar circuitos para conectar diversos dispositivos. Duración: 30h Próxima edición: 25 y 26 de mayo, y 1 y 2 de junio de 2013 Horario: S, D 16:00 – 19:00 Precio: 80 € Número de plazas: 15 Tipo de sesión: sesión teórico-práctica Lugar: INTERVENTO: Calle de Fernando Poo, 4 28045 Madrid Profesor: Andrés Felipe Duarte Marín Contenidos Donde?
How to drive drive brushless motor with Arduino? Arduino motor control Nokia 3310 LCD shield v1.0 with Joystick - £9.99 : nuelectronics.com, Arduino Freeduino projects Nokia 3310 LCD is low-cost, monochrome LCD with 84x48 display. It is popular for 8-bit AVR/PIC projects, search google for 'Nokia 3310 LCD', and you will find lots of resources. This Nokia 3310 LCD & Joystick shield can be used for Arduino /Freeduino board and other MCU projects. It has following features: Use popular Nokia 3310 LCD, monochrom, 84x48 pixels. Has 4 blue LED backlight for the LCD, so you'll be use it at night. Has a 5-direction Joystick , but only use ONE ADC PIN on Arudino for reading the Joystick. Directly plug into the Arduino or Freeduino boards Can be connected to other MCU projects, via extend connector J5 Supplied with fully functional Arduino library & demo application sketch What is included Nokia 3310 LCD shield v1.0 with Joystick (with Nokia 3310 LCD), fully assembled & tested Programming Notes The Nokia 3310 LCD is controlled by Arduino's SPI port at 5V logic, the schematic can be download from here Nokia 3310 LCD shield v1.0 with Joystick