background preloader

$5 Mobile Phone Projector

$5 Mobile Phone Projector
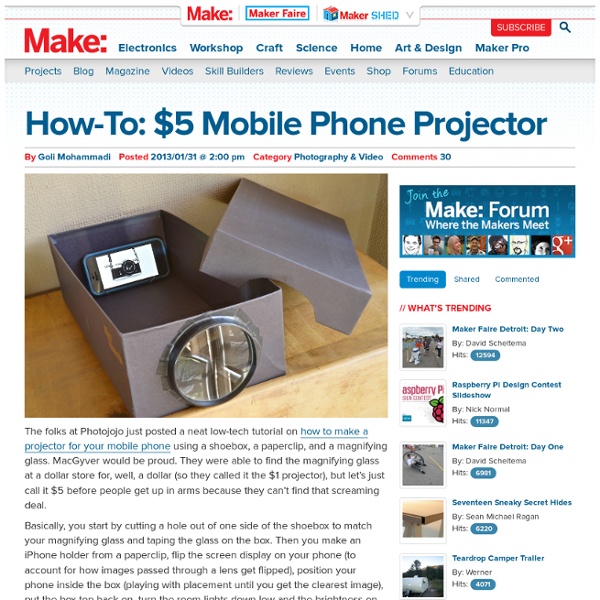
The folks at Photojojo just posted a neat low-tech tutorial on how to make a projector for your mobile phone using a shoebox, a paperclip, and a magnifying glass. MacGyver would be proud. They were able to find the magnifying glass at a dollar store for, well, a dollar (so they called it the $1 projector), but let’s just call it $5 before people get up in arms because they can’t find that screaming deal. Basically, you start by cutting a hole out of one side of the shoebox to match your magnifying glass and taping the glass on the box. Then you make an iPhone holder from a paperclip, flip the screen display on your phone (to account for how images passed through a lens get flipped), position your phone inside the box (playing with placement until you get the clearest image), put the box top back on, turn the room lights down low and the brightness on your phone up high, and revel in your resourcefulness. Doesn’t get more accessible than that! Goli Mohammadi Related

The Giving Bunny Project « StitchPunk For new readers: Are you visiting here because you found a bunny? Read on about The Giving Bunny Project, maybe even join in! Then we would love it if you left a comment telling us the name of the bunny you found and a little bit about your experience. You can even make a note on our Google map where you found your new friend. We hope your bunny brightened your day! This is a project that has long been in my head, and I’m so excited to be able to finally share it with the crafty community and see where it goes. The giving bunny is just what he sounds like. Can you imagine the unexpected delight of going about your day, maybe even not a very good day, and discovering this little gift left just for you? It’s a small thing, but a little bit of vigilante embroidery mixed with street art, and you can spread a tiny bit of bunny-shaped joy to someone you’ve never met, and maybe make what was a grey day a little brighter. Want to make one? The army of bunnies assembled and ready for deployment

Blow Smoke Rings Edit Article Blowing Traditional Smoke RingsAdding Spin and Speed to Smoke RingsQuick Methods for Beginners Edited by geoff. Arthur, Tom Viren, Ben Rubenstein, Sondra C and 102 others Picture this: At some point during a dinner party you look up and notice a smoke ring rising above the crowd and gliding across the room. Pretty cool, huh? Ad Steps Part 1 of 3: Blowing Traditional Smoke Rings Smoke Rings Step 1.360p.mp4 00:00 00:16 00:16 spaceplay / pauseescstopffullscreenshift + ←→slower / faster (latest Chrome and Safari)←→seek . seek to previous 12…6 seek to 10%, 20%, …60% 1Partially inhale the smoke. Part 2 of 3: Adding Spin and Speed to Smoke Rings Part 3 of 3: Quick Methods for Beginners Tips Warnings

Style Scrapbook: DIY "OMBRE DENIM SHIRT" December 29, 2011 in Uncategorized by Andy I FINALLY got around to do this DIY but since I didn’t want to ruin one of my favorite denim shirts, I went and bought a cheap one at a small store and luckily, the operation was successful!. …This DIY is as simple as they come so if you are feeling adventurous, here is what you need and the step by step: *Special fabric bleach in powder (if you can’t find it, use normal bleach) *Gold buttons (make sure they are the same size as the buttons you are replacing) 1. 2. 3. 4. 5. 6. 7. 8.

In this Crazy Life: Tips and Tricks Ive been working on this post for awhile now, as I find these neat tips and tricks I wanted to keep them all together and be able to share them with all of you lovelies! I have tried all of these, so I know they work. Just call me Martha Stewart- you know, sans the jail time. Some are from pinterest, some are from my grandma. If I got them from somewhere, click the picture and it will take you to the genius who came up with it :) If there is no picture, then I have no idea where I heard it- or I would cite it! 1. HOLY CRAP. 2. 3. 4. 5. 6. 7. 8. 9. 10. 11. If youre into nails, you have to check the awesomness out that is her blog. 12. via 13. 14. 15. 16. 17. 18. 19. 20. 21. via 22. 23. Head on over to I {heart} Nap Time and see some awesome recipies, craft ideas and overall awesomeness. 24. via 25. 26. 27. 28. via 29. 30. via 31. 32. 33. 34. 35. via That's all for now, lovelies, if you have any tips and ticks please feel free to pass them on!

38 Anthropologie Hacks Awesome Things To Make From Wire Calling all creatives out there, today’s 50+ roundup is going to feed your inspiration banks. We gathered over 50 super awesome things to make from wire. You can get craft wire for pretty cheap, and as you will see, you can even use wire hangers! How To Blow Smoke Rings - Hookah Company The most important thing to know about successfully blowing a smoke ring is this: you are going to look kind of dumb. Admitting this fact is the first step, now we can move on to execution! How do smoke rings work? I'm so glad you asked! There is actually a science behind the wicked sweet 'O's. Training Wheels Method to Blow a Smoke Ring We're going to go ahead and call this, 'The Tap Out'. Blow Smoke Rings Using Vowels! A, E, I, O...O...O! Jawin' This approach involves more muscle control. Do you have a smoke trick or smoking tip that you'd like to share? Tagged:smoke rings hookah smoke rings smoke tricks how to blow a smoke ring

Toilet Paper Roll Wall Art Well that’s a mouthful! So the time has come, it’s Pinterest Challenge time again! Every season Sherry from YHL and Katie from Bower Power throw a little link party to get people to stop pinning things and actually start making. This couldn’t have come at a better time because I have wanted to start this project forever and once Miss Kelly made her way into my kitchen I knew it was time to start it. This was the image I saw that sparked me to start saving my toilet paper rolls. I literally have been saving my rolls for. ever. Here’s what my toilet paper wall art turned into! Ok let’s get down to the nitty gritty. Next, I cut them up. Then, I took 4 pieces and glued them together using a hot glue gun. I continued doing this until I had about 40. Then I took the mirror I was going to use (10″ mirror purchased at Joann’s for $8) and placed it on the floor and started adding all the circles around keeping in mind that I wanted to keep it in a circle. Linking Up To: Young House Love Bower Power

25 clever ideas to make life easier - StumbleUpon Via: amy-newnostalgia.blogspot.com Why didn’t I think of that?! We guarantee you’ll be uttering those words more than once at these ingenious little tips, tricks and ideas that solve everyday problems … some you never knew you had! (Above: hull strawberries easily using a straw). Via: apartmenttherapy.com Rubbing a walnut over scratches in your furniture will disguise dings and scrapes. Via: unplggd.com Remove crayon masterpieces from your TV or computer screen with WD40 (also works on walls). Via: athomewithrealfood.blogspot.com Stop cut apples browning in your child’s lunch box by securing with a rubber band. Via: marthastewart.com Overhaul your linen cupboard – store bedlinen sets inside one of their own pillowcases and there will be no more hunting through piles for a match. Via: realsimple.com Pump up the volume by placing your iPhone / iPod in a bowl – the concave shape amplifies the music. Via: savvyhousekeeping.com Re-use a wet-wipes container to store plastic bags. Via: iheartnaptime.net

Hamper Made a laundry hamper for Emily's room this week. I've seen these everywhere, except they're big - and I wanted a smallish one for a specific corner of her room, and I was very, very tired of our plastic Walmart laundry baskets, so I got out my tools and sewing machine and made one. If you've never seen these before, they're very nifty things because they are roomy enough for lots of laundry but they can fold up (even with laundry inside) and be toted around. The fabric bag is buttoned on at the top and strapped down underneath so you can remove the bag completely and toss that in the wash, too. The wooden X-frame is such an easy and useful basic structure for so many projects - apart from this laundry hamper, you can also use it for camp chairs, camp beds, tents and so many other things. This is what I used: First, drill all the holes according to the plan: Click HERE to download the plan. Important: All dimensions of the fabric bag, including the straps, are the FINISHED dimensions i.e.

Related: