
Sew a Zipper Opening in Your Purse or Handbag Time for another tutorial! I've just finished adding instructions for a zipper opening into my Teardrop Bag pattern, and thought - Hey, what the heck, I should post this as a tutorial as well so that you fabulous sewers can add one to a bag of your own. I hope you like it, please leave a comment if you do! The pics were a bit wide for this blog so I couldn't use them full size, so you will have to click them to zoom in. This is a zipper opening that is made in a gusset, that is open at each end. Decide how wide you want your zipper gusset to be; mine is about 3" so I've cut the strips on either side 2" (5 cm) wide to allow for seam allowances. 2 Top Lining Pieces 2 Bottom Lining Pieces 1 Tab Piece 3” x 2” (8 cm x 5 cm) 4 Gusset Pieces 2” (5 cm) wide x the length of your desired zipper opening, plus 1/2" (13 mm) for seam allowance. 4 Fusible interfacing 2” (5 cm) wide x the length of your desired zipper opening. 1 Closed end zipper 2 inches (5 cm) longer than your gusset pieces.
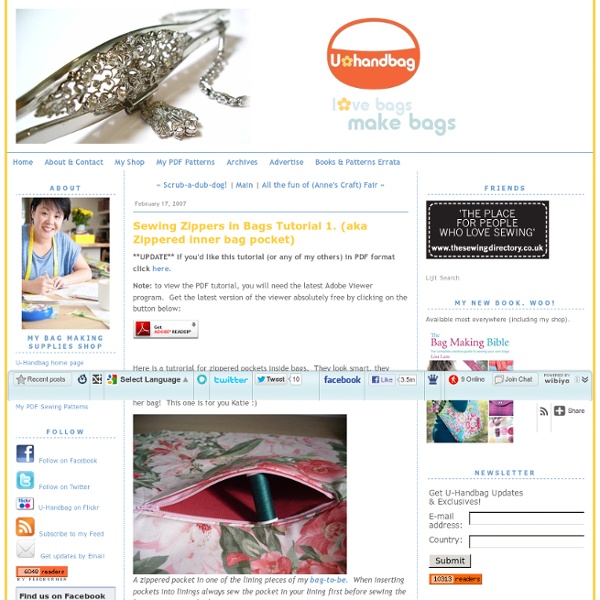
How To Sew an Inner Zipper Pocket I have tried several ways to sew in internal zipper pockets. I need one in every bag and I want at least one to be in every bag I make for my shop. They are so nifty, especially when you carry as much crap in your purse as I do and your cell phone rings. Anyways, it used to take me hours to make these. You need: a zipper (obviously ^^).fabric you want to use as your bags lining.fusible interfacing (Vlieseline).sewing machine, thread, scissors, the usual sewing utensils. The first step is optional. Measure your zipper and mark where to sew it in. Cut where you just marked your fabric. Fold over and press So, now I could serge the raw edges with a zig zag (or even take it to the serger) but, urgs, such tiny openings are a pain in the ass to serge. Add another strip of fusible interfacing to the other side. Now we need two rectangle pieces of fabric that will become the insides of our pocket. Now repeat the last step with your second rectangle and the other side of the zipper. Happy sewing!
Add a Zipper to a Finished Tote Bag My customers are always challenging me. One recently asked if I could add a zipper to an existing Oversized Beach Tote so that she could use it as an overnight bag. So in my usual way, I researched, I thank (thunk? thought? perseverated?) The existing solutions on the internet require using a fabric flap. With the zipper separated, baste one side to the bag. To sew the other side of the zipper, first attach it to the sewn side. I felt that it was a successful solution to the problem presented. I also tried tucking in the ends of each side of the zipper for a cleaner look. To tuck in the "bottom" of the zipper, I had to invert the zipper before joining it. Either way, a quick, simple way to add a zipper to a purchased or finished tote! Zippered Welt Pocket Done Properly A long time ago, I wrote the Pocket Series, which was a manic string of tutorials on making 25? 26? different pockets. It was meant to be a bunch of short, quick tutorials so that even the beginner-est of us could feel confident adding pockets to the various projects they were working on. One of those pockets was the zippered welt pocket. These photographs (but not the method or instructions; these were rewritten and changed for this tutorial) are conveniently borrowed from the Bella Bag pattern that's still in the testing lab(s), which explains why the big orange piece of fabric is strangely called the Lining Back. You will need: Step 1 Pin the facing to the main fabric (remember that in this tutorial, it has the funky name of Lining Back) so that the facing is on the RS of the main fabricthe RS of the facing is touching the RS of the main fabricthe facing is directly behind the welt interfacing Pin in place. Step 2 Sew exactly on the long edges of the welt (black dashed lines). Step 3
Inner pocket zip (scroll down) September 7th, 2012 Email 38 users recommend Here is my felted wool tote. Jen Stern Felted wool is so beautiful, the embroidered detail is just icing on the cake! Isn't it amazing how tiny a big cardigan can get? Photo: Jen Stern In the back of my mind, I've been meaning to try felting wool sweaters-shrinking one of my favorite cardigans in the wash was just the push I needed to give it a try! How to Embroider on Felted WoolEmbroidering on felted wool is like embroidering on a towel. After you cut out your bag pieces, use chalk to draw guide lines on the pieces that you want to embroider. I like to use the no-fuss, no-muss method of centering my border design. Hoop the Stitch n' Wash and use 505 Temporary Adhesive Spray to adhere the felted wool into position in the hoop. Here is my completed border. After you finish embroidering, put your bag together according to the pattern directions. Determine how long you want your zippered opening to be. Position the zipper behind this window.
Roomy 3D pockets I make loads of purses & one thing that is essential for a purse/bag is pockets!!!!!!! Everywhere I see the pockets are same.Sew on 3 sides & you are done.You know what,I don't like them!!!!!!!! The pockets should have room to keep things in it....................so I make 3 D pockets & I am going to share it with you all too:) I will explain how to make 2 types of pockets. Now we all carry gadgets right?????? Cut- 2 pieces from the pocket fabric-6.5" by 6". 1 piece batting -6.5" by 6". It is OK to sew at the edges as after turning it we will be top stitching all four sides. Now turn this inside out so that the pocket fabric is at the front & back with the batting in the center. Turn the fabric on the 4th unstitched side 1/4" inside & top stitch it.So you will get a padded pocket patch of 6" by 5.5". Now to add the pleats to make the pocket 3 D. From the bottom edge mark a point at 1.5" (A) & another at 0.5"(B).Mark at both the edges like this Back-stitch all the edges. at the pleats.
Adding recessed top zipper to purse/bag -Tutorial As promised yesterday here I am with a tutorial to add top zipper to your purse.You know I always prefer purses with zippers,somehow they feel safer & I don't have to worry that something inappropriate may peek out at the wrong time;) Among top zippers,the most elegant & professional looking is recessed or sunken top zipper. So without further ado ...............lets begin. When we make purses we usually cut outer & inner lining pieces equal,but as you can see here the lining is smaller.So first you prepare the outer pieces (don't join them yet) Now you decide how much recessed should your zipper be?????? To that measurement add 2 " & cut 2 pieces from the outer fabric with width equal to width of the top of the outer piece.This is what I mean............we will be sewing the zippers & lining to these pieces which I am going to call STRAPS. Cut little angles at the inside ends of theses straps as you can see in the pics above.These angles ensure that the zipper ends don't become bulky.
Making reversible bag | verypurpleperson from top of straps to bottom of bag: 50 cm / 20 inchesheight: 28 cm / 11 incheswidth: 40 cm / 16 inches I don’t know because I used leftover fabric for my bag. You can print the pattern and place it on your fabric to make an approximation. Fort similar bag, you can check Charlie bag by Burdastyle ($1.99). Please go to the bottom of this post to download the PDF pattern and tutorial. Disclaimer: You may use the finished products for both personal and commercial use (craft shops or markets only – no mass production). 1. 2. If you use my pattern, sew the darts before sewing the bottom and sides of bag. 3. 4. 5. Pull out each of the remaining straps. 6. 7. 8. 9. 10. A reversible bag! Thank you for reading and I hope this post is useful for you! Click to download:
Recessed Zipper How-To I've had a few questions about how to install a recessed zipper closure on a handbag. This has to be the longest tutorial written in the history of tutorials! I did my best to explain, but please let me know if anything is unclear. You Will Need: - (1) 14" zipper- (2) 15.5" x 2.5" inside upper fabric- (2) 15.5" x 16" inside lower fabric (I demonstrate using my own pattern, feel free to experiment!) * If you use your own tote pattern, be sure to alter your lining pattern to account for the extra fabric above the zipper - you want your outer and inner pieces to match after you install the zipper. 1. 2. Lift the presser foot and pull the zipper to the other side of the foot. Back stitch at the beginning and end, by the zipper stops. 3. 4. 5. Center the 2nd top strip along the zipper and sew. Place last bare side of zipper face down on last lining piece and sew. 6. 7. 8. You should be getting an idea of your finished bag! 9. 10. 11. 12. 13. 14. 15. 16. 17. 18. 19. 20. I hope that made sense!
Tutorial: Messenger Bag from Cargo Pants Want to make one of these? From a pair of these? Here's the tutorial! Materials: 1 pair cargo pants (from the going to Goodwill pile of course) 1/2 yard lining material bias tape (store bought or make your own) thread {1/4" seam allowances throughout} Getting started... Take your pair of cargo pants and cut the inseam of each leg of the pants up to the crotch area. Cut the bag exterior pieces: front flap (this is where the cargo pocket comes in handy - cool pockets you don't have to sew!) Cut the same size pieces from the lining material. Make the strap by placing the long pieces right sides together, sew down each side. Now make the front flap. Assembling the lining: Take gusset pieces (2 sides and a bottom) and sew the short ends together. Lay your connected gusset pieces right sides together on top of the front of the bag piece, pin, sew. Lay the back of the bag down and set the front/gusset piece on top, pin in place. Make the exterior just like you did the lining of the bag.
Dolman Sleeve Top Over the past few months, I've seen slouchy tops popping up everywhere. Most of the tops in my closet are slim fitting, so to add a little variety to the mix I took a shot at making this blue slouchy dolman sleeved shirt. I loved how it turned out, so I made another. And because I like you guys so much, I made a tutorial to go along with it. What you'll need: 1 1/2 yards of knit/stretchy fabric (slightly more or less depending on your size)thread in a coordinating color Step 1. Step 2. Once they're cut, they should look like this: Step 3. Next, with right sides together, sew up your shoulder seams. * I've heard many people say they have no desire to sew because they don't have a serger, and feel like their clothes will look "homemade" without one. Step 4. Line up the rectangle and the top of your shirt, and cut an identical neck hole along the folded edge, as seen below: Now, with right sides together, pin the rectangle to your top, matching up the neck holes. Step 5. Step 6. Step 7.
Trousse à bijoux de voyage {tuto} - Couture Préparez et placer les éléments de la trousse (Partie 2) Extérieur de la trousse :Prenez le rectangle de cuir 17.5 x 21 cm et arrondissez-lui les coins en utilisant un verre pour vous aider à faire le tracé de l'arrondi. Fermeture de la trousse :Prenez le rectangle de cuir 5 x 6 cm et arrondissez deux coins. Posez le dessus d'une pression du côté où les coins sont arrondis et venez le coudre sur le grand rectangle cuir 17.5 x 21 en plein milieu du côté de 17.5 cm. Pochette à colliers :Cousez un côté de la deuxième fermeture éclair sur le grand rectangle cuir à l'opposé de la fermeture de la trousse.Cousez l'autre côté de la fermeture éclair sur le rectangle à pois avec pochette fleurie à l'opposé de la pochette fleurie. Coupez toutes les pièces Dans le cuir :1 rectangle de 17.5 x 21 cm1 rectangle de 5.5 x 8.5 cm1 rectangle de 1.5 x 8.5 cm1 rectangle de 5 x 6 cm Dans le tissu à pois :3 rectangles de 17.5 x 21 cm Dans le tissu fleuri :1 rectangle de 17.5 x 9 cm Cousez tous les éléments ensemble