background preloader

Museum Tunic + instructions

Museum Tunic + instructions
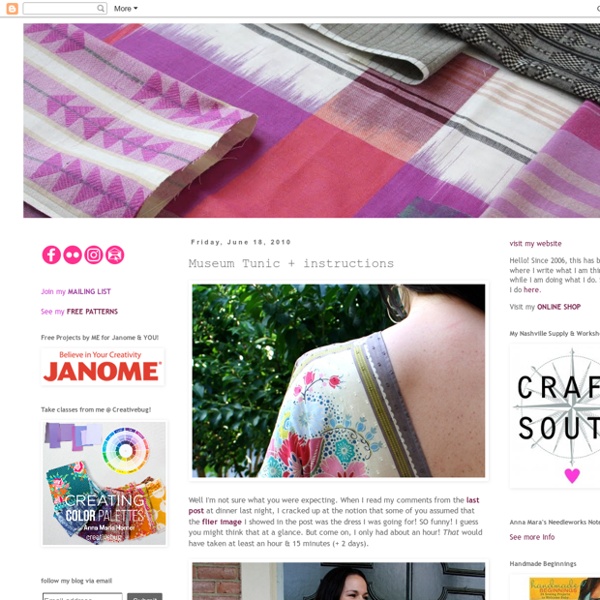
Well I'm not sure what you were expecting. When I read my comments from the last post at dinner last night, I cracked up at the notion that some of you assumed that the flier image I showed in the post was the dress I was going for! SO funny! Anyway, I've had the thought to make this ultra simple tunic from the Square Dance fabric for a while, and decided at the last minute last night to give it a quick whirl. A few notes: I used what's considered a panel and a half of the Square Dance fabric (45" length). The front is exactly the same as the back, and equally flattering from the front and the back too! The style could not be more simple, and it felt really appropriate to enter the amazing Golden Age of Couture show in something very simple. Thanks for your enthusiasm yesterday about the dressmaking madness, and hope you try one too!

Fun in the Sun{dress}: Oceanside Lace Dress Tutorial This dress was a guest tutorial over at iCandy for their Fun in the Sun{dress} series. I’m expecting #2 (as you can tell), so I wanted to do a fun dress that would accommodate my ever growing belly. I decided to stick with a basic concept and add the lace embellishments to make it different. I ended up adding a sash as well because when you have a big belly, these kind of things help make more of a shape. It’s created from rectangular pieces of fabric with shirring on the back to bring it in. Now let’s get started with what you need to make your very own Oceanside Lace Dress: -Lightweight fabric (see further below for how I figured out how much I needed)-Elastic thread for shirring-All the other wonderful things needed to sew-Find a lace that has flowers in it. 1. 2. The 4 pieces for the top are all the same size, but you might want to make the width of the back pieces a little smaller than I did. a. b. 3. 4. 5. 6. 7. 8. 9. 10. 11. 12. 13. 14. 15. Now your dress is all done.

Anthropologie Pratia Tank Top Tutorial February 6, 2010 1:59 pm Per popular demand, here is the Pratia tank tutorial! Start off with a t-shirt or tank top. What I did was get a larger t-shirt so I could gather it at bottom like the pratia tank. I cut off the sleeves so it would be a tank. Measure your neckline and get a piece of chiffon that length and fold it in half. Pin it to the inside of your neckline with it peeking out. Since I cut the sleeves off my T, I wanted to finish the edges. Stitch it. I highly recommend interfacing where you are going to be adding the embellishments, otherwise it’s going to sag. For the flower pieces, here is the shape and dimensions I used. Fold your pieces in half and cut that petal shape out. I used the extra sleeve pieces, cream chiffon(the kind that won’t fray) and another grey jersey I had. How many do you need? Lay two petals on top of one another, as shown. I did a small ‘X’ shape to stitch them so they stay in place. Just add more, and more, and more, and more………(It’s time consuming.

How-to make the Infinity Convertible or Wrap/Twist Dress **disclaimer: I am not a professional designer or tailor by any means. I love to sew and craft so this has become a beloved past time for me. I have adapted these instructions for my own use from the Shira.net and Rostitchery websites. If you have any questions please private message me :) Supplies newsprintpencilcompass (or string)metre stick (yard stick)square (right angled ruler)pattern weights (or traditional pins or things like soup cans)scissorsfabricpinsthreadserger (or sewing machine)1 inch elasticbodkin (or safety pin)large open space (floor or table) Terminology: right side of fabric - right side or face of fabric...Jersey fabric may or may not have a design on it, the side with the clearer design is the right side, alternatively the shinier side will also be the right side. Step one: Roll out the newsprint on the floor or table. Using your compass draw the first 1/2 circle at the top centre of the pattern. Now you will need two measurements for the wrap panels. Step Two: Step Three

Cozy Button Wrap with Disney from Ruffles and Stuff Welcome to the first day of Refashionista! I'm so glad you're here. Our first guest needs NO introduction, but I'm going to give her one anyhow. This is Disney from Ruffles and Stuff (and her gorgeous daughter). Her blog was one of the first craft blogs I found and I fell in love with it. So, welcome Disney! Hey everyone! It's so neat to be here at Cheri's place today with all of you. I'm also super excited for "refashionista" event! The refashion I'm sharing today is something I call the "Cozy Button Wrap". Wear it buttoned..............wear it open! Wear it belted....or as a wrap! *These photos of me are not the most flattering, so I'm not sure it really sells the product. So here's the how-to! 1. 2. 3. 5. Ta-da! A few tips: If you can't find inexpensive matching scarves like mine, try using two scarf sized lengths of snuggly flannel (just remember to hem the sides), or for a super-simple version, try fleece! Thanks again, Cheri. Have a wonderful day! Thanks, Disney!

kojo tutorial- drop waist blouson beach dress If you sent me into a clothing store with $50 to spend, chances are I’d come out with a new dress (or two- depending on the store). I realize that it’s probably more practical to buy separate pieces, but dresses continue to woo me with their ease and promise of a one-piece-outfit. And I kind of feel like I hit the jackpot when I find an uber-comfy dress (I feel the same way about dressing Piper Jane, incidentally, which is why there are three versions of the jersey JCrew-y dress tutorial). The jersey drop waist dresses that are popping up everywhere this spring are right up my alley (above from Victoria’s Secret, Piperlime, Splendid, Jcrew, Jcrew, Sessun and Anthropologie). Of course, I needed to try my hand at making one- and the “Upcycled/Repurposed” challenge week at Sew-vivor was the perfect opportunity. To make one of these super comfy dresses, you’ll need- -three men’s XXL tshirts -RIT dye (mine was navy RIT dye) -1″ wide elastic (at least 6″ long) -wide, sturdy ribbon (about a yard)

Making a picnic dress Several people have asked me how to make my Picnic Dress. It’s a bit too complicated for the step by step instruction on how to draft a pattern I gave for the draped t-shirt, but I hope this will be enough detail for anyone who is familiar with how dresses are made. You will need 4 yards of 45″ fabric and an 18″ zipper. These are the pieces of the pattern. Mark out the measurements listed and the distances between them. For example, on the waistband measure out the distance between your underbust/ribcage and your waist, then measure half your ribcage measurement at one side and half your waist measurement at the other. If you’re not used to making your own sleeves, trace both the arm hole and the top of the sleeve off a pattern you’ve used before and like. To make the curve of the skirt even, use your tape measure like an enormous protractor. To gather the top, mark out a distance ¾ of the difference between bust and underbust measurement on one side.

Flashback: One-Hour Elastic Thread Dress With summer upon us, easy and cool clothes are the name of the game. Nothing says summer fashion better than a breezy sun dress, and this week’s Flashback project is perfect for whipping up a cute and cool summer wardrobe. Nicole Vasbinder shows you how to make a sweet shirred dress that you can knock out in one hour. You’ll want to fill your closet with these dresses as the temperature rises this summer! By Nicole Vasbinder You can make this dress in about an hour using elastic thread to create shirring (soft gathers), which adds shaping. Materials Fabric Spool of elastic thread in either black or white Spool of regular thread Scissors Pins Iron Sewing machine Serger (optional) to finish seam allowances Directions Step 1: First, figure out how long you want the dress to be and cut 2 lengths of fabric that length. Step 2: Now on to the elastic thread! Step 3: Lengthen your stitch length to about 3mm and adjust your tension to 5 (but play around this a bit on your scrap). Related

Quick & easy shirred summer dress If you haven’t already guessed by now, I love summer! The whole way through winter I am thinking about summer! So even in the middle of winter I have been known to wear a summer dress with a denim jacket just to make me feel happy. When I made this dress last week, I wore it on my normal weekly shopping day with my fave denim jacket over the top & I was surprised by the amount of compliments that I got! You just thread the bobbin through the machine as normal. Using the presser foot as a guide, line it up with the top of the rectangle & sew straight across, using the shirring elastic in the bobbin. As in the picture above, keep using the presser foot as a guide, line it up with the last line of shirring & keep sewing straight lines. The above picture is what the shirring looks like on the inside of the dress. You then need to pin the both halves of the dress together along the 2 long sides. Simple & stunning! Enjoy!

Related: