background preloader

1-Hour Dress

1-Hour Dress
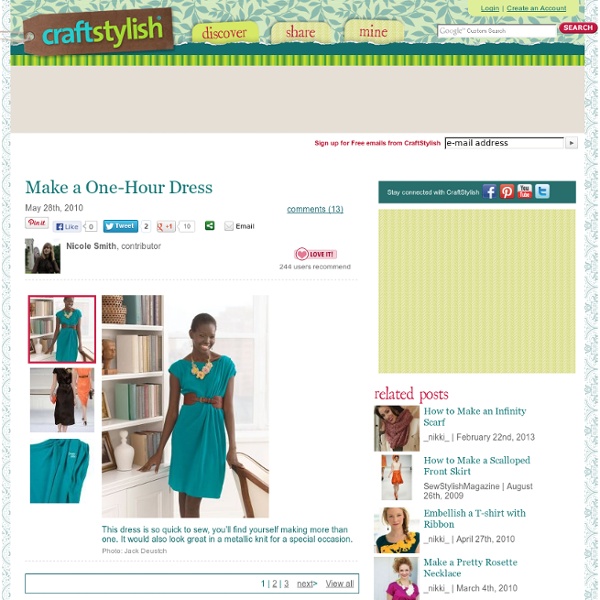
May 31st, 2013 Email 287 users recommend This dress is so quick to sew, you’ll find yourself making more than one. It would also look great in a metallic knit for a special occasion. Jack Deustch Inspiration by Oscar de la Renta Style.com Sloan Howard Photo: Jack Deustch What says summer more than a chic, lightweight dress? What You'll Need: French curveHand-sewing needleInterlock knit, 2 yardsMeasuring tapePattern paperRulerSewing machineThread Make the Pattern 1. 2. View 5 member project galleries

The Alice Dress It’s time for a little DIY Day clothing mash up. What do you get when you cross the tank top style dresses seen everywhere from Anthropologie to Target with a serious case of Alice and Wonderland on the brain? You get the Alice Dress! It’s comfy, feminine, and was very easy to make. You only need about a yard of fabric, some elastic, and a tank or t-shirt. I started with this old top from Target, but you could use any fitted tank or tee with some stretch to it. I cut the cami out of the top and saved the rest of the fabric for ruffles. For the skirt portion of the dress, you will need a piece of fabric wide enough to go around you twice and as long as you’d like. Fold the top over twice and iron and pin. You can also create the bottom hem at this time. Once you have the top of the skirt hemmed, use scissors or a seam ripper to cut a tiny slit in the fabric between the two hems. Cut a strip of elastic about an inch smaller than your waist and feed through the tube created by the two hems.

CONVERTIBLE DRESSING Here’s a clever little idea…convertible clothing. This dress works double duty as a skirt. It’s ideal for weekend wear or travel wear. It’s functional and versatile at the same time. Basically the concept is a wrap-around garment so it is adaptable to many shapes and sizes. No pattern is needed to construct it. Cut 2 panels along each selvedge edge 15″ wide for wrap tiesRemaining fabric panel is wrap skirt portion. Assembly: On the large skirt portion, fold in a ½” turn on each short edge to the wrong side of the fabric. Then turn each folded edge in ½” again. Along one of the long edges, create a rolled hem by turning ½”, then 1″. Next, fold the skirt portion in half and align and match the finished edges. From the finished edges along the long raw edge, measure 6″ and mark this location point. Now, take the two tie portions and align them, right sides together, along one short edge. Measure and chalk 1 ½” from each end of the seam. Divide the bust measurement by 4. Like this:

fun in the sun(dress) Gathered Grecian 12Jul Welcome to our spotlight, Liz from Cotton and Curls! She is an amazing refashionista who’s style is beyond compare…awesome. I loved sifting through the volumes of fun refashioning ideas that she’s done, and reading about her cute family and life…and she’s from Seattle, makes me like her even more! here are a few of her projects that i adored: Crazy girl over here took a huge mumu and made it into two fun little numbers! Check out how she did it! How to shorten a top without cutting or hemmingsounds like a rubix cube to me, but she makes it easy in this tutorial. and i {heart} this skirt..the style, the fabric, everything! no more of me talking, here’s Liz Hello icandyhandmade readers! With this dress I decided to go with a light knit in yellow which means, no need for hemming (knit doesn’t fray much) and it is quite flowy and comfortable. Instructions: At the end…you don’t need to hem.

The 1.5 Dress 1.5 yards + 1.5 hours = One New Dress. Scarlet and I met the prudent dad for dinner shortly after the completion of this number, and he complimented my new dress! I excitedly exclaimed “Thanks! I made it!” So, if your goal in life is to be as sexy as possible at all times, then I guess this isn’t the dress for you. Not even a little sexy? 1. You’ll see the front neckline is lower then the back. 2. Sew in place. 3. Align the edges and pin together: Sew together and finish the edges by serging, sewing with a zig zag stitch, or cutting with pinking shears: 4. Sew in place with a straight stitch: You can leave the sleeve like this, but it will be a bit pointy as in this pic: So i made a little tweak. Fold the tip of the sleeve down about 1″: Secure it in place at both sides of the fold with a few stitches perpendicular to the sleeve: 5. 6. So you need to finish the neckline. Then I folded one side over the other, and sewed it in place along the previous stitch line: 7. Done!

refashioning Okay, the kids are all decked out for the start of school next week- now let's focus on me. First up: recycling t-shirts into spaghetti accessories. Jersey necklace: Cut several long strips from knit/jersey fabric. Mine are all about 42 inches long. Some are very thin, others are slightly wider. Stretch each piece with your hands. Knot all the ends together. Lop off the excess and wear.... ...or use a scrap of fabric to wrap around the knot (bandaid style) and stitch to hold in place. Instant white shirt karma. I used the same technique to make a headband. I cut the t-shirt spaghetti very thin and doubled it over to stretch around my head. Stitch it in place and enjoy.

Gathered Summer Dress My favorite part of summer (besides iced coffee, warm nights & beach volleyball): The best thing about dresses is that you can easily make one from almost any shirt. By now I think it's pretty obvious that I love repurposing old clothes, & this dress is just that. I used a thrifted shirt that's bigger than my usual size, and some floral jersey fabric (which I'll talk more about in a bit) It's so so so easy to make. Supplies: - Thrifted tank top, loose fitting. *I used a special kind of jersey knit fabric, called ITY knit (interlocking twist yarn). You can even use the fabric from an old oversized shirt - I'm sure you can find some crazy printed jersey t-shirts at the thrift store - and don't forget to look in the mens' and maternity section. I tried on the top & marked the spot where I wanted the bottom half to start. The measurements of my huge rectangle of jersey was 60 inches wide & 31 inches long. Width - Laying flat, I measured the shirt at its widest, which was at the bottom. xo,

Make Your Own Cloak or Cape Before you get started, there are a few decisions that you need to make about your cape or cloak that will make the actual project a lot easier. Costume or Real Garment? - Is this just a one-time garment (try the no-sew version!) or do you want this to work as a real outer garment that protects you from weather? You'll want better material and to spend more time on a real cloak versus a cape for a costume party. Length? Material? Garment details - Do you want your cloak to have a hood or not? One of the greatest men's shirt makeovers ever--tutorial! Okay, I'm partial, but I think this is one of the greatest makeovers of a men's dress shirt into something else--a cute, springy skirt! I had so much fun with this and just figured it out as I went along, but I do have the pics and instructions for you in a tutorial. Follow along if you ever want to do this to an old shirt! Do note--I'm using a 100% cotton chambray shirt here. It's really sturdy and thick. I started out with this shirt from Goodwill Outlet. I grabbed a skirt from my closet to use as a pattern. Cut off the collar and back yoke--basically cut in a horizonal line, as high up as you can comfortably do it. Press the center back pleat out flat and mark your centers. To cut the back out, lay your shirt out with the center back becoming the fold of the fabric. For the front, lay the shirt front out flat and put the skirt on top. I placed the shirt front pocket in a good place on the skirt front and cut off the bottom of the shirt to make the skirt as long as possible. Ta-da!

Related: