
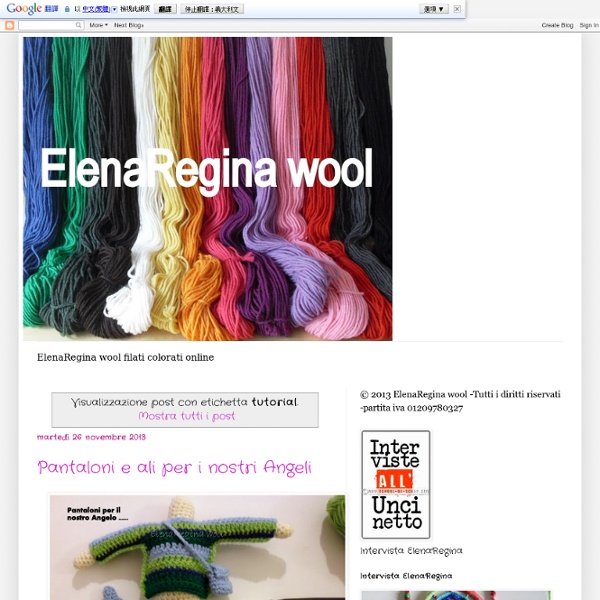
شركة مكافحة حشرات بالرياض (للايجار) رش الصراصير البق النمل الابيض شركة مكافحة حشرات بالرياض (للايجار) رش الصراصير البق النمل الابيض العته إن شركة مكافحة حشرات بالرياض هي من افضل شركات مكافحة الحشرات في الرياض لذلك إن اردتم الاعتماد على شركة متميزة في مجال القضاء على الحشرات بشكل كلي إليكم شركة رش مبيدات حشرية بالرياض حيث أن الشركة هي افضل شركة رش مبيدات بالرياض فهي من أحد شركات رش حشرات البق و الصراصير والنمل الابيض و العته المتميزة والمعتمدة افضل شركة مكافحة حشرات بالرياض شركة مكافحة حشرات بالرياض هي من ضمن الشركات التي تقوم بالعمل على القضاء الكلي على الحشرات لذلك فإن شركة مكافحة حشرات بالرياض تقوم بالعمل على القضاء الكلي على كافة انواع الحشرات لذلك فإن شركة مكافحة حشرات بالرياض تقوم بالعمل على ما يلي تعمل شركة مكافحة حشرات بالرياض على العمل على القضاء الكلي على كل من النمل الأبيض والصراصير والعته وغيرها من الحشراتكما أن الشركة تقوم بالعمل على استخدام مواد مبيدات فعالة للقضاء على اي نوع من أنواع الحشراتهذا بالإضافة إلى أن الشركة تمتلك الكثير من الأجهزة والمعدات المتميزة في مجال القضاء على الحشرات شركات مكافحة حشرات بالرياض شركات رش حشرات بالرياض
شركة نقل عفش بالرياض (للايجار) شركات فك نقل تغليف تركيب اثاث الرياض مرحبا بكم في شركات نقل عفش بالرياض لتخزين ونقل وتركيب وفك الاثاث مع حمايته من أي خدوش أو تكسير فإن الشركة واحدة من افضل شركات نقل اثاث بالرياض التي تسعى دائما لإرضاء العميل فنحن نعمل في شركة نقل عفش بالرياض على تخزين العفش في مخازن امنه فإن شركة نقل اثاث بالرياض رخيصة عن باقية الشركات الأخرى مع تقديم احسن الخدمات بالإضافة إلى فريق من العمال المدربون على أحدث طرق فك وتركيب ونقل وتخزين العفش افضل شركة نقل عفش بالرياض مع الفك والتركيب شركة نقل اثاث بالرياض شركات نقل عفش بالرياض تمتاز بالأمانة والمصداقية في جودة العمل والوقت ايضا فإن الشركة تتمتع بالنجاح والتفوق وهذا النجاح لا بد له من وجود اسباب حتى تدعم هذا النجاح فسنذكر بعض هذه الأسباب في مقتطفات ومنها إذا وداعا للقلق مع التعامل مع شركة نقل عفش بالرياض فهي شركة موفره لجميع الخدمات وذلك بمقابل أسعار رمزية تتناسب مع جميع فئات وطبقات المجتمع شركة نقل وتغليف الاثاث بالرياض شركة نقل وتغليف الاثاث بالرياض مفضلة عن باقي الشركات ولماذا هي مفضلة عن باقي الشركات ؟ نقل عفش بالرياض شركة نقل عفش بالرياض تمتلك الخبرة في نقل كافة أنواع الاثاث فمن خدمات الشركة
Top Ed-Tech Trends of 2012: The Platforming of Education Part 8 of my Top Ed-Tech Trends of 2012 series An Introductory Sidenote In late 2007, Web browser pioneer, entrepreneur, and now venture capitalist Marc Andreessen wrote a really great blog post about Internet platforms. When I decided I’d write about education platforms as one of my Top Ed-Tech Trends, I immediately searched for it. I had only a vague recollection of what Andreessen had written. Slight problem: some time in 2009, Andreessen deleted most of his blog posts, including that one. So a shout-out of thanks here to the folks who archived much of the site. Defining the Education Platform We throw the term “platform” around a lot in tech-speak, using it to refer to everything from software to hardware, from applications to operating systems, from websites to the Web and the Internet itself. Marc Andreesen offered a good definition of platforms in a 2007 post titled “The Three Kinds of Platforms You Meet on the Internet”: Education APIs As I wrote about APIs back in April, that means
شركة مكافحة حشرات بالباحة (للايجار) رش مبيدات الصراصير النمل في الباحه شركة مكافحة حشرات بالباحة (للايجار) رش مبيدات الصراصير النمل في الباحه نقدم لكم افضل شركة مكافحة الحشرات بالباحة تعمل على القضاء على مشكلة انتشار الحشرات في المنزل عن طريق رش مبيدات حشرية تخلصك من وجود الصراصير وبق الفراش والنمل الابيض بشكل تام فإن كنت تريد التخلص من جميع أنواع الحشرات فكل ما عليك هو الاعتماد على افضل شركات رش مبيدات الباحه تعمل الحشرات على تشكيل خطر كبيرا على صحة جميع الأفراد حيث أن الحشرات قد تقوم بنقل الفيروسات والبكتريا لذلك فإن شركة مكافحة حشرات بالباحة هي افضل شركة تقوم بالعمل علي تقديم جميع الخدمات في هذا المجال وذلك لأن شركة رش مبيدات بالباحة تقوم بعمل مايلزم للقضاء على جميع انواع الحشرات المنزلية تسعى شركة رش حشرات بالباحة على بذل قصارى جهدها في إبادة الحشرات وذلك بالاعتماد على افضل المبيدات الحشرية المضمونة والآمنةتعمل شركة رش مبيدات حشرية في الباحه على توفير جميع الأجهزة والمعدات الحديثة والأفضل التي تستخدم في أعمال رش المبيدات تعمل شركه مكافحه بق الفراش في الباحة على توفير مواد معقمة للمفروشات والملابس والسرر والدواليب تتميز بأنها فائقة الجودة والكفاءة
Esercizi sullo studio di una funzione - Sito personale di Francesco Daddi Vai alla pagina del "Liceo xxv aprile" di Pontedera Esercizi sullo studio di una funzione razionale fratta (21/05/2012) Verifica sullo studio completo di una funzione (19/05/2012) Esercizi sullo studio di una funzione (28/04/2012) - le funzioni sono tratte dai vecchi temi di maturità scientifica Simulazione della terza prova di matematica (28/04/2012) Verifica sulla derivata prima di una funzione (11/04/2012) Verifica sullo studio di una funzione razionale fratta e sul calcolo dei limiti (10/03/2012) Esercizi sullo studio di una funzione (29/02/2012) Verifica sullo studio di una funzione e sul calcolo dei limiti (17/01/2012) Verifica sullo studio di una funzione e sul calcolo dei limiti (assenti del 17/01/2012) Verifica sul dominio di una funzione e sulle funzioni definite per casi (19/11/2011) Esercizi sul dominio di una funzione e sulle funzioni definite per casi (16/11/2011) Esercizi sul dominio di una funzione e sulle funzioni definite per casi (9/11/2011) Esercizi sui limiti (14 aprile 2010)
شركة نقل عفش بالطائف # الكوثر 0531140506 ارخص شركات نقل العفش والاثاث شركة نقل عفش بالطائف # الكوثر 0531140506 ارخص شركات نقل العفش والاثاث افضل شركة نقل عفش بالطائف افضل شركة نقل عفش رقم #1 بالطائف تقدم خدمات جيدة بخصم خاص وتوفر شركة نقل اثاث بالطائف معدات وادوات حديثة وعمالة مدربة ويتوافر بها دينا لنقل العفش كما ان ارخص شركه نقل عفش بالطائف تقدم اسعار نقل العفش في الطائف رخيصه مما يجعلنا افضل وارخص شركات نقل العفش داخل الطائف وفي الحويه كما ان ارقام شركات نقل عفش بالطائف متوفرة اتصل بنا 0531140506 📞 كما ان الشركة المسئولة عن نقل الاثاث في مدينة الطائف يجب ان يتوافر فيها عدة امور خاصة بأهالي مدينة الطائف لأن طبيعة أهل الطائف يتميزون بعدة أمور فيجب ان تتوافر مميزات في شركات نقل العفش الموجودة بالطائف لكي تستمر تلك الشركات منها ما يلي هذا وقد توفر افضل شركه نقل عفش بالطائف جميع الوسائل والإمكانيات اللازمة لعملية نقل العفش من مكان الى آخر كما اننا في ارخص شركة نقل عفش بالطائف نوفر معدات حديثة ومتطورة تسهل عملية فك وتركيب وتغليف وتحميل وايصال اثاث منزلك الى المكان المطلوب بأمان تام وبدون أي اضرار ارقام شركات نقل عفش بالطائف نقل عفش بالطائف شركة نقل اثاث بالطائف
شركة مكافحة حشرات بمحايل عسير (للايجار) رش مبيدات الصراصير النمل العته شركة مكافحة حشرات بمحايل عسير (للايجار) رش مبيدات الصراصير النمل العته نقدم لكم شركة مكافحة حشرات بمحايل عسير من أحد الشركات التي تقوم بالعمل على خدمات مكافحة الصراصير بمحايل وخدمات مكافحة النمل الابيض والفئران والبعوض ونقدم خدمات رش المبيدات بمحايل عسير وخدمات رش الارض قبل البناء باحترافية عالية ومبيدات حشرية فعالة ومضمونة وآمنة في افضل شركات مكافحة الحشرات بمحايل عسير المتخصصة افضل شركات مكافحة الحشرات بمحايل عسير شركة مكافحة حشرات بمحايل عسير هي من افضل الشركات المميزة والتي تقدم خدمات جيدة في اعمال مكافحة الحشرات في محايل عسير وخدمات رش المبيدات بمحايل عسيروخدمات مكافحة الصراصير ومكافحة البق ومكافحة النمل الابيض لذلك تقوم شركتنا بتقديم التالي شركة رش حشرات بمحايل عسير تعتبر هي الشركة الأفضل في عالم مكافحة الحشرات بمحايل عسير لذلك تقوم شركة رش المبيدات بمحايل عسير على القيام بتقديم جميع الخدمات المميزة في هذا المجال داخل المنازل والمستودعات والشركات والمكاتب شركة مكافحة الحشرات بمحايل شركة مكافحة الصراصير بمحايل عسير شركة مكافحة النمل الابيض بمحايل عسير شركة رش حشرات في محايل عسير
شركة مكافحة حشرات بالاحساء (للايجار) رش مبيدات الصراصير النمل البق نقدم افضل خدمات مكافحة الحشرات بالاحساء باقل الأسعار وافضل النتائج حيث اننا افضل شركة رش مبيدات بالاحساء نقدم خدمات مكافحة الفئران بالاحساءوخدمات مكافحة النمل الابيض في الاحساء وخدمات رش النمل الاسود وخدمات مكافحة الصراصير ومكافحة الحمام في الاحساء ولأننا ارخص شركة رش حشرات بالاحساء نقدم خدمات رش الارض قبل البناء في الأحساء بافضل المبيدات للقضاء على العثه إن وجود الحشرات في المكان الذي نعيش فيه يمثل خطورة كبيرة ولذلك كان من الضروري التخلص من كل الحشرات فور ظهورها وذلك يكون عن طريق أفضل شركة مكافحة حشرات بالاحساء حيث أن تلك الشركة هي شركة مكافحة حشرات بالاحساء فهي الشركة التي تعمل على مكافحة الحشرات تماما واليكم بعض الطرق تقوم الشركة بالعمل على استخدام مبيدات ذات فاعلية وقوة على الحشراتكما تعمل الشركة على استخدام أجهزة وآلات حديثة تساعدها في القضاء على جميع الحشراتوالأهم من ذلك كله هو جودة وكفاءة المبيدات المستخدمة في الشركة افضل شركة مكافحة حشرات ورش مبيدات بالاحساء شركات مكافحة الحشرات بالاحساء شركة مكافحة الفئران بالاحساء شركة مكافحة النمل الأبيض بالاحساء شركة مكافحة الصراصير بالاحساء
شركة مكافحة حشرات بجازان (للايجار) رش مبيدات النمل الابيض والصراصير شركة مكافحة حشرات بجازان هي شركة مميزة تقدم خدمات مكافحة النمل الابيض وخدمات مكافحه صراصير والقضاء على الأرضة لذلك فإن شركة مكافحة بق الفراش بجازان هي افضل شركة مكافحة حشرات بجازان والتي تقوم بالعمل على تقديم جميع خدمات رش مبيدات جازان ورش الارض قبل البناء ونعتبر افضل شركة مكافحة حشرات بجازان نقدم خدمات بالضمان افضل شركة مكافحة حشرات ورش مبيدات بجازان شركة مكافحة حشرات بجازان هي تلك الشركة التي تعمل على مكافحة جميع أنواع الحشرات ومساعدة سيادتكم في التخلص من أي نوع من الحشرات في منازلكم لذلك فإن شركة مكافحة الحشرات بجازان هي الشركة الأفضل من بين باقي شركات رش المبيدات بجازان لأن شركتنا تقدم خدمات جيدة ومضمونة وتعمل على تعمل الشركة على تقديم خدمات مكافحة الحشرات عن طريق استخدام افضل المبيدات القوية والفعالةكما أن شركه مكافحه الحشرات بجازان تقوم بالعمل على تقديم خدمة رش المبيدات عديمة الرائحة لكي نرفع عن العميل تكاليف البحث عن مكان آخر للجلوس فيه بعد رش المبيد في المنزلهذا بالإضافة إلى أننا في شركه رش مبيدات بجازان نعطي للعميل ضمان كتابي بمدة متفق عليها نضمن فيها عدم ظهور الحشرات في المنزل
شركة تعقيم بجدة - 0548212258 #خدماتي# شركات تعقيم من كورونا بجده شركة تعقيم بجدة هي الشركة الرائدة في مجال التعقيم من كورونا بجده وجميع الخدمات المنزلية فهي شركة متخصصة في خدمات التعقيم والنظافة لذلك فإنها الشركة الأولى في مجال تعقيم المساجد من كورونا بجدة لذلك فإن شركة تعقيم بجدة هي الشركة المتخصصة بخدمات تعقيم المنازل والمساجد والمكاتب والفلل والشركات بافضل واقوى مواد التعقيم التي تقضي على الفيروسات المستحدثة بنسبة 100% To contact us, click here📞 شركة تعقيم بجدة هي شركة تقوم بالقضاء على الجراثيم وجميع الفيروسات وذلك لحمايتك وأسرتك من جميع الأمراض لذلك تمتاز الشركة بما يلي تقوم الشركة باستخدام أفضل المعدات الحديثة للعمل على تعقيم المكانتضم الشركة أفضل فريق عمل مدرب وذلك للتعامل مع المعدات الحديثةكما تقوم الشركة بتقديم أفضل الأسعار شركة تعقيم بجدة هي الشركة الأفضل والتي تقوم بتقديم خدمات تعقيم شاملة وذلك للتخلص من كافة الفيروسات والجراثيم افضل شركة تعقيم منازل بجدة شركة تعقيم بجده شركة تعقيم عند ما نريد القيام بتعقيم مكان ما فإنك حتما ستجد أنك تريد الاعتماد على شركة تعقيم وذلك يكون لأسباب كثيرة ومن تلك الأسباب ما يلي شركات تعقيم بجدة شركة تعقيم منازل بجده