background preloader

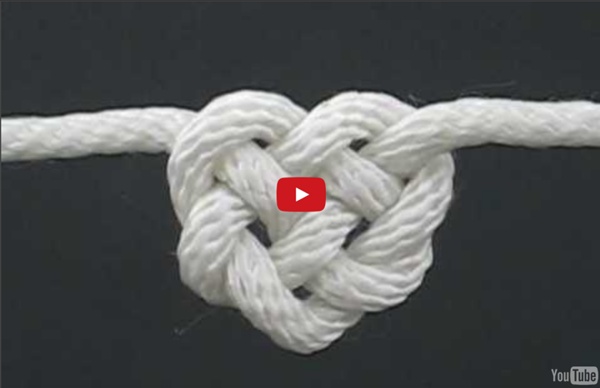
How to Tie the Celtic Heart Knot by TIAT (A Knotty Valentine)

How to Tie the Celtic Heart Knot by TIAT (A Knotty Valentine)

Moda Custom: BRINCO DE PAETÊS (OU LANTEJOULAS) Com certeza você já deve ter visto alguma peça da coleção Paetês da Vivara. Eu achei o máximo. Claro que eu queria um brinco desses de ouro maravilhoooso, mas ouvi dizer que o par de brinco que é só uma lantejoulinha (ou paetê, é a mesma coisa) no pino custa R$ 650,00. Resolvi fazer minha versão baratinha e improvisada da peça. Quer fazer também? - um par de base/pinos de brinco - um retalho de cetim dourado - paetês (ou lantejoulas) - missangas ou quebradilhos - linha e agulha - tesoura e isqueiro - cola para bijuteria

Eisbrecher Spiele | Ice-breaker Spiele Quelle: www.Praxis-Jugendarbeit.de | 2500 Spiele, Andachten und Ideen für die Kinder- und Jugendarbeitnur für den privaten Gebrauch | Eine Veröffentlichung - egal wo - ist ohne unsere Zustimmung nicht erlaubt. Icebreaker-Spiele (Eisbrecher-Spiele) sind keine reinen Kennenlernspiele – eher Spiele um miteinander warm zu werden. Deshalb auch manchmal als warming up genannt. Es steht der Fun im Vordergrund. Manche Spiele eignen sich auch direkt als Partyspiele, die während einer Feier zwischen der Musik immer mal wieder eingeschoben werden können. Neue Leute kennen lernen, miteinander warm werden, eine echte Gemeinschaft bilden – das sind die primären Ziele vieler Kinder und Jugendlicher, wenn sie in eine Gruppenstunde gehen oder die Termine der Jungschar besuchen. Dazu braucht es nicht viele Hilfsmittel und Materialien. Der spielpädagogische Hintergrund liegt bei Icebreaker Spielen geradezu auf der Hand. Das Affe-Mann-Mädchen Spiel Das Spiel geht analog dem Spiel Stein-Schere-Papier.

Cut it out!! ......canvas tutorial I love a wall I can read! Take your favorite quotes and put them up on the walls with this easy, inexpensive idea! Supplies: Canvas (found mine at Hobby Lobby in a 2 pack for $7.99) Fabric contact paper spray paint staple gun printer and exacto knife or a cricut machine Step 1: Cover your canvas in the fabric you selected and secure it with a staple gun on the backside of the wood frame. Step 2: Using contact paper cut out the letters of your saying on a circut machine. Position the letters on the canvas. Step 3: When all the letters have been placed, spray a thick layer of spray paint over the entire canvas. Step 4: When it is dry, peel the letters off. Hang it on your wall and enjoy! another design option: Instead of covering the canvas with fabric, just place your letters onto the canvas, spray and peel. **edited to add: I get several emails asking about how to get the letters to stick better and prevent the paint from bleeding underneath.

Como fazer colar gola No começo do ano mostrei aqui no blog um maxi colar bordado que fiz, como recebi alguns e-mails elogiando resolvi fazer um outro colar, o tal do colar gola. Para quem não curtia muito aqueles colares enormes, colar gola é uma boa opção! É um acessório muito bonito, valoriza qualquer look e, embora seja algo que chame atenção, é bem feminino e alguns modelos são muito discretos. Bom, a montagem acima é o passo a passo da montagem do colar que eu fiz. Comentários comentários

Joghurtbombe (Rezept mit Bild) von victoria1033 das beste Dessert der Welt perfekt! sehr gut gut geht so schlecht sehr schlecht Vielen Dank für Ihre Bewertung! Sie haben dieses Bild bereits bewertet! Zutaten Zubereitung Arbeitszeit: ca. 15 Min. Joghurt, Zucker und Vanillezucker in eine Schüssel geben und miteinander verrühren. Die Masse vor dem Verzehr aus dem Sieb auf eine Platte stürzen und mit Früchten umlegen, und diese - wenn nötig - leicht mit Zucker nach Bedarf süßen. Tipp: Sehr gut schmecken dazu angetaute TK-Beeren, rote Grütze oder frische Erdbeeren. Ein super einfaches Rezept. mit dem man bei Gästen schwer Eindruck machen kann.

DIY Stitched Hat If I had a nickel for every time my mom has warned “the sun is not your friend,” I could retire tomorrow. Honestly. Instead, my closet is full of sun hats, fedoras, cowboy hats, visors, and various other sun shielding apparati. While it may not suffice as an alternative to sunscreen, kudos to Lola Ehrlich for transforming a simple straw hat into a chic stitched fedora and inspiring us to add a little pizzaz to one of our many hats! Supplies List Start by cutting the ribbon or band off the hat. Pull the thread through the back side of the hat, leaving an inch of slack. Using the brim as a guide, start stitching along the edge of the hat. Pick another color and stitch several rows along the band of the hat. Give it some character by adding a little something along the band . . . why not? Your stitched fedora is finished! (top photo from here, rest of images by Honestly…WTF)

Blog da Tammy: Como faz?: Destroyed Jeans Sempre na moda, não importa se é inverno ou verão, o shortjeans é sempre hit!E nesse verão não vai ser diferente!Por isso, vou ensinar como eu fiz o meu shortsurradinho,que particularmente, é o meu modelo favorito e combina com tudo. Vamos lá? Eu usei uma calça jeans antiga do meu irmão, porque gosto dos shorts mais larguinhos.Você pode usar uma calça jeans antiga, sua ou da sua mãe, mas se quiser um visual mais boyfriend , pode compra uma masculina bem baratinha na C&A ou Renner.É só clicar nas fotos que elas aumentam. 1. 2. Foto ampliada dos cortes. 3. 4.QUARTO PASSO:Faça o mesmo processo na barra do short.Cuidado para não fazer muito próximo do fim da barra, porque corre o risco de arrebentar os fios brancos com o tempo.Se você puxar os fios que ficam soltos na barra, eles vão começar a desfiar o que também cria um efeito muito legal, e impede que o short desfie mais do que o previsto. Use o estilete para criar pequenos rasquinhos nas laterais do short e na braguilha. Gostaram do post?

Khan Academy love note pillow tutorial Before I moved from Oregon to San Diego to be near my boyfriend (my now husband) we maintained a long distance relationship. A big part of that relationship was writing letters, email and LOTS of little love notes sent back and forth. We both saved all those letters and notes and once in while we will pull them out, spend time shaking our heads and laughing while reading them- so naive and silly we were! For a while I've wanted to do something creative with some of those notes and came up with the most simple idea to make little love note pillows. FYI- I am OBSESSED with pillows and believe that you can never have too many around the house (they are EVERYWHERE) so adding a few more to the collection is always a good thing. I started by selecting a couple of notes and letters that I scanned. Or they could be photographed I pulled the documents over to Photoshop and adjusted the brightness and contrast- this could really be done in any photo editing program. I printed it out. Next I cut it out

Abstract Wallpapers HD for Desktop Backgrounds WallpapeprsCraft butterflies, neon, light neon, butterfly, light light, color, pattern abstraction, light, shine light, beam, curve line neon, butterflies, abstract fractal, patterns, lines line, arc, curve abstraction, painting, girl feathers, flower, petals circles, neon, light abstract, wave, gold black, white, abstract space, IOS 7, abstraction line, bending, 3D Tiny Polaroid Magnets | { Ambrosia Girl } Hi there! It’s felt like forever since I’ve last blogged, and has felt like an eternity since I’ve done anything crafty and nifty. Since my morning sickness has gone into full speed (yes, we’re expecting our third this fall!) I came across these DIY Pantone chip magnets on How About Orange and wanted to do something similar. You will need: Cardboard (mine was the backing of a sketchbook — much thicker than the back of a regular spiral bound notebook) or 2-3 sheets of white cardstock or poster board spray-mounted together to use as a sturdy backing to the magnetsOpaque white marker (necessary only if your cardboard is not white) Craft knife Metal straight edge/ruler Clear packing tape or frisk film. Step 1: Download a Photoshop file of the Polaroid frames below. Step 2: Print out photos onto photo paper. Step 3: Spray the back of your sheet of photos and also the cardboard with spray mount. Step 4: Trim out photos with craft knife. 487 Comments

Una festa di carta Proprio ieri vi avevo detto che le decorazioni per le nostre feste dovrebbero essere facili da fare, belle e perchè no, anche economiche. Vi propongo oggi una selezione di foto che vi aiutano a creare una festa a tema facilmente, non trascurando il particolare ma risparmiando! Come? Usando della semplice carta crespa!Dall'invito, alle decorazioni, e perche no anche per vivacizzare un concktail o un dolcetto.Basta poco davvero, solo delle forbici e voglia di fare.Perchè se è vero che alcuni compleanni a tema che vi ho mostrato possono essere costosi da realizzare, vi do ragione, ma ci sono tanti modi per creare cose belle e non esagerare col budget! Ecco la carta crespa cucita che diventa una splendida ghirlanda o il decoro di un piccolo invito che possiamo fare in casa noi stesse semplicemente cucendo fari strati di carta tagliata nel senso della lunghezza per creare un effetto festone. E ovviamente cappellini e ghiralnde appese qua e la! Infine una bel fiore di carta per il cake topper!

the haystack needle: simple gift wrap I love any reason to pull out my collection of rubber stamps, and I'll never tire of seeing ways to wrap presents with a simple, stylish edge. This gift wrap inspiration comes by way of my friend and wedding photographer Charlotte Jenks Lewis. I love how she created a modern handmade look for wrapping gifts that's also personalized. And with this idea, you can skip the gift tags and splurge on some pretty ribbon instead. If you're on the hunt for alphabet stamps, I spotted an amazing antique set of stamps over in Pretty Tape's shop. ps. (photographs by charlotte jenks lewis)

Related: