background preloader

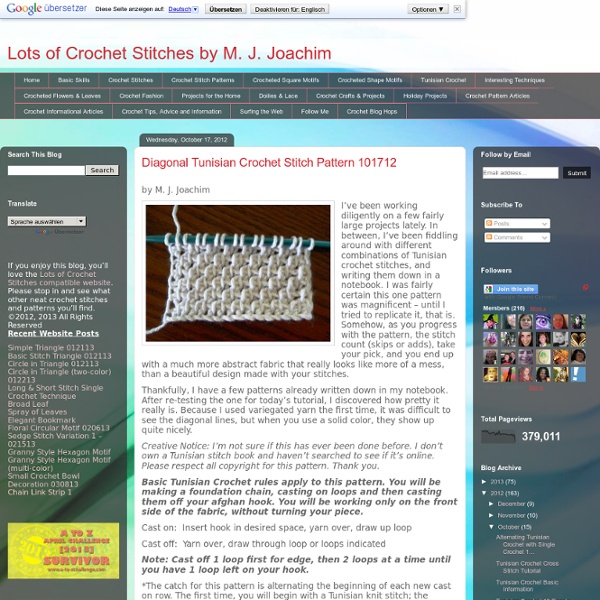
Diagonal Tunisian Crochet Stitch Pattern 101712

Diagonal Tunisian Crochet Stitch Pattern 101712
by M. J. Joachim I’ve been working diligently on a few fairly large projects lately. In between, I’ve been fiddling around with different combinations of Tunisian crochet stitches, and writing them down in a notebook. I was fairly certain this one pattern was magnificent – until I tried to replicate it, that is. Thankfully, I have a few patterns already written down in my notebook. Creative Notice: I’m not sure if this has ever been done before. Basic Tunisian Crochet rules apply to this pattern. Cast on: Insert hook in desired space, yarn over, draw up loop Cast off: Yarn over, draw through loop or loops indicated Note: Cast off 1 loop first for edge, then 2 loops at a time until you have 1 loop left on your hook. *The catch for this pattern is alternating the beginning of each new cast on row. You might think of it as pairs of rows to make this easier: Row A: Tunisian knit stitch first, then horizontal bar Row B: Cast off Row C: Horizontal bar stitch first, then Tunisian knit stitch

Narcissus Lace Tunisian Stitch To make the Narcissus Lace Tunisian Stitch, you’ll need to get your long afghan hook and make a foundation chain with a multiple of 4 stitches. Step 1: Insert hook in 2nd chain from hook; yarn over, draw up a loop {Repeat Step 1 across row, keeping all loops on your hook.} Step 2: Yarn over, draw through 2 loops on your hook; *chain 4, draw through 5 loops on your hook {Repeat Step 2 from * across row until you have 3 loops remaining on your hook. Chain 3, draw through 3 loops.} Step 3: Chain 1, insert hook in next 3 chain stitches and in each chain stitch in each loop of chain 4.

Urban Shells pattern by Katherine Crombie Urban Shells is a quick and easy scarf that is lacy enough to be feminine. Ridges created by post stitches add an interesting and stylish dimension. The two row repeat is easily memorized, but interesting enough to keep you engaged until you finish. I have also designed a matching beanie: Urban Shells Beanie The pattern is in US terminology. I used 300 yards of a DK weight yarn, but the pattern will easily lend itself to other yarn weights. To increase or decrease the width of this scarf, make sure the starting chain is a multiple of 12 + 2 Any item that you make from this pattern is yours to do with what you please, including selling, so long as you do not claim credit for the design. If you do make items from this pattern to sell, I would like the pattern to be referenced - it stops people thinking you’re using it without permission and it’s handy for referral purposes - also, it’s good manners!

Paradie du crochet - Le crochet tunisien | korie.artblog.fr Le Crochet tunisien , la technique Le crochet tunisien ressemble beaucoup au tricot réalisé avec des aiguilles. On l'exécute avec un crochet trés long destiné à recevoir toutes les mailles d'un rang, muni à un bout du crochet traditionnel, et à l'autre d'une boule (comme sur une aiguille à tricoter) pour éviter que les mailles glissent du crochet. La technique Le crochet tunisien s'effectue toujours à l'endroit, en travaillant de droite à gauche à l'aller pour monter les mailles et de gauche à droite au retour pour les couler. Chainette: monter une chainette avec le nombre de ml nécessaires à l'ouvrage. 1er rang aller: Piquer le crochet dans une maille,Faire un jeté,Ramener une boucle que l'on conserve sur le crochet,Procéder ainsi pour l'ensemble des mailles présentes sur la chainette de base. 1er rang retour: Faire 1ml et un jeté,Passer le jeté au travers de 2 boucles,Faire un autre jeté et poursuivre jusqu'à la fin du rang. Bon Crochet :

Afton's Afghan ---Revised--- Jan. 8 2013 I made a video tutorial and posted it on Youtube It's my first video tutorial so be patient :) ----Revised---- Aug 28 2012 This is the Blanket Grandma Turner (Tyson's Grandma) made for Afton when she was born. Yes, it would have been easier to just ask for the pattern but it was fun trying to figure it out on my own. Well, I finally did it so I thought I would share because it really is one of the neatest patterns I have ever seen. So I kind of came up with a pattern but it was kind of hard to explain so I decided to do a picture tutorial. This is the actual pattern I came up with: Here's the revised version to try and make it easier to follow Grandma's 3D Baby Afghan Hook Size H Lion Brand Pound of Love: pastel Pink Row 2: ch 3 (does NOT count as dc), 3 dc in next dc. Repeat row three until desired length Last row: ch 3, (dc in next 3 dc, dc in ch 3 sp ) repeat to the end of the row. Photo Tutorial: Ch 3.

Free Photos - Free Images | Stockvault.net - Free Stock Photos Meladora Mesh Stitch - Meladora's Creations Free Crochet Patterns & Tutorials If you haven't subscribed to my video tutorials on YouTube yet please click the subscribe button below Starting the mesh If your working in the round, DC into first st and ch 1, sk a st, dc and ch 1, sk a st (repeat til end of round) If your working in rows, then you will want to skip the first 4 chains and DC in 5th chain from hook. Round 2 Working in the stitches one row below This row we will still be working on the previous row, but now you'll be working the stitches in between. If your working in the round, DC into the skipped st one row down. If your working in a row, turn and DC into the first stitch, which is the top of the previous rows DC, you are creating a side border to make sure your projects stays straight, always DC your very last and very first stitch. As you can see below in the picture, the middle stitch. If your working in rows, then you will want to skip the first 4 chains and DC in 5th chain from hookAs you can see below in the picture, the middle stitch.

La technique du crochet à la fourche Maille de base : Faire une boucle et la placer à l'intérieur de la fourche, piquer le crochet dans la boucle, faire un jeté et 1ml,1er rang : Faire pivoter la fourche d'un demi tour, passer le crochet sous la boucle et faire une ms, Reprendre au 1er rang autant de fois que nécessaire. Arête double : Maille de base : Faire une boucle et la placer à l'intérieur de la fourche, piquer le crochet dans la boucle, faire un jeté et 1ml,1er rang : Faire pivoter la fourche d'un demi tour, passer le crochet sous la boucle et faire 2 ms, Reprendre au 1er rang autant de fois que nécessaire. Arête en bride : Maille de base : Faire une boucle et la placer à l'intérieur de la fourche, piquer le crochet dans la boucle, faire un jeté et 1ml,1er rang : Faire pivoter la fourche d'un demi tour, passer le crochet sous la boucle et faire 3bs, Reprendre au 1er rang autant de fois que nécessaire. Page

Daisy Crochet Stitch The daisy crochet stitch is a fun and versatile stitch that works up fairly quickly. I’ve made dainty, but very durable, kitchen washcloths with it; I’ve also combined it with the Tunisian stitch to make a winter vest. The daisy crochet stitch would be an excellent choice for baby items, perhaps a charming bib and bonnet set, or soft and cuddly blanket. Once you get the rhythm down, it’s almost as easy as making single crochet stitches, only with a lot more detail and some very fancy stitchery. Foundation Row: Make an uneven number of chain stitches Right Side (1st Row) Step 1: Skip the first chain; draw up a loop in each of the next 4 chain stitches, keeping all 5 loops on hook Step 2: Yarn over, draw through all 5 loops on hook Step 3: Chain 1, draw up a loop from the center of the previous daisy stitch you just made Step 4: Draw up a loop from the last vertical stitch of the previous daisy stitch you just made, and from the next 2 chains (5 loops on hook) Wrong Side (2nd Row)

Tricothèque Bienvenue dans la TRICOTHÈQUE Des modèles inédits, une sélection parmi les modèles les plus populaires de nos collections précédentes, dont vous pouvez télécharger gratuitement les fiches explications.C'est cela, la Tricothèque ! Note : certains coloris de fil à tricoter mentionnés dans les explications des plus anciens modèles présentés ici ne sont plus forcément disponibles à la vente. Vous aurez probablement besoin d'un programme spécifique pour pouvoir lire les fichiers au format PDF.

Holding Hands, Feeding Ducks pattern This is a scarf based on star stitch.The name comes from a song by The Brunettes. “Holding hands, feeding ducksWhen I met you, that's what I wanted to do” Yarn: Handpaintedyarn Colonia 140 or other thick-and-thin aran weight yarn, around 1.5 - 2 100-gram skeins. Needle size: US 10.5 / 6.5 mm Gauge: Doesn't really matter. Abbreviations:RS: right sideMS: make star--purl three stitches together but leave the stitches on the left needle. Star stitch:Multiple of 4 stitches + 1 (i.e. 17, 21, 25, 29...)Row 1 (RS): Knit all stitchesRow 2: P1, (MS, P1) repeat to endRow 3: KnitRow 4: P3, MS, (P1, MS) repeat to last 3 stitches, P3Repeat these 4 rows. Scarf Pattern:Cast on 25 stitches (or other multiple of 4 stitches +1) and work in star stitch till desired length.Long tail cast on counts as the first knit row (otherwise there is a purl ridge at the edge).Bind off on RS.

Related: