
Une touche de peps pour mon sweat gris A la base un sweat tout gris et une fille qui avait envie de peps...sûrement l'arrivée du printemps! Ce sweat gris je l'adore! Je l'avais acheté chez Petit Bateau il y a deux saisons et j'avais trouvé original le fait que la face envers du sweat soit jaune citron...mais comme il n'y a aucun rappel de couleur sur l'endroit du sweat je suis bien la seule à connaitre cette petite fantaisie, une fois porté on ne voit plus qu'un sweat tout gris!!!! Alors j'ai eu une idée...lumineuse je ne sais pas ...mais fluo en tout cas! Ça change tout! Cette customisation toute simple peut être réalisée sur n'importe quel sweat ou pull! A vos ciseaux! TUTO: Comment transformer son sweat shirt avec une patte de boutonnage Il faut: 1 sweat-shirt10 cm de tissu de couleur contrastée (coton MT)toile thermocollanteun kit de pressions 1- Marquer le centre milieu dos du sweat à l'aide d'épingles et mesurer précisément la hauteur du sweat pour calculer la longueur de la patte.
Enfin mon mien !! Et le tutoriel du sarouel hydride super facile ! Et voici donc le troisième du nom, et son tuto (tutoriel et patron super simple du sarouel pour la créa, et pour les attaches, pas forcément intuitives la première fois) Bon alors, pour commencer, QuéZaCo ? Il s'agit tout simplement d'un grand rectangle de tissu (pour moi T.36: 72x150 cm + 4 liens aux extrémités - 50 cm pour chacun: sergé, biais, ruban ou autres...). A vous de lui faire la ceinture de votre choix (ou pas) et les déco qui vous plaisent :o) Ci-dessus, une pintade qui essaye de le tenir pour vous montrer alors qu'il y a du vent Avant le tuto pour les attaches, un grand merci à ma copine Pam pour le tuyau de ce sarouel qui est vraiment une chouette idée ! Pour le porter, 2 options : 1. On place le coté "dos" et on l'attache sur le devant de la taille: On remonte ensuite le devant et on l'attache au niveau de la taille, dans le dos: Et voila le sarouel qui déchire tout ! Celui là c'est enfin MON MIEN (enfin!!!!!) 2. (ça marche mieux sur de "vraies" poitrines ;o) )
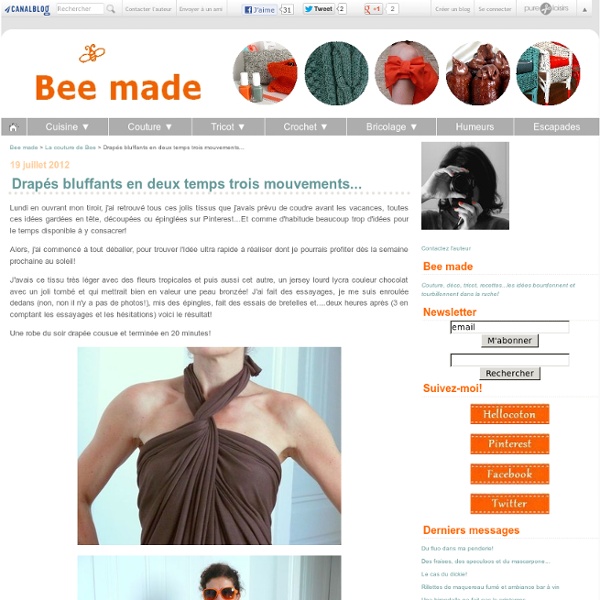
rostitchery: convertible/infinity dress (this post was originally published on 29 june, 2006, with the title "one seam convertible dress".) have a question? please visit the convertible dress FAQ's. have you made a convertible dress? do you want to see other convertible dresses, share ideas on how to make them, and find ways to make your convertible dress even better? then hop over to flikr and join the convertible dress group! PLEASE NOTE: the instructions for making this dress are available for free but are not to be used for commercial purposes. please do not sell dresses made using these instructions, and do not make copies of the instructions without asking my permission first. thank you! but the version i liked best was the one by monif c., a plus-size designer who makes AMAZING clothes that non-plus size girls can envy. and here, without further ado, is how to make this variation, using ONE SEAM: this is the one and only seam. when the dress is done, it will look like this (that's a 60" measuring tape on the strap):
The "Winter Is Coming" Maxi Dress I know, I know, this dress doesn't look suitable for winter at all. But those little white and silver flecks and the swirling grays, don't they make you think of snow flurries? Okay, obviously I don't know anything about snow. Actually, I don't know much about Game of Thrones, either, since I've never felt motivated to pick up a notoriously violent, plays-with-your-emotions-by-killing-everyone-you-care-about-in-an-astoundingly-Joss-Whedonesque way, still unfinished fantasy series, but I do know the phrase "winter is coming" is the motto of House Stark. And somehow there are wolves and Daenerys is the queen of dragons. Yup, that pretty much sums up what I know. I liked that it was totally something one could wear today, and in a jersey to boot! Here's how I made the pattern: After cutting and sewing my dress, I did still have to make tweaks to get the exact fit that I wanted, but the diagram above is a good starting point.
Vacances romaines Coût : 22€ env Fournitures ? 1,50 m de popeline en 1,40 m de large ? ? ? Coupe (schèma en taille 38) ? ? et les plis se répètent, tournés vers le côté. ? ? Réalisation Surfilez sur les bords des morceaux, sauf les encolures et les emmanchures upcycle an old sweatshirt - part 1 I recently found a box of old clothes from college, 90% of which I will never wear again. I was about to throw them all in the "get rid of" box, when I realized several items could actually be reused. My little guy needs some new hats and mittens for winter, and what better material than an old sweatshirt? It's already warm and soft and stretchy! So today I'm just going to write about making the mittens - I'll post about the hats and slippers later (probably whenever I get around to finishing them... hmm...) Honestly, the hardest part of this whole project was getting my little monster to hold still enough to trace his hands. 1. I made two attempts - one with the fingers separated, outlining between each, the other more like a mitten. 2. 3. 4. (See how the base of the hand lines up with seam of the sweatshirt?) 5. 6. 7. 8. 9. I'll post about the cute hat (also made from the sweatshirt) soon!
Boho Maxi Dress: a tutorial This dress is an incredibly easy make. By now you may have realized that I'm all about the simple projects. I'm far from being a master seamstress, I just work with what I know and try to learn as I go. I've never actually owned a maxi dress before, but now I might be hooked. Want to make one too?? Materials: 1 4/5 yd Extra Stretchy Jersey Knit (60"wide) (You want a lightweight knit. 1/3 yd Trim Fabric Dye I know that there are many of you out there who have a fear of sewing with knit. A couple of things to keep in mind when sewing with knit... Let the material go at it's own pace when feeding through the machineUse a zig zag stitch or a stretch stitch. Tutorial: Fold your panel of fabric in half along the 60" side. Because it was so huge, it was difficult to get a decent pic of this step...so I drew up this nice little chart instead. Sew everywhere you see the white dashed line. After your 3 seams, turn your fabric inside out. Cut out an 8" strip at both ends for the sleeves. Dye: You'll need:
Spotted Imazu Kasia Here is my latest finished project, this time Burdastyle's pattern Kasia skirt made up in our Japanese cotton Imazu Spotted Night. The pattern is fabulous and quick to sew - with very clear instructions. I've made this up for a friends daughter who's been wanting a high waisted skirt. I made no alterations to the pattern except cutting out the 38 for the bottom half of the pattern and the 36 for the top, as the pattern measures very snug at the hip.I really love the button and gathered yoke detailing on this skirt. The only decision now is long or short for the length...what do you think?
the Circle Skirt I used to think that a gathered skirt was the easiest skirt to sew. But I may have changed my tune. A circle skirt is possibly even easier!….especially if you leave the elastic exposed. If you’ve ever made a poodle skirt before, it’s the same concept. Once you’ve created your pattern, you can whip up 4 skirts in an hour! Okay, let’s get started. What you need (for a little girl’s skirt): * about 1 yard of fabric* appx 3/4 yard of 2-inch wide elastic FABRICS to use:* Rayon* Polyester Charmuese* Simple Cotton* Thin Corduroy* Lightweight WoolMany fabrics will work for this project. ELASTIC:Wide elastic from fabric stores typically comes 2 inches or 3 inches wide; white or black in color. If you’d like to add a colorful twist to your skirt, check out our easy Tutorial for Dyeing Elastic HERE. Measure around your waist. PATTERN:This requires a bit of geometry but don’t worry, we’ll break it down for you. You need to figure out the radius so you can easily draw a circle. draw another 1/4 circle:
Princess & Dragon - Ylenia Manganelli : Cersei Lannister Gown - Costume TUTORIAL and PATTERN #3 Cersei Lannister Dress Cosplay Costume TUTORIAL and PATTERNFIRST AND SECOND SEASON Character: Cersei LannisterVersion: Long sleeves gowns, Season One and Two Cersei Lannister is my favourite character, I love her since the firs-.. ehm, I didn't like her at the beginning. I needed time to understand why she was like she was. I started making Cersei cosplays when the tv series wasn't even aired for the first time; the most of my cosplay is inspired by the Book Saga. 2/3 of Cersei's gowns is a mix between a caftan and a kimono. This is the pattern I used. Difficulty: Normal -> it assumes a fairly good knowledge of sewing MATERIALS: Silk fabric, linen or schantung silk, passementerie if needed Instructions: 1. 2. 3. 4. 5. 6. I tried to explain the best I could, I hope this makes sense to you! Here's the PATTERN of Cersei's Belt The result: