
Ein Weltraum-Sternenbild — Tutorials 1 Erstellt ein neues Dokument: 1024×768px (oder eine andere Größe – wie ihr wollt).Füllt diese Schwarz. Geht nun auf Filter / Rauschen / HSV-Rauschen und wendet die Werte am Bild an: 2 Geht nun auf Farben / Helligkeit / Kontrast und wählt -25/+55 als Werte. ihr erhaltet einige stärkere weiße Punkte auf schwarzem HG. Benennt diese Ebene “kleine Sterne”. 3 Dupliziert diese HG-Ebene nun, nennt sie “große Sterne”. Wendet erneut Helligkeit/Kontrast an: -70 / 40.Als nächstes müssen wir die Ebene doppelt so groß machen, damit die kleinen Sterne etwas an Größe gewinnen. Drückt SHIFT+T und gebt 200% Vergößerung ein. 4 Wir verstärken nun noch die Sterne: Hierzu invertieren wir erst das Bild (geht auf Farben / Invertieren) damit wir das Ergebnis besser sehen. Anschließend wählt ihr Farben / Schwellwert und drück auf “Automatisch” rechts unten im zugehörigen Dialog.
30 Best Photoshop Abstract Effect Tutorials Under Articles Sometimes, you may find it difficult to look for some of the highest quality photoshop tutorials using search engines. As most of time, almost all tutorials would label themselves to be good, high quality or even the best photoshop tutorial you can find. In order to save your time, Photoshop Lady come up with 30 Best Photoshop Abstract Effect Tutorials of All Time. Under Photoshop Tutorial, Texture & Patterns In this tutorial I will create an effect like the one in the header of the MSNBC.com website. This tutorial is about making a “mac” style background. Under Abstract Effect, Photoshop Tutorial I decided to write another one on some of the photoshop effects. This is my first tutorial in over a year and a half. This article shows you how to create a smoke effect in photoshop, and to achieve that I used a photo of smoke and some photoshop filters. This tutorial explains you how to create a energetic, vibrant, colorful wallpaper, like the ones available at Color Charge.
Karton Visitenkarte mit gerissener Banderole Karton Visitenkarte mit gerissener Banderole von Avarra Überarbeitung vom 04. Januar 2009das Original Photoshop Tutorial steht hier Das Tutorial sowie mein Material sind nicht für Kurse außerhalb dieses Forums freigegeben! In diesem Gimp Tutorials erstellen wir eine schöne Visitenkarte mit Karton-Wirkung und machen eine Banderole mit einem Effekt von gerrissenem Papier am Rand.Du lernst wie man Effekte mit Mustern erzeugt, indem man sie einfach über den Ebenenmodusverändert, wie du mit einfachen Kniffen, effektvolle Strukturen erzeugen kannst und dumachst Bekanntschaft mit den Ebeneneffekten, bzw. wie du einige Effekte selbst erstellen kannst. 1.Starte mit einem neuen Dokument, Größe: 540px × 350px. Fülle den Hintergrund mit einem Farbverlauf von #"7a93ab" nach #"c8d6e3" und zwar vonrechts nach links. Ziehe mit dem Recheck Werkzeug eine Auswahl mittig deiner Ebene. 2.Während die Auswahl noch aktiv ist gehe auf: Filter> Render>Nebel. 18.Fülle deine Auswahl mit weiß Lieben Gruß Deine
How to Install Photoshop Brushes, Styles, Shapes and Other Content There are hundreds of Web sites (including this one) offering free Photoshop brushes, layer style effects, actions, shapes, patterns, gradients, and color swatch sets. Here's what you need to do with these files to get them working in Photoshop, along with links to where you can find these free goodies. Brushes Place the *.abr files into: Program Files\Adobe\Adobe Photoshop X\Presets\Brushes where X is the version number for your version of Photoshop. Brushes created in Photoshop 7 or later will not work in earlier versions of Photoshop. From the Brushes Palette in Photoshop, click the small arrow in the upper right corner of the palette, and choose load brushes. • Free Brushes Layer Styles Place the *.asl files into: Program Files\Adobe\Adobe Photoshop X\Presets\Styles where X is the version number for your version of Photoshop. • Free Layer Styles Shapes • Free Shapes Patterns • Free Patterns Gradients • Free Gradients Color Swatches Actions • Free Actions Zip Files Questions?
Tutorial Carbon Muster mit Gimp erstellen … die Inhalte von PSD-Tutorials.de stehen nur registrierten Mitgliedern zur Verfügung. Damit wollen wir den Communitygedanken weiterführen. Als Mitglied trägst du - wenn auch nur im Kleinen - zum Puls der Community bei. Und nur so ist es möglich, weiterhin hochwertige Inhalte für alle bereitzustellen. Niemand kauft gerne die Katze im Sack, auch wenn sie kostenlos ist. Achtung: Du kannst den Inhalt erst nach dem Login kommentieren. In diesem Tutorial erstellen wir ein Carbon-Muster und speichern es hinterer als GIMP-Muster (Pattern) ab. Als Vorlage dient ein englisches Tutorial, das ich ins Deutsche übersetzt habe (Quelle am Ende). Tastaturshortcuts stehen in [eckigen Klammern] Los geht's! Schritt 1: Wir erstellen ein neues Bild mit 8 * 8 Pixeln (Hintergrundfarbe ist egal - ich habe weiß genommen) ( Datei -> Neu [STRG+N]) Danach stellen wir den Zoom auf 1600% weil wir so einfach die einzelnen Pixel einfärben können. Schritt2: Wir haben jetzt unsere gezoomte Arbeitsfläche vor uns.
100 Tips about All Adobe CS4 Applications | Layers Magazine It seems like only yesterday that we were working on the “First Annual Layers 100 Hot Tips.” Now here we are three years later with our Fourth Annual installment of one of our most popular features. After all, who doesn’t love tips? Those little nuggets of wisdom that make you say, “That was really cool. I can’t wait to fire up my computer and give that one a try.” This year we decided to try something a little different. This time around we decided to go straight to the horse’s mouth: the Senior Product Managers at Adobe. Adobe Photoshop Lightroom 2 By Tom Hogarty Get smart with your collections Create a Smart Collection in the Library module to automatically gather a set of images. Quickly navigate to recently viewed folders The filmstrip at the bottom of the Lightroom interface includes a number of navigation tools that are accessible in all modules. Panels only when you want them I often hide my left and right panels in each of the modules by tapping the Tab key. Adobe Photoshop CS4
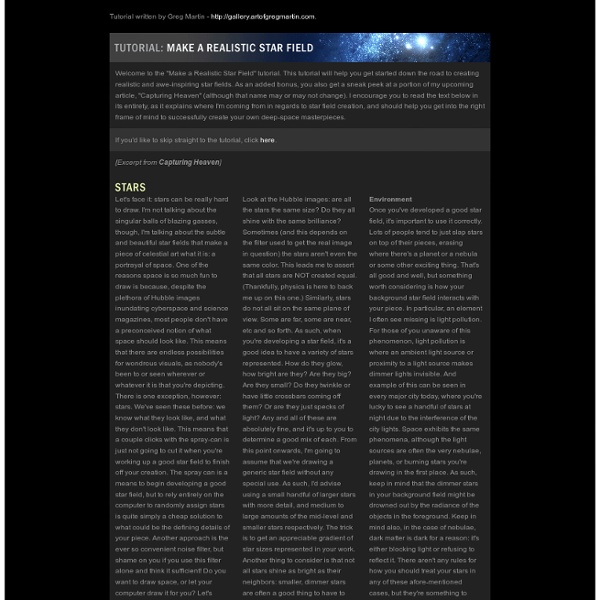
Tutorial: Sternenhimmel Anzeige von Dirk Metzmacher Wer eher selten zum Abendhimmel aufschaut, der könnte Sterne, Gasnebel und das leuchtende Band der Milchstrasse in Photoshop nur mit Hilfe einiger Filterkombinationen erzeugen. Erste Sterne Die Hintergrundebene wird mit schwarzer Farbe gefüllt, dann eine neue Ebene über »Ebene ↔ Neu ↔ Ebene durch Kopie« oder Strg+J erstellt. Diese wird über »Ebene ↔ Neu ↔ Ebene durch Kopie« oder Strg+J dupliziert und mit »Bild ↔ Anpassungen ↔ Helligkeit/Kontrast«, (Früheren Wert verwenden) und Helligkeit -40 sowie Kontrast 80 behandelt. Gröbere Sterne Die Ebene wird über Strg+J kopiert, dann über »Bearbeiten ↔ Transformieren ↔ Skalieren« oder Strg+T in der Grösse verdoppelt. Auch diese Ebene wird kopiert, dann über den »Filter ↔ Weichzeichnungsfilter ↔ Gaußscher Weichzeichner« mit einem Radius von 2 Pixel weichgezeichnet. Sternenhimmel Man könnte nun einfach mit dem Radiergummi-Werkzeug von jeder Ebene ein paar Sterne löschen. Vorbereitung der Gasnebel Gasnebel eingearbeitet
Photoshop Tips From The Pros - Outdoor Photographer How-To Tuesday, May 19, 2009 By Tim Grey There are many elements that separate the top nature photographers from hobbyists. With today’s digital tools, not only do photographers rely on a great eye, time-tested technique and quality equipment, but also on their ability to optimize images after capture using Photoshop and other tools. Jay Goodrich (www.jaygoodrich.com) is an internationally published and celebrated photographer. Jay Goodrich Color Range Selections 1 One of my favorite Photoshop tools is the Color Range selection tool. Smart Selective Sharpening2 With Smart Selective Sharpening, I utilize a layer mask to control how much to sharpen specific areas of the image. To make this work, click on the Background image layer on the Layers panel and choose Filter > Convert for Smart Filters from the menu so you can apply a filter nondestructively. If you take too much sharpening away, press X again to make white the foreground color and paint again to bring back the sharpening.
60+ Useful Photoshop Actions For Photo Enhancements | Photoshop Tutorials Each Photoshop action stores a sequential series of tasks/jobs, and by hitting the ‘play’ button you get the same effect again and again without the need to repeat steps individually. Photoshop actions are powerful and great time saver when it comes to batch photo processing. Adobe Photoshop comes with a default set of actions pre-installed that could give you a pretty good idea how thing works. In this post, we want to show you a list of 60+ Useful Photoshop Actions For Photo Enhancements. You might also be interested in these following Photoshop resources: Color Balance, Hue/Saturation Photoshop Action 2by saturn-rings Cross-Processing ATNby mutato-nomine 50 Photoshop Postwork Actionsby manicho Portrait Actions I by ver00nika Portrait Actions II by ver00nika Action Pack I by EmberGFX Actions Clyck by muffim-clyck Caitlins actionsby mumbojumbo89 Color actionsby freaky665 Color Enhancing Actions by Princess-of-Shadows Colors Actions by anaRasha-stock Cool photo effect actionby Numizmat Black & White
10 High-Quality Free Leaf Textures In this set, you’ll find 10 free and high-resolution leaf textures which can be utilized in a wide range of ways. They have a very liberal Creative Commons license so you can use them in any manner you choose, whether it’s personal or commercial. Preview You can find various sizes of each image in by clicking on its title or preview image; doing so will bring you to their own Flickr pages where you can download the texture files that interest you. Alternatively, you can browse the entire Six Revisions Leaf Textures set on Flickr. Leaf Texture 01 Leaf Texture 02 Leaf Texture 03 Leaf Texture 04 Leaf Texture 05 Leaf Texture 06 Leaf Texture 07 Leaf Texture 08 Leaf Texture 09 Leaf Texture 10 Licensing details The above works that featured here and in the Flickr Leaf Texture set are licensed under the Creative Commons license and can be used for personal and/or commercial purposes. The Creative Commons license requires you to "attribute the work in the manner specified by the author or licensor".
Massive List of 1009 Hi-Res Free Textures and Background Images | 2experts Design - Web Design and Graphic Design Blog As most of you already know that uses of textures is one of the interesting trend in modern web designs. The though of this list is to serve as a one stop solution. In this list, you’ll find 1009 variety of high quality and high resolution textures for Free! 50 Free Rusted Metal Texture Backgrounds 50+ High Resolution Textures 15 free, high resolution rough textures [postadsense] 20 free cardboard textures and objects for designers 6 High-Res Red Rocks Texture Pack 6 High-Resolution Grungy Paper Textures 7 Free High Resolution Wood Textures 20 High-Resolution Denim Textures 15 High-Resolution Grunge Textures 10 Free High Resolution Bricks Textures 10 + Free Grunge Style Rust Textures Cardboard Textures For Designers 400+ High Quality Patterns 60+ Free Textures from SXC.hu 29 Most Useful Texture Packs of 2008 40+ Beautiful Patterns and Textures 60 Impressive Free High Resolution Textures 300+ Vintage Style Textures 20 Free Hi-Res Grunge Stained Paper Textures
30+ Most Wanted Photo Manipulation Tutorials in Photoshop Part I Inspired by the 30+ Weirdest Animal Photo Manipulations, I made a list of Photoshop Tutorials for you to learn how to make your own photo manipulation. Here is a 30+ Most Wanted Photo Manipulation Tutorials in Photoshop to help you enhance more techniques on manipulating images. There will be a Part II on this showcase so make sure to watch out for it. How to Create a Flaming Photo Manipulation On this tutorial, you’ll manipulate a picture so it looks like a woman burning in flames. Alien Photo Manipulation Photoshop Tutorial Turn a woman into an alien by combining two photos. Landscape photo manipulation In this tutorial,you will learn how to create your unique wallpapers using photo manipulation.Using some images you’ll learn how to blend in different landscapes creating a surreal effect. Making of “Color Combustion” a Photo Manipulation In this Photoshop tutorial you’ll be walking through the making of a digital photo manipulation called Color Combustion. Alien Invasion Ads
Super Cool Watercolor Effect in 10 steps in Photoshop Last year I wrote a Photoshop tutorial for PSDTUTS showing how to create a very nice design using watercolor brushes. It was inspired by the work of guys such as Bruno Fujii, Margot Mace, Raphaël of My Dead Pony and Stina Person. This time I will create another effect but it will be using Masks and Watercolor brushesl; it's inspired by another great digital artist, the master Scott Hansen the mind behind ISO 50 and also some images from the Daily Inspiration. So in this tutorial we will use Photoshop, some brushes from Brusheezy and some stock photos. Step 1 Open Photoshop and create a new document, I'm using 1920x1200 pixels. Step 2 Add a new layer, fill it with white then make sure you have black and white for the foreground and background colors. Step 3 Let's add a nice texture. Place the image in the document on top of the other layers. Step 4 Now let's place an image in our document. Step 5 The image is hiding because of the mask. Step 6 Pick another Brush and paint again. Step 7 Step 8