
http://www.pickles.no/whirl-it-lampshade/2009/6/28/whirl-it-lampshade.html
Place your bets now... Who needs Vegas baby, when you've got DIY projects like this?! I did this yesterday, and now the suspense is killn' me! Once it dries completely [soon hopefully... but I can't rush it which is also killn' me] I'll deflate the ball and find out if all my hard work was worth it [or not]. And let me tell you... it was hard work. I [loosely] followed the instructions from a blog called Pickles.
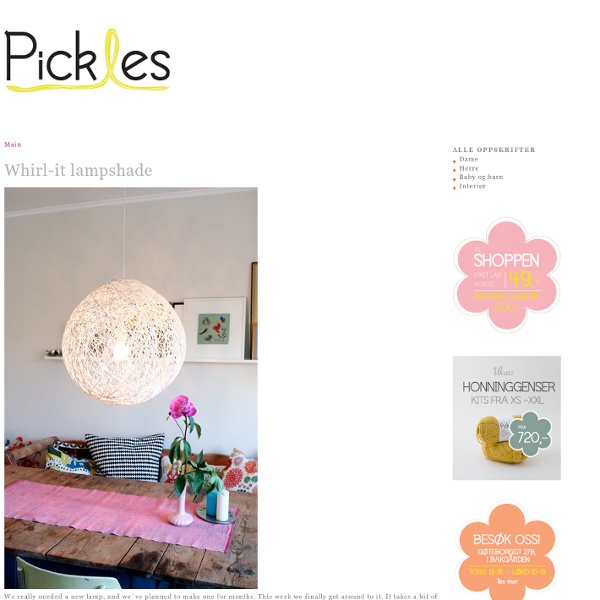
Whirl-it lampshade - free DIY tutorial We really needed a new lamp, and we´ve planned to make one for months. This week we finally got around to it. It takes a bit of different materials, but it´s really easy when you´ve started. We recommend making it outdoors, as it gets quite messy. Crafts for Men « Keywords: gift, christmas, wrapping, gift-wrap This year, I vowed to only make or buy handmade holiday gifts for my friends and family, and I've kept to it so far. But wrapping these gifts in commercial paper didn't seem to make much sense, so I wanted to create some handmade gift wrap to match. I happen to think a gift wrapped in newsprint is actually quite attractive, and love the look of text on a package, but wanted to put in a little more effort. So I came up with a cool option that's clean, masculine, and maintains the typographic look of the newsprint.
Can Lights A four dollar lamp from GW and a pineapple juice can make a simple custom lamp. Cut off the original shade with tin snip (or now that I know what I am doing, I could say dismantle the wiring and remove original shade). Using the original shade as a template, drill all appropriate holes in your can. Use a Dremel or other tool to sand off all burrs left from the can opener and drilling (you don't want the can snagging or cutting people). Spray paint the inside of the can silver (this helps hide the seam a bit and any drill marks) and spray paint the outside with hammered copper). Reassemble your lamp (I had a friend who knows wiring help me do this, if you know how to wire a lamp do it yourself or you can do like I've done in the past and bring it to a hardware store or handyman that does small repairs).
DIY Craft Project: How to craft a twine-ball light garland {As featured on Rock n Roll Bride} Time for another DIY craft project and today I’ll be showing you exactly how you can make this twine-ball light garland yourself. It’s one of those projects that’s a little bit messy and does take quite a bit of time, but it is so much fun. Plus you have a really cool piece of decor at the end of it. Perfect for parties or around the home, you can paint it up in any colour you want to match your design scheme, and when lit, it looks so pretty, casting lots of patterned twinkly light everywhere. Mine is now taking pride of place in my office.
sewing Last week it took a melt down for me to carve some time for selfish sewing. I’ve been really busy with black friday business for I Still Love Calligraphy, prepping for Alt Summit and taking care of kiddos. No complaints though!! We’re flabbergasted at how quickly the calligraphy kits sold out (buying supplies for more kits tomorrow!). Your support has made putting food on the table and a roof over our heads possible. Thank you for keeping us busy! The Queen of Creative Reuse The incandescent bulbs that shone so merrily in the Queen's palaces all her life and yours, Dear Reader, is going to be phased out by the federal government. They will eventually no longer be allowed to be sold in the United States. People will be looking for creative things to do with all those incandescent lamps (subject of a future Trashy Wench blog, I'm sure) and all the bulbs in those lamps, regardless of whether they are working or burnt out bulbs. The incandescent bulbs come in all sorts of shapes and sizes, all with wonderful curves of all shapes, sort of like the Wench and her wonderful female friends! Here are some pictures of bright ideas of what others have done with their curvy little bulbs:
5 Minute DIY: Fabric Poppy Flower Gift Toppers In the last minute craziness of finishing Gifted Magazine a few weeks ago, I completely forgot to add a note about the cover image (photo by me) and the poppy gift toppers I made for it. Oops! In any case, today I thought it would be fun to share a simple how-to with you so that you can make your own DIY Fabric Poppy Flower Gift Toppers. Crafts — Page 2 Irresistible by DaisyCrafts In Little House knitting news, I was halfway through knitting a second sock yesterday when I put down my needles and took up another set of needles. Tiny ones, size 1. DIY Glass Bubble Chandelier When we desired a new light to go over the dining table, I wasn’t thinking about making one. Then I remembered designer Jean Pelle’s instructions to make a chandelier at ReadyMade. A chandelier would be much nicer than our old light fixture. The original design for the chandelier used porcelain sockets and coiled string. We used galvanized pipe and IKEA.
How to make gift bags from newspaper When I bought something at a store recently, the clerk handed me my purchase in a bag made from a newspaper. I liked it very much and had to make some more—thus today's DIY recycled newspaper project: gift bags made from the Wall Street Journal. You can vary the dimensions, of course, but here's what I used to create a bag that's 5" tall, 4.5" wide, and 3" deep. Stack two sheets of newspaper on top of each other. This will be a two-ply bag for extra sturdiness. JUNK CAMP A picture of Ron, my UPS man, would have been a better shot. The packages laying on my front stoop will have to do. What's in them you ask? Well it is Friday, and I am scratching my head once again asking myself what in the heck happened to the week of August 4th 2008? Since I did such a lousy job of documenting my movement through out the week I decided to refer to my infamous black book. Ask anyone that knows me and they will tell you I never leave home without it.
DIY 'Light Bright' Installation from Blueprint Magazine After a series of failed baking adventures I realized it was time for me to transfer my love for YumSugar and food magazines to CasaSugar and design magazines. In the spirit of the holidays I picked a Light Bright project from this month's Blueprint magazine. I must admit, I'm a much better painter and craftswoman than I am a baker so the project was definately a confidence booster. The Blueprint picture is on the left, my replica is on the right. The Blueprint directions suggest: Start by painting a stretched canvas from an art-supply store (Blueprint used a pale-pink latex paint, I picked a light gold color because the walls of my house are all beige).