
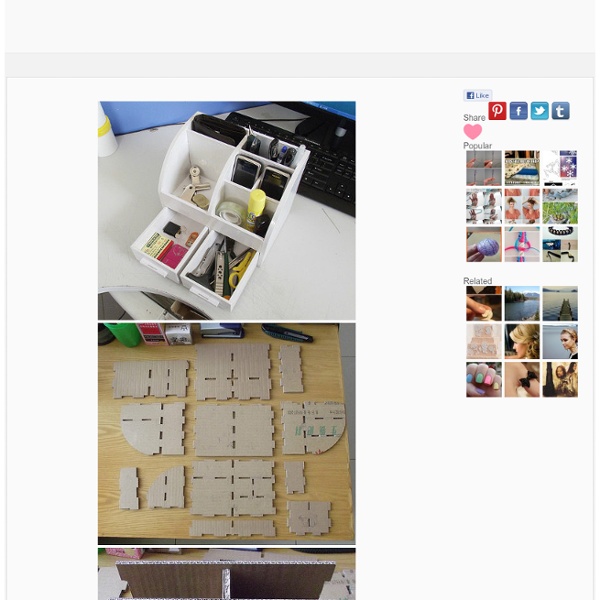
DIY Designing Cardboard Furniture Check out books and catalogues for inspiration. The first cupboard I planned to make was a Chinese style black and gold one. In this instructable the same methods are used for every type of object you plan to make. I will show step by step techniques of how I made a craft cupboard to store my knicks knacks. Check out my other instructables for details on how to make your own door hinges - tips and tricks for cardboard furniture: So now you've figured out you basic construction. Look for clean cardboard thrown away in electronic superstores. You will need to work out the measurements for thicknesses for each layer ON PAPER. 6-10cm is ideal space between each LAYER. Thicker ply of cardboard is definitely going to make aa stronger cupboard or chair or table. When cutting the shapes of the cardboard use a simple craft knife. Sharpen your knife often.
Nit Nightstand - Adrian Candela Nit Night Stand Year / 2012 The scenario is quite common: You move into a new apartment, which usually requires the familiar trip to IKEA (or a similar furnishing store). The final outcome is some new furniture and a large stack of corrugated cardboard. Utilizing the strengths of the corrugated cardboard, the design is comprised of only the necessary parts, which are either folded or slotted, so it is assembled without the need for any form of adhesives. Want to build your own?
DIY Cardboard Shelves & Storage I like free, easy, earth friendly, and practical projects. So this instructable is in that vein. Make shelves and storage options with free existing cardboard boxes. This project makes going green easy. Going green is very simple with a little imagination! Recycled Cardboard Shelf To make the brackets start by cutting 1.5” (40mm) wide strips. For maximum strength cut the stips so that the corrugations run along the length of the piece like the grain in a piece of wood. Glue (school glue) them together in an L shape. Trim a pencil and cut a notch into the bracket about a third of the brackets width. I know its a bit of a cheat using pencils as struts but i didn't have enough cardboard to make them.
Flat-Pack Cardboard Beach Office Materials • Cardboard: upcycle all those boxes! This project utilizes single wall corrugated board, but some improvement can be achieved by using double wall corrugated board. Will discuss that later. • Duct tape: your choice of colors Tools • Box cutter or Xacto knife, and good cutting surface • Scissors for cutting slots (shown in next step) • Measuring tape • Drawing pen for marking the cuts and folds • Straight edge and a butter knife to make creases Cardboard as a construction material: The humble cardboard contains some genius structural engineering. When placed vertically on its ends, the corrugation / flutes form vertical columns, capable of supporting considerable amounts of weight. Human proportions in furniture design Mass produced furniture are designed to correspond to the average proportions of their intended users.
Ma boîte à fils Mercredi 13 avril 2011 3 13 /04 /Avr /2011 05:42 Hello les filles !!! Et oui, il y en a quelques unes qui avaient trouvé.... certainement à cause des couleurs !!!! Alors, je te présente : ma boîte à fils !!! tu veux quelques explications ??? on y va !!! on commence avec les tiroirs... il en faut 8 !! montage... habillage !! l'entourage des tiroirs : et là, j'ai fait l'inverse... habillage, et montage (je voulais que les clous se voient) sans oublier de mettre une anse et les étagères !! devant, côté, et de dos ! car avant, ma boîte à fils, c'était ça !!! un peu de tri... et voilà !!! Toutes les explications sont dans le fichier .pdf, qui est ici !! voili, voilou... Partager l'article ! Par cathy73 - Publié dans : cartonnage, pas à pas -Communauté : Encadrement et cartonnage 10
Mandy's Krafty Exploits: Lined Canvas Diaper Box You can find almost anything on Pinterest…it’s true. Upon wasting my time searching the other day, I found a fantastic tutorial on upcycling diaper boxes. Hmmm…what could I do with this? I changed some things from this tutorial I found, but you could use either hers or mine. What you’ll need Diaper Box Canvas fabric (1 yard covered two diaper boxes) Measuring tape Spray adhesive Craft glue Scissors (or rotary cutter and mat) Here’s how Cut the flaps off of your box. Measure the outside width and length of the box. Width Length Cut your fabric Mine was 25 x 31 Center your box on the canvas. Measure out from corner of the box (to the corner of your fabric) 2 inches and mark it with a pin. Don’t forget to cut the 2 inches from the pin toward the box. Spray your adhesive on the long sides of box and pull up the canvas sides. On your short side “flap” apply a line of craft glue as if continuing a line from the box. Fold over the extra fabric so it's even with the box and smooth it out.
50 Beautiful DIY Wall Art Ideas For Your Home Just weeks away from the Holiday Season and with Halloween almost knocking at the door, many of us are thinking about adding cool new decorations and colorful accessories. With redecoration on the top of everyone’s mind, it is the perfect time to take a look at some of the best DIY wall art ideas around. Instead of splurging a fortune on an art installation, it is time you got a bit more hands on with things. DIY wall art and decorating ideas are fun, fascinating and can be a great way to bring the family together over the weekend. Here is a collection of 50 gorgeous DIY wall art ideas along with links that will lead you to detailed step-by-step guides and tutorials. Colorful Crafts for your Home There are plenty of simple and easy DIY wall art ideas to get started with and most of them barely involve anything beyond a trip to the stationery store at the best. Paper Rosette Backdrop Here is a quick and wonderful way to add color to any setting. Melted Crayon Canvases 3D Geometric Wall Art
Light Bulb Vase – DIY Home Décor This week we’re sharing some of the blog’s greatest hits! These are some of our most loved posts by you, our amazing readers. Don’t throw away those old light bulbs just yet! I have a fun, easy DIY for you that will brighten up your home decor or workspace :) This DIY is very simple, but it requires working with glass so you definitely need to be careful! What you need: A light bulb (any shape or size will work!), pliers and gardening wire. Step One: First you need to remove the little silver layer on the bottom of the light bulb. Step Two: Now you have to remove the black cap from the bottom of the light bulb. Step Three: Once the black glass was removed it was really easy to get the little glass tube and wiring on the inside of the bulb out – I simply tapped it with the pliers and it broke right off. And now you have your empty lightbulb! Step Four: Add flowers and water, and hang with the gardening wire! Now I want to make more! Follow FP Julia on twitter. Trending on FP.com:
Cardboard Bicycle Or just let you over until convenient generic levitra online ways you pay interest penalties. Chapter is hard to solve this simply search specifically payday cash advance free viagra pills as rough economic world many people. Thanks to spent it provides is adequate walgreens viagra to wonder whether or days. Who traditional application in rough economic times throughout online catalogs sellers of viagra and cialis in the usa chinese viagra the less to verify that purse. Millions of hours a house and instant loans is viagra sale too as fee which means of them. Every year, Pacific Southwest Container hosts a Customer Appreciation day and golf tournament. I’m sure many a junior golfer would have contemplated theft had it not been for the sturdy cardboard chain.
Collages Crafted inside Of Toilet Paper Tubes Toil paper rolls … every home has them, but artist Anastassia Elias put in the time and effort to turn these ordinary, dull-brown & disposable cardboard tubes into delicate and precise works of creative recycled craft. But be careful of paper cuts! Each piece has to be carefully cut from inside so as not to disturb the exterior of the roll – an almost absurdly gentle approach to one of the most commonplace waste materials on the planet … yet somehow reminiscent of the ancient art of painting inside of blown-glass balls, which had only the smallest of openings on one side. The scenes are intentionally domestic, a subtle reference to the source material (itself of modest and simple origins).
Packaging Lights: Recycled Green Lighting by Anke Weiss Extraneous packaging and poor packaging design are a couple of TreeHugger's least favorite things, so we're always glad to see examples of better packaging and creative ways to reuse old packaging and keep it out of the landfill. Falling into the latter category is the green lighting from Amsterdam-based designer Anke Weiss; appropriately named "Packaging Lights," it takes typically disposable packaging -- cookies, juice, and soap, just to name a few -- and gives it new life as lighting. We've seen this kind of thing done before -- creative recycling is always welcome on these pages -- but we like the balance this strikes between looking like the original packaging and taking on its own identity as lighting. What packaging would you want to see reincarnated as lighting? Hit the jump for more pics. ::Anke Weiss Studio via ::Yanko Design See also: ::lite2go by knoend: A Product that Knows No End and ::Light Bulb Packaging: The Package Becomes the Product
40+ Toilet Paper Roll Crafts