
3D Scanner: FabScan Pi There are several way to build an affordable 3D scanner for your home. One way is to make photos (maybe even automatisied) from all sides of an object and let Autodesk 123D Catch do its magic. Another option is to use a depth camera like the Kinect and place your object on a rotating table and get depth images of all sides - great especially for a person scanner. A cheap option is using a line laser which enlights on line on a object, get a camera image of that line and then rotate the object a bit and repeat - until you get the 3D form out of this slices when you have rotated the obect by 360 degree. Francis Engelman build such a system as bachelor thesis at the media computing group of the RWTH Aachen - the so-called FabScan. It uses a basic webcam, an arduino for controlling a line laser and a stepper motor for a turntable. One disadvantage was that it relies on a external computer for processing, which gives a hassle with different operating systems and so on.
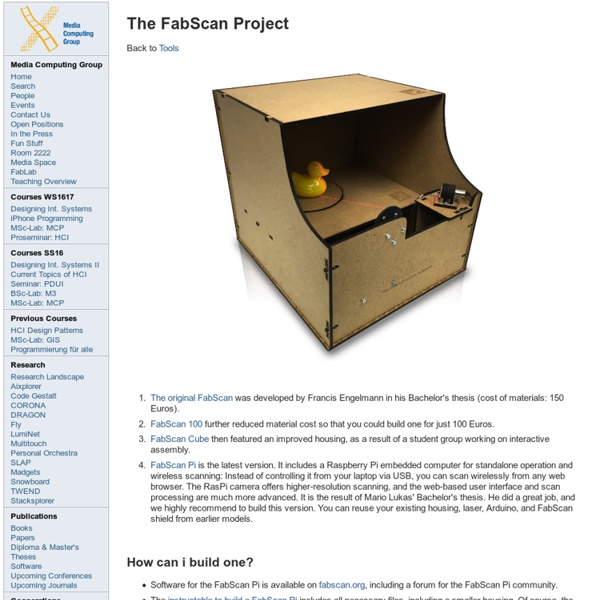
Un oeil neuf sur la lumière : fabriquez votre spectromètre Traduit par Camille Ducoin La lumière blanche... n'est pas blanche : elle est constituée de beaucoup de couleurs différentes. La composition de la lumière (son spectre) s'étudie grâce à un appareil nommé spectromètre. Nous verrons dans cet article comment en construire un, rien qu'avec une boîte de céréales et un disque compact. Cet instrument fait-maison nous permettra d'admirer le monde merveilleux des couleurs cachées dans les objets environnants, comme les ampoules, les tubes fluorescents, les écrans d'ordinateurs et les flammes de bougies. Comment décomposer la lumière Il y a plusieurs façons faire apparaître les couleurs composant la lumière blanche. Une autre façon est d'utiliser une grille de diffraction formée d'un grand nombre de sillons minuscules tracés parallèlement les uns aux autres sur une surface, comme il est montré ci-dessous. De par l'interaction des ondes de lumière avec les petits sillons, les différentes couleurs se trouvent réfléchies dans différentes directions.
Fabscan Pi project - 3D scanning for all - The MagPi MagazineThe MagPi Magazine The full article can be found in The MagPi 38 Few things in modern life are more fun than 3D-scanning an object, then using a 3D printer to create a copy. But 3D scanners are still very expensive to buy. FabScan is an open-source, DIY 3D laser scanner being developed by René Bohne and Mario Lukas. Initially, FabScan was connected to an external computer, but Mario and René have recently created a Raspberry Pi version that houses all the components required inside a single box. The FabScan project has a long history. The wooden case contains a motorized turntable that rotates the object being scanned. “The FabScan without the Raspberry Pi is an open-source, do-it-yourself 3D laser scanner,” says Mario. “The FabScan uses a laser cut plywood case,” continues Mario. You place an object on the turntable so the laser runs across its surface. “Since I introduced the Raspberry Pi to the FabScan project, the webcam [has been] replaced by the Pi Camera Module,” Mario tells us.
Build: Heron’s fountain This week I am actually going to be making something that does not require electricity. Although, you may be able to fool people into thinking it does. We are going to be making Heron’s fountain out of common household materials. This is a really easy build and would be a perfect project for to build with your kids. Maybe you could even sneak in a lesson on fluid dynamics or perpetual motion? Heron (Hero) of Alexandria was a mathematician and an inventor. Total cost of build = $2 (you can scavenge the 3 water bottles) What You need: Supplies (3) 16.9 FL OZ Water bottles (I used Dasani) (1) 9″ length of tubing (1) 11″ length of tubing (1) 15″ length of tubing Small amount of clay (Play-Doh) Note: The tubing is for aquariums and is 3/16″ thin wall rigid tubing. What you need: Tools and equipment Scissors Drill (hand or electric powered) 5/32″ drill bit (slightly smaller than the tubing diameter) Step 1: Make the fountains’ reservoir Cut (1) of the bottles in half as pictured.
FabScan CUBE Back to FabScan The FabScan CUBE is a 3D-Scanner. It is an improved version of the original fabscan 3D-scanner. The new FabScan Pi works as a standalone device controlled with a web browser. Files for the lasercutter The files can be cut on any laser cutter. BOM - Bill of Materials Arduino Sketch Upload the latest version of the Arduino sketch to your Arduino UNO: Assembly Instruction there is no full assembly manual available yet. Renderings Some renderings of the housing:
Paper Chromatography Assembly: FabScan by Wetterott (my personal instruction guide!) | A girl with a 3D printer One of the things we found at Makerfaire Rome and were eager to try is the FabScan 3d scanner by Wetterott. It comes in a kit, and is really cheap (126€). So we bought the kit and assembled it a couple of days ago. As always, here comes the review. As soon as you open the box you realize that the construction is really really simple. There are the arduino and the shield, the laser module and the webcam, a motor with its driver. But let's start building it! I was building it with Carlo this time, and he just started with the arduino shield that was the most difficult (and less described) part. So part 1: the shield. Then just place it on the Arduino board provided. Part 2: the Pololu stepper motor driver carrier. Now on to step 3: dismembering the poor webcam. Step 4: the laser nothing to assemble here, you just open the box and solder the 2 wires to the shield. Step 5: assembling the wooden enclosure and adding the components. Here you can see the colors of the wires, without squinting
FabScanPi About the Project FabScan is an open source 3D laser scanner. The project started in 2010 at Germany's first FabLab in Aachen. The FabScan PI is the next generation of the FabScan 3D Laser Scanner. A Raspberry Pi 2 and a Raspberry Pi camera module are used to turn the FabScan PI into a stand-alone and web-enabled 3D Laser Scanner. Quick Start The fastest way to use the FabScanPi is to use the FabScanPi Raspbian ISO image. Latest Release A list of all released images can be found here.Since release v2016-05-15-14-05 the image files are zipped. You have to unzip the file to get the .img file. ip-address-of-your-raspberry-pi ] It is also possible to join the web-enabled FabScanPi user interface by pointing your browser to NOTE: fabscanpi.local requires zeroconf. Purchase a Kit You can purchase the FabScanPi as a kit or in parts at Watterott Electronics
Laser Scanner 3D SkanDal — Centre de Ressources Numériques - Labomedia Les lasers sont dangereux: Laser Scanner 3D SkanDal Sécurité. Le premier Scanner 3D totalement documenté, à 2 Lasers piloté par des scripts en Python, sous Licence GPL V2. Copyright Labomedia. 3D Scanner, with 2 Laser and python scripts, made with only 3D Printing pieces. skandal sur GitHub et la page d'installation. Pour lancer, double clic sur scan, lancer dans un terminal. Des commentaires peuvent être déposé sur la page de discussion. 2 laser ligne génèrent des plans verticaux à 45° par rapport à l'axe vertical de la caméra, coupe la pièce suivant 2 lignes. L'objet est fixe sur un plateau fixé en direct sur un moteur pas à pas de 200 pas par tour. Le scanner est dans une chambre noire pour ne voir que la ligne laser. laser gauche on moteur fixe, shot avance d'un pas attente une seconde pour qu'il n'y ai plus de vibration enregistrement de l'image caméra avance d'un pas etc ... jusqu'à 200 pas avance d'un pas laser gauche off, laser droit on enregistrement de l'image caméra etc ... Principe
Découvre Ciclop et Horus Nous avons le plaisir de te présenter Ciclop, le premier scanner 3D DIY de BQ, et Horus, un logiciel de numérisation 3D. Comme nos autres produits DIY, Ciclop et Horus sont sous licence libre et appartiennent au patrimoine technologique mondial. Toutes les informations sur la conception mécanique, l’électronique, le logiciel, les algorithmes, les mathématiques et les expériences réalisées seront à disposition de la communauté. Chacun peut étudier le fonctionnement du scanner, mais aussi le modifier et le faire évoluer. L’objectif est de contribuer au développement de ces appareils. Notre scanner s’appuie sur de grands projets du patrimoine technologique mondial développés par la communauté, notamment GNU/Linux1, Python2, Reprap3 et Arduino4. Techniques utilisées Il existe plusieurs techniques pour capturer la géométrie tridimensionnelle d’un objet : la triangulation laser, la lumière structurée, la vision stéréoscopique, etc. Ciclop est un scanner 3D en kit open source. Conception Firmware
La photogrammétrie : VisualSFM et MeshLab 1 Introduction Il est généralement difficile aux étudiants de trouver les plans nécessaires pour étudier la structure d'un monument ancien. Les plans anciens, s'ils existent, sont souvent incomplets. Nous présentons ici un tutorial utilisant deux logiciels libres1 pour obtenir simplement à partir de photos les nuages de points et les maillages permettant d'établir les plans nécessaires à l'analyse structurelle. Il n'est pas nécessaire d'avoir de connaissances particulières en photogrammétrie pour utiliser ces logiciels, les principes de bases sont expliqués ci-dessous. 2 VisualSFM 2.1 Principe de fonctionnement VisualSFM a été développé par Changchang Wu à l'université de Washington à Seattle. Fig 1: Feature matches3 à gauche et Inliner matches à droiteFaçade occidentale de la cathédrale de Chartres 2.2 Installation du logiciel 2.3 Tutorial Les étapes à suivre pour produire votre premier nuage de points 3D sont indiquées ci-dessous. 2.4 Vérification du fonctionnement 3 MeshLab 4 Conclusion