
DIY Wrap Bracelet You should all know by now that we are all about stacking bracelets on our wrists. The more, the better. In fact . . . the most, the best! With that being said, we’ll show you how to master a version of the ever so popular wrap bracelet. It’s so simple and addicting, you’ll soon be churning out these wristlets with your eyes closed. You’ll need (for a double wrapped bracelet) :* Lengths will vary depending on the size of your wrist (see comments for suggestions). Fold the length of leather cording in half to form a loop. Place the ball chain along the leather cording with the end of the chain meeting the end of the wrap. Continue wrapping while checking it for fit around the wrist. When you have reached the end of the ball chain wrap the linen cording around the leather strands 2-3 more times. Thread the hex nut through the strands and tie a second knot. Trim with scissors and your wrap bracelet is finished!! The materials are listed for a double wrap bracelet. It’s a party!
DIY Stone Sconces This is a super easy project that anyone can do on the super cheap. I wanted some nice sconces for my guest bath downstairs. I looked high and low and couldn’t find anything I wanted and the ones I did like were about $20 a piece….story of my life. A few weeks back I was strolling the Dollar Tree trying to see if there was anything that I could fashion into a sconce. Anyway let us continue. I walked back into the Dollar Tree and grabbed 2 bags of decorative stones, glass tealight candle holders, a pack of glue sticks and some sponge brushes for $6. I already has some wood at the house and some dark brown paint. We had a wood board that was 1/2 inch thick. Once the paint dried I nailed the picture handing hardware to the back, top part of the larger rectangles. Then hot glued the small bottom piece onto the back. Lay the sconce down on it’s back and glue the stones onto it, trying to fit them together as tightly as possible. Checkout the finish product proudly handing on the wall.
5 Minute Simple Pillow Tutorial photo credit lisa clarke I know most of you probably know how to cover a pillow but I did have a few tips that might help your pillow look better and made faster. My friend Abi is trying to save money everywhere she can for her upcoming wedding in June. She is making the ringbearer pillows....errrr I am making them. So I thought I'd get a good post out of it and documented the very simple process. 1. 2. 3. 4. 5. 6. 7. 8. 9. 10. 11. 12. 13. Now with 13 steps maybe it seems like this took a long time but I promise once you know it by heart it only takes about five minutes.
A Beautiful Mess: DECORATE A year and a half ago we signed a bunch of papers and unlocked the door to our 100-year-old, yellow house for the very first time. It's been a trip. If you would have asked me on that day how long I thought it would take to get everything "decorated" I would have said three months. I have friends and family with "finished" homes. Fast forward a year and a half, and I'll tell you one thing I know for sure—nothing is ever perfect. Unrealistic expectations? Today I'm here to share what I've learned from this 100-year-old yellow house and this past year and a half of in-progress living. 1. Here's what I mean. As the years went by I started to understand my look a little more. Houses are the same way. Your home has its own set of strengths and weaknesses. I'm not one of those people who thinks if you buy a 1960s home that you have to decorate it just like the sixties, but learning about the era will teach you a ton and provide both context and inspiration for your ideas! 2. 3.
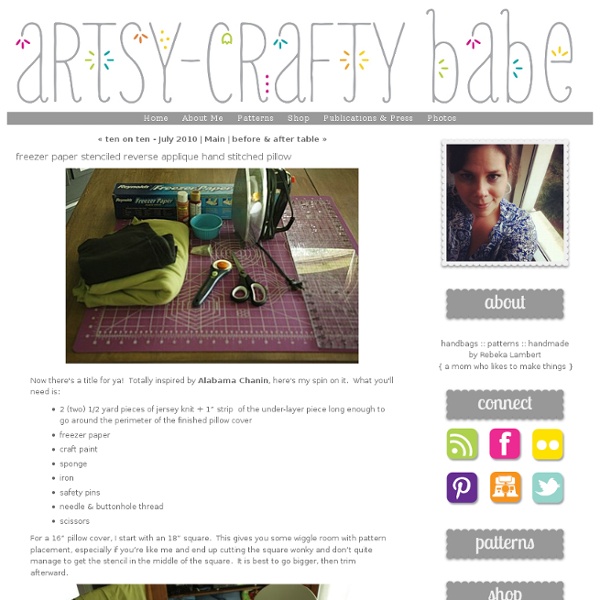
stencil with freezer paper (harry potter tee) Yes, I am a nerd. I came up with a brilliant idea for a Harry Potter t-shirt and I couldn't resist. "Expecto Patronum!" However, you can make whatever kind of design you want with a freezer paper stencil. I learned about the joys of freezer paper back in my early college days. Basically, freezer paper is backed with a plastic coating that will stick to soft surfaces when ironed, but it peels off cleanly and easily. To make a sweet t-shirt you will need: paper & pencil a t-shirt an iron a piece of cardboard or poster board fabric paint & brush Start by drawing your design on some regular old paper. My design kept getting bigger, so I taped two sheets together. Next, place your design underneath a sheet of freezer paper and trace it neatly with a sharpie. The marker gives your lines greater width making it easier to cut them out and paint them in later. Now place a piece of cardboard under your freezer paper to protect your table while you cut. Important: Set these shapes aside.
Darkroom and Dearly: {diy: shower curtain} First of all, can I say how in love I am with this Anthropologie shower curtain? I mean, really. Freaking gorgeous. Then again, the price on it is $118.... gulp. Just when I decided to stick with my own lacy, $20 curtain from Target, I discovered a clever blogger who made this beautiful ruffly creation from scratch! {Elle Apparel} takes $20 worth of fabric, endless time and patience, and creates this amazing wonder: When you're finished picking your jaw up off the floor, visit {her tutorial} and see how it's done! & DIY: Tank Dress with Pockets! academichic At long last, I present a tutorial for the tank dress I made a few weeks ago before the end of the semester blindsided me. I’ve been seeing these tank+patterned skirt all over the place lately, but frequently they were too short or too short-waisted for my particular proportions. After some googling, and studying the really excellent skirt tutorial and t-shirt dress tutorial at Ruffles and Stuff and the skirt with pockets tutorial at Freshly Picked, I decided that even my fairly rudimentary sewing skills could handle this project. And since I celebrated my height yesterday for Dress Your Best week, it seems appropriate to post a sewing project prompted by my need for a longer-than-in-stores dress. Supplies: a tank top2 yards or so of patterned fabricscraps of a coordinating fabric for pocketsmatching threaddisappearing fabric pen or chalk Steps: 1. 3. 4. Pin and cut out a pair. 5. 6. 7. 8. 9. 10. 11. 12. 13. 14. 15. A note of warning. I can imagine so many fun variations on this.
Song Lyric Wall Art / D.I.Y. Project A couple weeks ago, I found a paint-by-number at an unbeatable price. I can't pass these things up even though I already owned this particular design. I thought that I could maybe use it to make a fun D.I.Y., but my new rule is that all thrifts that I purchase with the intent of restyling need to get done right away. Here's how I did it... I displayed our piece in our bedroom, on Jeremy's side of the bed. A couple weeks ago, I found a paint-by-number at an unbeatable price. return on creativity: paint sample coasters I've had this map coaster tutorial in my inspiration file for awhile. I wanted to make a set of map coasters for my brother; one coaster for each city he has lived in. The plan was to use an old atlas I had lying around, but all the cities were in the middle of the state, right where the atlas folded in two. Sigh. So I decided to make paint sample coasters instead... All you need is tiles, Mod Podge, spray acrylic, paint samples, and cork or felt. Would you believe that this project was the first time I ever used Mod Podge in my life! My paint samples had rounded corners, so I first squared them off. Then I measured the samples to fit the tiles and cut them into squares. Don't you just love a project where even the scraps are pretty? I used Mod Podge to apply the samples to the coasters and then applied about five coats of Mod Podge over the top. Finally I applied some spray acrylic. That's it. I think these would make a great gift.
Earth Day: Free As A Bird Pillow A horizontal pillow injects an interesting shape into the ordinary pile of pillows. This one features an envelope style opening on the front rather than the back, so we can show off a set of three beautiful cherry wood buttons. The buttons are not only fabulous, they are also keeping the pillow cover closed. Who says beauty and brains don't mix? We love how the free-as-a-bird silhouettes on this print swirl and swoop between the live oaks. This is the third in our collection of three pillows celebrating Earth Day. Fat Quarter Shop has even put together a kit for this project so you can order exactly what you need to make a pillow just like ours. Any Sewing Machine (we recommend the Janome DC4030 ) ½ yard of 44-45" wide fabric for the pillow's right side: ½ yard of 44-45" wide fabric for the pillow's left side: Pillow fill or 12" x 22" pillow form: All-purpose thread to match fabric Three 1¼ buttons: Scissors or rotary cutter and cutting mat See-through ruler Fabric pen or pencil Straight pins
Quilting Basics - Part I - Getting Started Quilting Basics - Part 1 Quilting Basics - Part 2 Quilting Basics - Part 3 Quilting Basics - Part 4 Probably the question I get asked MOST is... how do you get your stitches so even. Quilting is all about stitches. So, today, we are going to make a practice piece. Materials: solid fabric - use a light weight cotton or flannel (fabric should be washable in order to remove the tracing paper design) light weight cotton batting - DO NOT use the "fluffy" type of battings contrasting quilting thread or cotton floss (I used a fun variegated floss) needle small chunk beeswaxcopy of pattern or blank 8 1/2" x 8 1/2" piece of paper safety pins and/or stapler tracing paper and tracing wheel (the type with a "teethed" wheel, not a "smooth" wheel) To get started we need a design. Now, you can either make a copy of a design I created, or let the spirit move you and draw your own. Cut out your fabric and batting. Take your top fabric and lay it on a hard surface with right side up.