
DIY rope rug A couple weekends ago, I made a rope rug. A 4-foot one, to be exact. I had seen this rug from the Purl Bee and the MegaDoily rope rug from Ladies and Gentlemen and wanted to make one. My friend Ashmo asked if I’d be willing to make one as a wedding gift for her friend. My answer? Of course! The inspiration: the materials: -Rope cord (16/32 diameter). -crochet hook, size “S”. -pattern steps: I followed the pattern all the way through, making sure to crochet each round relatively loosely. When I had to join the rope (i.e. when I finished a box of cord), I taped the ends together and sewed them to the rest of the rug to keep them in place. Here’s the rug in progress (and me having fun with it): It took roughly 8 hours to make. I was really happy with the final rug. Overall, I’m glad I got to make a giant rope rug.
Amigurumi | Piggy Bun Pattern The story of these piggy buns began in October 2012….. It was supposed to be a challenge between my friend (Margaret) and I, where each of us need to come out a craft to make these cute little piggy buns (a picture inspired from the dimsum that I dined in). We set a deadline but I wasn’t able to make it due to my extreme busy lifestyle; copping for renovation, a day job, an updated high traffic blog (thank you, without you seeing this, it ain’t going to be), plus a family of 3 to take care of. So, Margaret went on with her project but I didn’t get anything done… woooppppsss…. and she did a great job, see her piggy bun here. Today, I am very thankful that Margaret shares her pattern here. They are not only cute to display or become one of your ornaments, I found out one functional purpose of it. OK, Margaret, I still owe you mine, sorry that I can’t make it on the deadline we have set but will definitely do it. {Get detail tutorial and pattern on next page.} Pages: 1 2
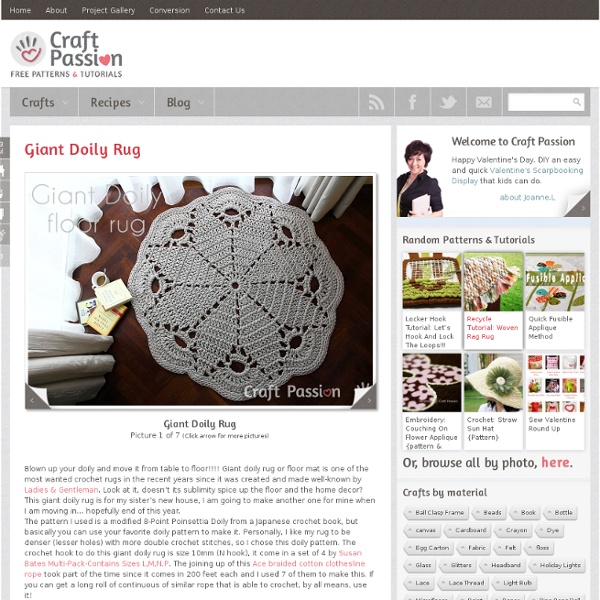
Dances With Wools » Blog Archive » A Giant Crochet Doily Rug for Our Living Room You’ve all seen the pictures on Pinterest for that giant doily rug. I repinned it myself. It’s just gorgeous and it led me to search for others of its kind. Sadly, there are many out there, but no one has bothered to offer up tutorials or patterns. Two weeks ago, I set out to correct this by making one of my own. I will warn you, what you’re about to read will be painful. I ripped this apart and re-started three times. Giant crochet doily rug For this project, I wanted something softer than what the other people were achieving with their rope crochet, so I used Lion’s Brand Hometown USA in New York White, 9 skeins of it. Special stitches: PICOT — Chain 3, slip stitch into first chain. Gauge: It doesn’t matter. With white, ch 8. PLEASE NOTE: I may offer this as a PDF at a later time. Trish
Amigurumi | Owl - Mr. Murasaki Who doesn’t dream of making their own stuffed toy? Stuffed toy making can be from a few methods, besides sewing, AMIGURUMI (crochet or knit stuff doll) is one of the most popular methods. When I saw Mei Li’s blog (AmiguruMEI) for the first time, my jaw dropped. When I got to know that she designed her own amigurumi doll, I knew I need to know her more and introduce her to you. 1. My first amigurumi was a lamb in slumberland (though he looked more dead than anything, haha!). 2. My husband enjoys reading, so he’ll be with his book and I’ll be working on my half-finished doll – that’s one of the ways we spend time together. 3. 4. 5. There’s just something about working with yarn that gets me going. 6. 7. 8. I’m currently working on an exciting project that I’m not able to announce just yet, but I hope to be able to do so very soon! 9. 10. {CLICK HERE to get pattern & tutorial of Owl Amigurumi – Mr Murasaki.} Pages: 1 2 Get all updates via email: Highlights from Our Partners
TUTORIAL :: Beginner's crochet - how to make fabric baskets Learn to crochet. Make lovely crochet fabric baskets. Use up fabric scraps and upcycle thrifted sheets and tablecloths. I love making these fabric baskets – there’s only one crochet stitch to learn and it’s a great craft to pick up when you have a spare minute. Let’s get started… click on the link below for the step by step tutorial. I’ve made baskets using fabric yarn, rag rope that I’ve made and and rag rope that’s available for purchase. What you’ll need Firstly gather your supplies. The grey and blue basket – made from fabric yarn – measures 22 x 9 cm (8.5 x 3.5 inches) and I used a total of about 1.6 metres (62 inches) of quilting weight cotton fabric (x the full 42 inch width of the fabric). Making rag rope and fabric yarn To make both rag rope and fabric yarn you start in the same way. Cut the selvedge edges off the fabric. Now tear the fabric into one long strip. For fabric yarn Cut the fabric strips into a manageable size. To make rag rope Start by dampening the fabric strip.
Amigurumi | Koala I found a Koala Amigurumi Pattern in the Woman’s Day website and I have some off-white and gray organic cotton yarns on hand, so I made a pair of these small little stuffed koalas for my kids in reverse color. Some ideas to make it differently: 1. This adorable little koala is about 3-5″ tall only (depend on your yarn and the matching hook size), install a key ring on it’s head and turn it into a key chain, hang it to the bag’s zipper. 2. If we sew the limbs closer to the center of the body and insert 4 small strong magnets to the tip of each limb, you can make it “huggy” and hug on a tree branch or at the edge of your curtain or your pencil, ruler etc… 3. And, and…. instead of poly-fills, stuff beads into the body to weight it down and with the magnets of it limbs, it can be a cute memo holder on your desk too 4. Find the appropriate positions for the ears, approx at the center of the vertical cross section of the head, middle of the height. Lastly, stuff and sew the limbs to the body.
Crochet Tutorial: Yo-Yo Puff Difficulty Level: Beginner, must know how to crochet tptr, tr, dc, tr2tog, sl st & chAbbreviations:ch = chain tr = treble tr dec = Treble decrease (aka tr2tog – treble next 2 stitches together) tptr = Triple treble sl st = slip stitch st = stitch yo = yarn overPatterns:Yo-Yo PuffWritten:Starting Ring: ch5, slst to first chain to form a base ring. Rnd 1 : ch8, tptr19, slst to the 8th chain. Rnd 2 : ch3, tr on the next st, *tr2tog or tr dec on the next 2 sts*, repeat * 9 times, slst to the dc loop. fo with at least 8″ long yarn tail.Diagram: Using 2.5mm hook or recommended hook size for your choice of yarn. Round 1: Chain 8, this is deem as the first st of your tptr. To crochet a tptr: Yo 4 times, insert hook into the ring, yo, draw loop through (6 loops on hook), *yo, draw through 2 loops* 5 times. A finished tptr as the 2nd st of this round. Sl st to the 8th chain of the first st to complete 1st round. Round 2: Chain 3, yo twice and get ready to crochet a tr. Sl st to the 3rd chain.
Crochet Tutorial: Loop Stitch I came across this beautiful loopy stitches few months ago, a reader sent me a picture and asked if I know how to crochet it… I didn’t have a clue that time, curiosity leaded me to find out more and spent some moment to practice and master the skill. Here I am, sharing with you how to crochet it (scroll down for the video demo). I am doing a couple of projects by using this loop stitch, detail to follow soon. It is called loop stitch or fur stitch. So far, I haven’t found any abbreviation for it, so I am going to call it by name… Loop stitch. The loop can vary from long to short, depends on how long you want it to be. There are 2 ways of crocheting it, 1 strand over or 2 strands over into the stitch. The working is similar to as crochet a SC (single crochet), the only thing that you have to do is to wrap the yarn onto your finger and pull both strands through the stitch….. watch the video demo for better illustration. Additional info you may want to know: 1. Print / Download PDF
Cookie, the Amigurumi Girl Free Pattern | Tales of Twisted Fibers I’m super excited to tell you that the pattern for Cookie, the amigurumi girl, the little cutie you all loved so much, is now ready for download :D And, as I had promised in my last post, the pattern is FREE for all you lovely, amigurumi lovers! Cookie is 8.5 inches tall and very, very mischievous. So should you decide to make one for yourself, be warned—she can be quite a handful. So, without further ado, here’s the link to the pdf. Click on the image to download If there’s one thing that gets me more excited than designing my own amigurumis is seeing what other crafters make with my patterns. Cheers! Like this: Like Loading...
Summer 2011 Rnd 1: In tan, make an adjustable ring and work 5 sc in the ring, do not join, place marker to mark the first stitch of the next rnd: 5 sc. Rnd 2: [2 Sc in each sc] 5 times: 10 sc. Rnd 3: [Sc in next sc, 2 sc in next sc] 5 times: 15 sc. The wig cap will be crocheted to fit around the head stopping right before you get to the point where you start decreasing. After making the two arms and legs, the body will just be a torso, then the petals and wings will be crocheted and sewn on. Arms (make 2) Rnd 1: In flesh color, make an adjustable ring and work 6 sc in the ring, do not join, place marker to mark the first stitch of the next rnd: 6 sc. Legs (make 2) Rnd 1: In flesh color, make an adjustable ring and work 7 sc in the ring; join with slip st to first sc; place marker to mark the first stitch of the next rnd: 7 sc. Torso Rnd 1: In green, make an adjustable ring and work 6 sc in the ring; join with slip st to first sc; place marker to mark the first stitch of the next rnd: 6 sc.
Fairy Tale Poncho The Fairy Tale Poncho is my first adult garment design! It’s easier to make than it looks, and with it’s asymmetrical hem and mitered stitching, it’s designed to flatter larger bodies as well as smaller ones – and look as good with jeans and boots as it does with a crown and glass slippers! The Fairy Tale Poncho is made in four “rectangl-ish” shapes that are sewn together. Fairy Tale Poncho Add this pattern to your Ravelry Queue and Favorites US – M/N, 9.00mm hook1250 – 1500 yds Worsted or Aran weight yarn (Lion Brand Heartland in Redwood shown)1 button3 stitch markerstapestry/yarn needleGauge (laid flat – will hang larger): 7 rows x 10 sts = 4″ in patternSizes: Small/Medium (Large/XL, 2X/3X, 4X/5X)Video tutorial: Seamless Join; Mattress Stitch RECTANGLE A: (Tip: Add a stitch marker to each of these pieces to help you remember which ones are A vs B) Row 1: Ch 104 (106, 108, 110), sc in the 2nd ch from the hook. Row 2: Ch 2 (does not count as a st), dc in the 1st 43 sts. Time to try it on!
Waffle Knit Snood Ready to wear If you have been following my blog you will have realised that I like to crochet. I learned to knit before I learned crocheting but I have never been very good- I think the main problem with knitting is it takes longer (ok, I should probably practise more!) I have had this chunky bamboo wool in my stash for a while now- it’s really soft. I made this for me but it looks like it may get shared with my husband since the colour and pattern are both very gender neutral and he likes how soft it is too! Waffle knit Pattern: Cast on any multiple of 3 + 1 stitches. Row 1: Slip st as if to knit, *p2, k1, repeat from * to end Row 2: Slip st as if to purl, *k2, p1, repeat from * to end Row 3: Slip st as if to knit, k to end Row 4: Slip st as if to purl, p to end Repeat rows 1-4 until you have the desired length for a snood or scarf. I used a crochet hook to single crochet my ends together to form a loop because the wool was too chunky to go through any needles. Like this: Like Loading...
Gingham Scarf with Scalloped Edge For my sister This is one of my favourite items made this Christmas. It was for my sister in law and made out of cotton yarn as she cannot always wear wool next to the skin. I love the effect of little crocheted squares all sewn together but hate the effort involved! I added the scalloped edge to pretty it up a bit, but without looked good too. Pattern The scarf is constructed by crocheting two threads together at once. Use a 5mm size hook (the yarns will be crocheted together. Wind the coloured yarn into 4 balls with a ratio of 2:2:2:5.Wind the white yarn into 3 balls with a ratio of 2:2:5. To keep the yarn from tangling, I threaded each of the smaller balls through holes on a laundry crate I had handy. Lengthways balls of yarn kept tidy in a crate Special stitch: modified double crochet: dc’ Used to change thread colours between the different squares. After 2 rows Tips: I would advise weaving in ends as you go. Front of work detail Scalloped Edging Scalloped edge detail End result Like this:
Diamond Scarves A themed gift I mentioned in an earlier post about my grandparents upcoming diamond wedding celebrations. Not being able to afford a gift of real diamonds, I’ve made diamond themed scarves instead! For my Nanny The heather coloured one is for my Nanny (who my shop is named after). Chunky diamond infinity scarf – For my Grandad The chunky grey scarf started off being this pattern I mentioned previously in my zigzag scarf post. Diamond pattern with ribbing Pattern (for chunky grey diamond infinty scarf): I used Wendy Serenity Super Chunky wool and a size 9mm hook (3 skeins – 240m). Special stitches: Front post treble crochet 2 together: fptrc2tog This makes a V-shaped stitch in front of the work with the two arms of the V being worked around the posts of sc stitches 2 rows below. Work the first fptrc2tog as follows: The remaining fptrc2tog stitches of round 2 are worked the same but with the first arm of the V worked around the same post as the last arm of the previous stitch. Yarn over.