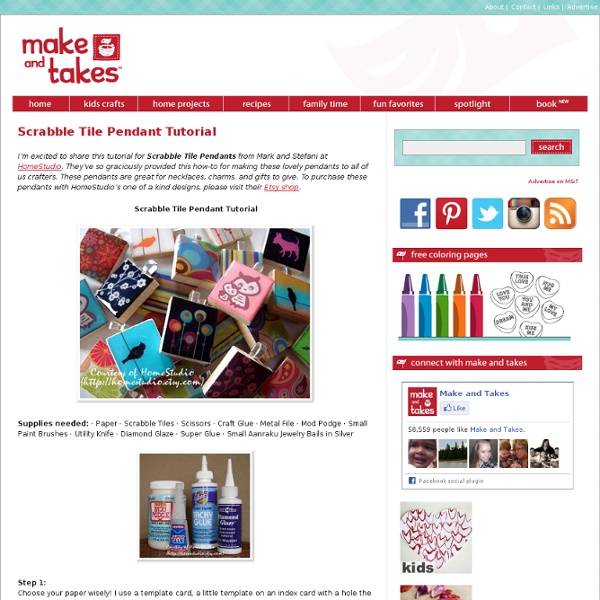
Scrabble Tile Pendant Tutorial
Large T-Shirt to Fitted Tee Tutorial | a.steed's.life
I have these two t-shirts that I love. They're soft, comfortable, and have good worn (and sentimental) designs on them. But, I never wear them for anything other than around the house because they are large men's t-shirts and look completely shapeless on me. Then I found this great tutorial on YouTube for how to make a big t-shirt a fitted shirt! - T-Shirt Surgery: How to Make a Shirt Fit So, while I was staying with my mom at her camper this summer (she lives & travels in an RV), I asked her to help me try it out. First, a before & after look at the t-shirt we did. So, here's how it's done. Start with a t-shirt you love that's just too big Turn the shirt inside out and lay a shirt that DOES fit you on top of it, lining up the collars so that you can be sure it is centered over your large t-shirt. Thanks to brianagayle for the video tutorial & tips! No time to make your own?
~Scraps and Scribbles~: Hand-made Goodie of the Week: Scrabble Tile Pendants
These are one of my favorite craft projects. They make great gifts. To make your own, you'll need: Wooden Scrabble-style tiles (I found mine at Michaels in the wooden shapes section) Scrapbook paper, photos, whatever image you'd like to use (I used flowers from a tissue box-anything goes!) Glue-on bails Necklace cord or chain Clasps Utility knife Hot glue, glue stick Mod podge Diamond Glaze-this can be hard to find, I suggest going to the Judi Kins (the manufacturer) site and locating a retailer Thin cardboard Pencil and sponge brush Start by tracing your tile onto the cardboard, near the middle. Using the utility knife, cut out the traced square. Then, using your awesome new guide, cut out the image that you want to use. Now it's ready to be glued onto your tile. Here' where your glue stick comes in. You might have some edges to trim up once it's glued on. Once your image is glued on to your tile, apply a thin layer of mod podge, getting all around the edges of the tile, too.
Joyful Ruffle Neck Top – Tutorial
Last week I showed you the top I made for my MIL’s B-day, remember? Well today is My Mom’s B-day! So Feliz Cumpleaños Mamá!! And as part of the celebration, I will show you how to make this top! Maybe it can be the Mom’s B-day Top!! The process is not very complicated and if you are making one for yourself I will describe the measurements I took, so you can adapt them to fit you. For the top I used some left overs I had of red polka-dot Chiffon, and I wear the top with something under it because the fabric is see trough, but you can make it with your choice of fabric, so you can wear it alone. Top Front: The width for this piece is your bust, I added to my measurement 1 inch on each side for the folding, plus 1.5 inches on each side for comfort. [Click Images to Enlarge] I love this top, is so comfortable and the ruffles make me feel very girly Let me know if you make it I will love to see, Happy Sewing! * This tutorial is provided for personal, non-commercial use only.
quilting
This fun scrappy quilt is quick to put together and great for beginners. Use lots of different colors to keep it bright and fun…or just a few colors to keep it calm and simple. Finished Size: 36" x 41" 1. 2 white strips 1 1/2" x width of the fabric (at least 42"). 2. 3. 4. 5. 6. 7. 8. Fast, fun, and CUTE!
Related:
Related:
