
Pimp My Stoller We have HUGE doll stroller fans in our house, and I am not just talking about Evie. My boys love racing around the house with the strollers pretending they are transformers. When they are up they are cars, when they are folded down they are motorcycles and much to my dismay they are often folded and lifted and made to be missal launchers. This is usually okay with me because thanks to Grandma and a neighbors garage sale we now have a dolly stroller for each child hence no squabbling or at least minimized amounts. I want Evie to love princesses as much as the next mommy but I also thought it would be fun for her “boutique” Bonjour Evette dolly to have a matching on e of a kind stroller. Evie was a fan… okay so she didn’t really notice a difference. But I am sure Evette felt good rollin’ in style Of course we had to stop every now and then to eat some rocks Evie is doning one of her new spring outfits and looked so comfy and cool. The locals were out in mass as it was a weekend. Scissors
4 Homemade DIY Christmas Jar Gifts I found these recipes around the web and had a fun time making them with my daughter! These are great gifts that the kids can help out on and so easy to do! Cowgirl Christmas Cookies Christmas Girlfriend Cookies Peppermint Stick Cocoa Toffee Blondies My daughter having loads of fun helping make these Christmas Jar Gifts! Need more ideas for Christmas crafts with kids? (Visited 94 time, 2 visit today) cozy car caddy tutorial Without further ado ... Cozy Car Caddy Tutorial Materials used: two pieces of denim (17 x 10 inches and 17 x 6 inches) one piece of Duck Cloth or other heavy fabric (17 x 10 inches) gray and yellow felt (gray felt cut to 17 x 3 inches, yellow felt cut into seven 1 x 1/4 inch pieces White Piping (two 17 inch pieces) 6" belting 1" Velcro scrap fabric for applique freezer paper, sponge brush, and acrylic paint sewing machine and supplies 1. 2. 3. 4. 5. I used scrap cotton fabric for the car body and felt for the wheels. 6. Line up the raw edge of the piping with the raw edge of the denim. along the existing stitch line on the piping. 7. I forgot to take a few pictures at this point ... bear with me. 8. 9. 10. 11. 12. I sponged 3 light layers of white acrylic paint for my numbers (let each layer dry before applying another). Fill your pockets with matchbox cars, and you are ready to roll. Here's how it folds: Fold the caddy in half so the road meets the pockets. Enjoy! p.s.
How to: Fall leaf candle holder Ok! This may look a bit familiar. While I sat brushing Mod Podge on dozens of leaves to use on my Fall wreath, I decided to light a little jar candle covered with fall leaves that I made last year to keep me company. I enjoyed the warm glow of the candlelight dancing through the leaves so much that I just had to make a bigger one! But this time I made it with the intention that it could be used the rest of the year for crafty storage! I used a large, one quart jar with a two piece canning lid. This has worked so well, I am planning to make a full set of four - one for each season to use to store tea bags, Splenda packets etc. on my kitchen shelf - keeping them in rotation as candles as the seasons go by. And since it is so easy to do, I am making some with my two little gingerbread house buddies for their Thanksgiving table! How to make a Fall Leaf Candle! All you need to make one: dried, pressed fall leaves, regular Mod Podge, a jar and a brush. 1. 2. 3. 4. 5. 6. 7. Here is a sneak preview!
Pots & Pancakes At Pots & Pancakes we do exactly what we say on the tin, we paint pots & cook a range of delicious Pancakes. No appointment necessary just pop in to see us at anytime. We have a huge range of pieces to choose from including mugs, plates, teapots & bowls as well as lots of little bits & pieces for children like dinosaurs, kittens, butterflies & bears. Prices start at £4 for tiles, side plates & standard mugs £10, with dinner plates at £14, teapots around £22 & lots of bits in between. If you are lacking inspiration, don't worry we have a mini library of ideas & lots of simple techniques so everyone can make something to be proud. If you would like to join us for painting it usually take about an hour to an hour & a half, but if you have grand plans & fancy yourself as the next Clarice Cliff, then it may take you longer or more than one session to finish . We have a huge range of ceramics to choose from and offer a number of speciality glazes to the adult painters.
How to make a Fairy Wand 7.3K Amazing Shares Facebook 24 Pin It Share 180 180 Twitter 11 Google+ 2 StumbleUpon 7.1K Email -- Email to a friend 7.3K Amazing Shares × How to Make a Fairy Wand (DIY) Tutorial I have always wanted to Make a Fairy Wand (and you can now check out my how to make a tulle wand tutorial), but not the usual kind of puff ball fairy wand, something different, more creative. My initial thought was to make more of a “crystal ball” fairy wand. This is what I came up…the project took about 30 minutes. What you will need to create this Fairy Wand (or one of your own style) is the following: Dowels (i opted for a larger dowel and cut it in half w/ a hand saw…that didn’t go so well) $.99Ribbon to wrap the dowel $2.99Tulle (I had this at home)Clear plastic Christmas ornament $1.29 (get 2 in case you hot glue mess it up like I did)stuff to put inside the ornament..I used a stream of marabou fluff, other ideas are flowers, glitter, ribbons, bows or rhinestones. Don’t be afraid to get girly here. ~Trisha
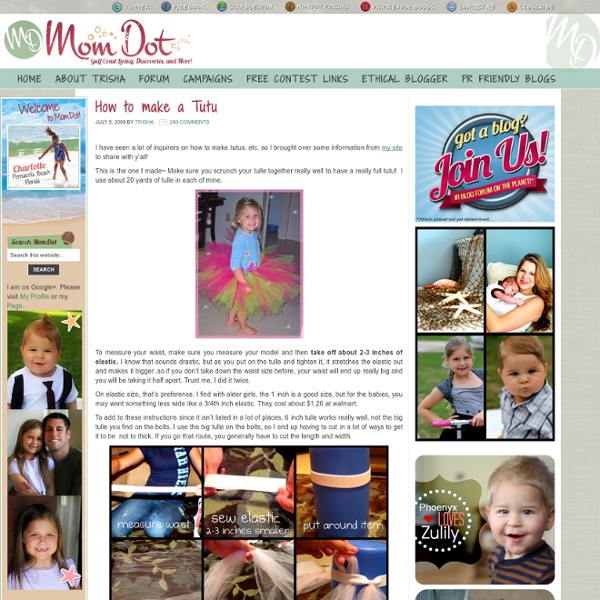
sewing tutorial | KIDS | crafts | handmade gifts | bread bags | fort kits | diy hang tags | saltwater-kids After receiving a few comments and emails with questions about the hot/cold packs I made for Halloween, I thought I would give you a quick rundown of the details. The tutorial for sewing and filling the packs can be found over at Rubber Punkin, so I am just going to share how I was able to get 24 packs from one yard of fabric. CUT:(24) 12" X 5" - from main fabric (see diagram below)(24) 6" loops - (I cut 1" strips from a t-shirt, stretched them out, and then cut the 6" lengths) Here is the layout for cutting 24 packs out of 42" wide fabric (you will have 4" left over along the 36" side) Check out the TUTORIAL for sewing and filling the packs HERE at Rubber Punkin. Thanks for stopping by!
8 Crafts Using Baby Food Jars A couple of weeks ago I shared with you a few recipes using leftover jar baby food. Now that all your baby food jars are empty here are a few baby food jar crafts that look pretty neat using the empty baby food jars. Baby Food Chandelier Halloween Votives Baby Night Lights Baby Food Jar Party Favors Personalized Tea Light Holders Snow Globes Soy Candle Place Cards Valentine Snow Globes Have you done any interesting crafts using baby food jars? (Visited 65 time, 65 visit today) The Rubber Punkin: Growing Like A Weed Heat Pack My son is going through a growth spurt. I remember when I would get growing pains as a child and how awful it was. Hot baths late at night, mentholatum lotion, but my favorite remedy was a nice warm heating pad. 1. If you wanna get real fancy, you could even make different rice packs for different stuff. Lavender: good for leg cramps, anxiety, great for calming and can help with sleep.Wild Orange: good for colds, anxiety, flu, and to calm.Breathe: respiratory system problems, coughs, colds, asthma.DigestZen: Can help balance the digestive system, flu, stomach aches, gas, and colic. If you want to check out some of these oils, visit Melissa here. 2. 3. 4. 5. 6. Now, pop it in the microwave for 1-2 minutes and sooth those aches and pains. I love comments... wink, wink.
Free Shipping 10pcs/lot New Colorful DIY Stamp Set, Creative Cute Multi Designs Stamps, Decorative DIY Stamp-in Stamps from Office & School Supplies on Aliexpress Enjoy Your Shopping Enjoy Your Colorful Life New Colorful DIY Stamp Set, Creative Cute Multi-Designs Stamps, Decorative DIY Stamp Material: ABS+Plastic Size: 8-10mm Shipping1)Free shipping for most country.2)We will send the order within 3 days after you make the payment. 3)We will guarantee the qualtiy of the our box Product Warranty: We provide product warranty for all our products. Feedback : 1)Your Feedback is really important to us, please take a few seconds to leave great feedback if you are satisfied with our product or service, thank you so much !! Return Policy: 1)We guarantee your zero risk purchase experience here. 2)We offer full refund to you,if the product has any quality problem. 3)If you not satisfied with any questions about our products in addition to the quality of products,you want to change the the items or return items .you may return or exchange the item within 14 days after delivery for a refund of the item price.
Felt Letters for Clementine’s Room Yesterday I finished these felt letters for Clementine’s nursery. They had been sewn and stuffed months ago but I had this idea that they would all hang individually from the tension wire that holds up her curtains and then when I tried it and realized they would spin around and half of the letters would be backwards I gave up and for months there’s been a hanging “Cle” in her room with a backwards “e.” The solution ended up being a strand of clear thread which runs through the letters and is looped at the ends so it can hang from nails. And now I’m so geeked about how cool this turned out that I look for excuses to wander into the nursery and stare at it. I will freely admit that the idea for these letters was not mine. If you have a child with a sensible short-lettered name, you might yet decide you want to make your own set. 1. 2. 3. 4. 5. You can see the stitches pretty clearly in the picture above. 6. 7. 8.
The Daily B: fabric letters for the fridge Miles has been chewing on our plastic fridge magnets, and since they're all secondhand (read: old), I got a tad worried about phthalates and other toxins. So, I had the idea to make him some fabric magnets that he could gnaw on. THEN I thought, wouldn't it be cute to have a fabric alphabet?? I layered some felt in between scraps of my favorite fabrics and cut out the letters. Total cost: $4 for the magnets. I like the rough (shall we say shabby chic?) I only got to "J" before the kids woke up from their naps. Safety Note: Make sure the magnets you use are large enough that your kiddo can't choke on them, and stitch them completely inside the fabric.
Just Another Day in Paradise: Old MacDonald Puppet Tutorial and Pattern EDITED NOTE: A couple of you have reminded me that I didn't show a picture of poor Old MacDonald. MY bad! HERE is where you can find a lovely picture of Mr. Here is it! I have scanned and downloaded the actual patterns into this post, but I am also posting the link to download them instead. There are 7 pattern pieces. Supplies you will need: Felt in following colors- tan brown white gray yellow blue cream black pink orange Coordinating thread Old MacDonald Patterns Basic Instructions: You will cut out each pattern piece in the color of felt depicted in the pictures of the whole set of puppets. The hardest part really will be cutting out all of the pieces. I will be showing how I sewed the horse, but the same basic instructions apply to all the animals, with just a few variations, which I will specify. First: Lay out pieces that go on to the front of the puppet with 1 piece of the hand puppet, and then pieces that go on the back with the back piece of the puppet. Second: Prepare all the individual pieces.
easy play dough recipe | NurtureStore By Cathy James on March 19th, 2012 ** Love play dough? Get your copy of The Homemade Play Dough Recipe Book!** Nurturestore has lots of articles about fun play dough ideas but I though today I’d get back to basics with an easy play dough recipe master class. Calling it a master class is very tongue-in-cheek: it’s a super easy recipe and even if you’ve never tried making your own play dough before I’m sure you’ll be able to whip up a cordon bleu version. Easy play dough recipe master class I’m going to show you my favourite no cook play dough recipe. Step One: Take a large bowl and add 2 cups flour, 1 cup salt, oil, 2 tablespoons vegetable oil, 2 tablespoons cream of tartar Step Two: add in any dry extras such as glitter Step Three: boil the kettle and pour 1 1/2 cups of the water into your mixture. Step Four: mix the ingredients together to form a dough. Step Five: done! Play dough problems: solved Play dough too crumbly? Play dough too sticky? Want a coloured play dough? Get the book!