Tutorial: Foundation Single Crochet
This foundation single crochet tutorial is broken down by each teeny-tiny step and includes a quick video demonstration at the end. When I first attempted to learn this technique from a magazine, I had pretty good illustrations to go by, but I was still totally confused by the whole thing. It took me 3 or 4 tries over a couple of months to even feel confident that I was doing this correctly. Hopefully with photos of each step, you'll be able to learn this a little easier than I did. For using a foundation single crochet row in the middle of your crochet piece, like the handles of my handbag or the armholes in a sweater, check out my foundation single crochet supplement. Foundation crochet stitches were developed by (or popularized by - I haven't actually seen his book, so I don't know if he came up with this himself or if he discovered the technique from another source) Bill Elmore. The reasons foundation stitches awesome are: Basic Instructions First Stitch 1. 2. 3. 4. 5. 6. 7. 8. 9. 10.
TUTORIAL: LINING A CROCHETED BAG… « while they play…
Lining a crocheted bag: Write down the width and add 1/2″ for (2) 1/4″ seam allowances. example: width is 8″+ 1/2″ = 8.5″ Write down the height and multiply by 2. example: height is 6″ X 2 =12″. Now, add 1″ for (2) 1/2″ folds. example: 12″ + 1″ =13″. Now make your cuts… Set aside and use the following formula for your pocket. For example: for a 5″W by 3″ H pocket…. 5″ + 1/2″ (2) 1/4″ seam allowances.width: 5.5″. 3″ X 2 = 6″ + .5″ (2) 1/4″ seam allowances.height: 6.5″. Now, make your cuts… Lay fabric down wrong side facing up.Create 1/2″ folds in both the top and the bottom of the piece and press with an iron. Now, sew the folds down using a 1/4″ seam allowance. Set aside.MAKE YOUR POCKET… Fold the piece in half, right sides facing and press with iron. Sew around the edges using a 1/4″ seam allowance, leaving a space of about 2″ in the top center. Pull the pocket right side out and press with iron…. Pin pocket to bag lining, so that the opening of the pocket is at the bottom… Press the side seams open….
Standing Double Crochet - Joining Without the Slip Stitch and Chain!
The Standing Double Crochet stitch is one I came to late – and I wish I’d known about it years earlier! It’s not a stitch that you’ll usually find specified in a pattern, and as such it has no standard abbreviation. What it is, is a technique – one that will allow you to start a new row on a crochet project without having to use the telltale “join with a slip stitch and chain 3” – and I can’t wait to share it with you! Video Tutorial: Standing Double Crochet – Right Handed Left Handed Photo Tutorial for the Standing Double Crochet Step 1: Hold the yarn end with the last two fingers of your hook-holding hand. So what do you think? NOTE: Several different people have now written to me, claiming that they invented this technique.
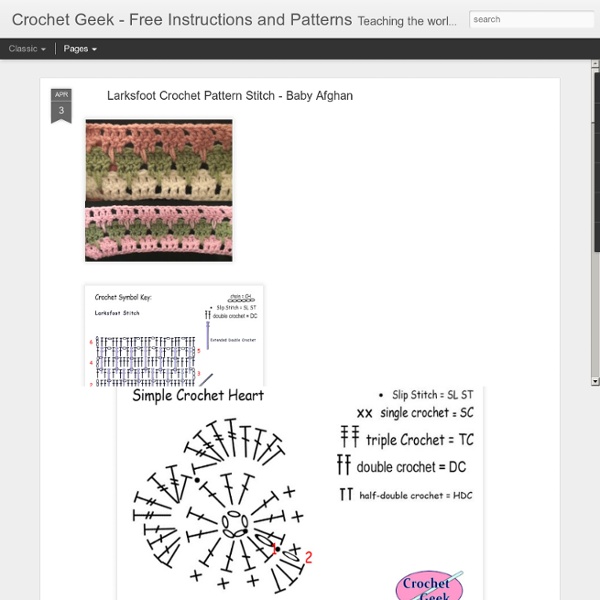
Crocheting For Dummies Cheat Sheet
Cheat Sheet You’re never too old or too young to discover crochet. The skills you master, the benefits you receive, and the beautiful heirlooms you create can last a lifetime and be passed on to future generations. Common International Crochet Symbols and Crochet Stitch Abbreviations Check out the following quick reference guide to the International Crochet Symbols and the abbreviations (in parentheses) for common crochet stitches. Abbreviations for Common Crochet Terms So they stay free of clutter, crochet patterns feature a lot of abbreviations for common crochet terms. approximately (approx) begin(ning) (beg) between (bet) contrast color (CC) centimeter(s) (cm) decrease(s)(d)(ing) (dec) follow or following (foll) gram or grams (g) inch or inches (in.) Making and Measuring a Gauge Swatch before You Crochet Making sure your stitches are consistently the right size is very important when crocheting. Follow these steps to make and measure a gauge swatch before you crochet:
Crochet Hook Size Conversion Chart
If you're new here, you may want to subscribe to my RSS feed. Thanks for visiting! Crochet hook sizes can be a bit confusing, especially if you are either new to crochet or live outside the U.S. and are trying to find the right size to follow an American pattern. American crochet hooks go by two names: a letter and a number. Use the chart below to find the size called for by your pattern, and you will be able to identify the size (in mm) that you should use. Crochet Hook Conversion Chart This chart also reveals another slightly confusing aspect of the American sizing system: you will notice that the difference in mm between two hook sizes is not a consistent difference. This isn’t all of the hook sizes there are! Now, you’re ready to start converting and crocheting!
Lacy Vs and Picots Crocheted Edging -- Free Crochet Pattern for a Lacy Vs and Picots Edging
This edging was originally designed to accompany the striped lace baby blanket, but you can adapt it to many other projects as well. Please see the baby blanket pattern for materials list, yarn information, abbreviations and design notes. Round 1: Work 1 round of sc all the way around your project. When you get to the corners, ch 2 to form the corner space. If you are using this edging on the striped lace baby blanket, you'll start by working 129 evenly spaced sc down the side of the blanket, ch 2, 129 more sc across the foundation chain, ch 2, 129 sc back up the other side of the blanket, ch 2, and 129 sc across the upper edge. If you're working a different project, the number of sc sts will be different. Round 2: Ch 3, [Skip 1 sc, (v st in next sc, skip next 2 sc.) To Form the Corner: V st in next ch-2 space, ch 2, v st in same corner space.] Last Side: Repeat from [ to ). Round 3: Work 1 v st in every v st, all the way around. Work a sl st into the center of the next v st.