chauffe-eau-solaire - chauffe-eau-solaire-barentin
Chauffe eau solaire Situation: Seine maritime Introduction : Utiliser le soleil pour préchauffer l’eau chaude sanitaire avant la chaudière au gaz. Mise en œuvre : Fabrication de deux capteurs avec 6 radiateurs acier, verre en façade et isolation du caisson. Motorisation des panneaux pour un suivi du soleil par vérin. Régulation du circulateur en utilisant des sondes de températures au niveau des capteurs et du ballon et gestion par module logique Zelio de shneider electric. selection du panneau 1 ou 2 par vanne motorisée de mon ancienne chaudiere. Modification d’un ballon électrique en lui retirant la résistance électrique et en installant un serpentin de cuivre en guise d‘échangeur. Raccordement par tube PER entre le capteur et le ballon distant de 25m. Réalisation: Date de début du projet: mai 2006 *essais d‘un radiateur installé sur une planche avec un verre devant. Température relevée après 25 m de PER de l’ordre de 65° avec une pointe à 82°. par unité: 1er capteur: 2em capteur: * régulation :
almost free garage heat – just drink a lot of soda | Hemmings Blog: Classic and collectible cars and parts
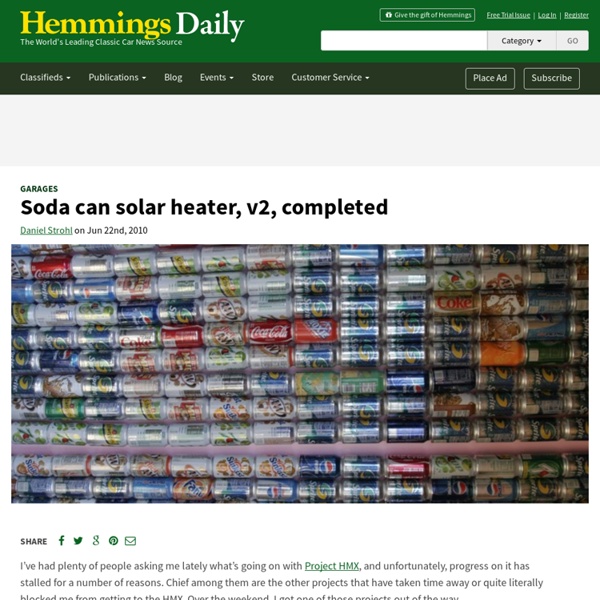
I’ve had a few days during the HMX build while I’m either waiting for parts or waiting for something to dry and had some free time. I’m not exactly one to sit and watch TV when I have nothing planned, so I set out on another project. While I have electricity out to the garage now, heat has been an issue all winter long. Mattar graciously lent me his kerosene heater, which did an okay job of taking the bite off the chill. Insulating the garage would go a long way to help keep the bitter Vermont cold out, but that’s a project for another day. I decided instead to take advantage of the south-facing side of the garage and build a solar furnace to collect some of that sunshine just bouncing straight off my garage. I started with some 2x4s and plywood to build a simple box. I actually built the box to certain dimensions, based on what scrap materials I had and on the dimensions of my heat collection method – aluminum cans. Stack the cans with liberal doses of adhesive caulk.
Réseau des éco-hameaux du Vignoble (44)
New York Mini-Studio
A couple years ago, Manhattan architect Luke Clark Tyler lived in a 96 square foot apartment. Instead of upsizing with his latest move, he chose to squeeze himself and his belongings into even less space. Luke now lives in a 78 square foot shoebox studio. It’s too narrow to fit a bed lengthwise, but using a bit of plywood and 2x4s he built his own custom bed/couch. When it’s down as a bed the room is mostly bed and when it’s up as a couch he has a very close relationship with the wall, “but I just use it as an excuse not to buy an ottoman because… I can just prop my feet right up on the wall.” He keeps his clothes, plates, microwave, books, spices and shaving and cleaning supplies in a large built-in cabinet. While he admits he misses being able to cook a real meal- though he’s vegetarian so eats a lot of vegetables and nuts and can even microwave eggs- Luke doesn’t see living small as a sacrifice.
EcoHameau47
Tunes in Tiles: Recycling Records & CDs into Roof Shingles
Round, flat, thin, durable and uniform in both shape and size … it is no wonder more than one person has thought to turn old vinyl records and music CDs into a new (not to mention bright and variegated!) material for tiling rooftops. For better or worse, these are apt to stand out a bit more than your average-type metal, asphalt and clay varieties. There is a point where a CD/DVD or record simply becomes too scratched to play, landing them largely in landfills due to the difficulty of recycling them by conventional means in some places – hence these projects from Jayefuu and Matt Glassmeyer. While the central holes in each music-playing format may lend themselves to a more clever attachment solution down the line, for now these projects do involve additional drilling for more conventional nails and screws (as directly hammering can cause unwanted cracks or breaks).
A Beautiful House Made from Trash & Recycled Materials
Driftwood railings line the rickety bridge leading to the cattle-bone numbers next to the front door of this unique recycled home – featuring far more than the sum of its scraps and parts, a beauty that emerges from the textured materials of which it was made (by hand). It starts with stacked corks and bottles, old newspapers, scrap wood and recycled metal … and culminates in layered color-sample ceiling tiles and shards of mirrored glass arranged piece by piece to assemble an amazing interior wall mosaic. Old t-shirts form the floors in one room while an antique wood-burning stove adorns the next and glass wine bottles allow light and distorted views from one space to another. Less an interior design or decorating project and more a work of collaborative art, it is clear that each contributor to the construction process added their own custom (and often unplanned) elements.
cordwood : ONLY MODERATOR WITH 44YEARS EXPERIENCE
Strawbale House Building Books: Build your own energy-efficient house of straw!
Strawbale House ConstructionBooks & Overviewby Thomas J. Elpel, Author of Living Homes Strawbale buildings are all the rage in alternative construction today, and with good reason--they are cheap, easy to build, and very energy efficient. Strawbale buildings look similar to adobe, with massive walls, wide window sills and typically rounded corners, but with the added benefit of a higher insulation value. Strawbale homes and outbuildings were first developed by pioneers in the Sand Hills of Nebraska where there was lots of straw, but few trees. Due to publicity in the 1980's and 1990's there are now strawbale buildings popping up all over the world--in wet and dry climates, from hot southern environments to chilling northern extremes. Strawbale homes are very well insulated. There are two types of strawbale houses. Living Homes Stone Masonry, Log, and Strawbale Construction by Thomas J. The Strawbale Houseby Athena and Bill Steen Hoping to build a strawbale house? Quick Summaries: