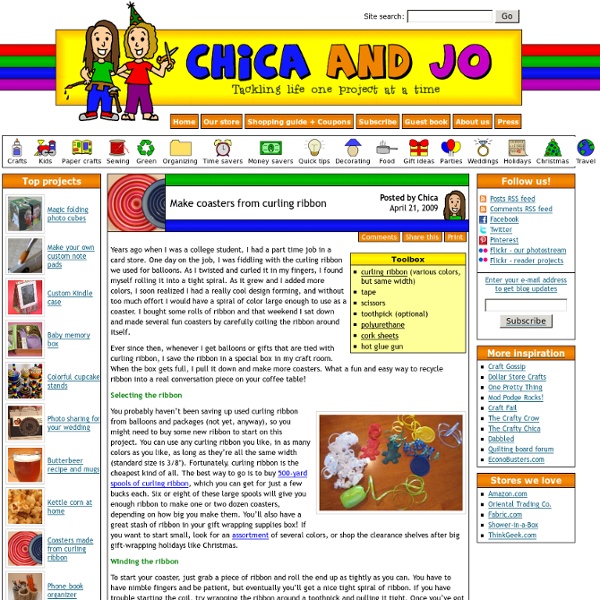
background preloader

Curling Ribbon Coasters

Curling Ribbon Coasters
Years ago when I was a college student, I had a part time job in a card store. One day on the job, I was fiddling with the curling ribbon we used for balloons. As I twisted and curled it in my fingers, I found myself rolling it into a tight spiral. As it grew and I added more colors, I soon realized I had a really cool design forming, and without too much effort I would have a spiral of color large enough to use as a coaster. Ever since then, whenever I get balloons or gifts that are tied with curling ribbon, I save the ribbon in a special box in my craft room. Selecting the ribbon You probably haven’t been saving up used curling ribbon from balloons and packages (not yet, anyway), so you might need to buy some new ribbon to start on this project. Winding the ribbon To start your coaster, just grab a piece of ribbon and roll the end up as tightly as you can. Now for the fun part. You can see a lot of potential fun here with patterns and colors. Coat the coasters or brush-on varieties.

Paper Flowers Why not brighten up your gloomy winter day, by making your own paper flowers. This super simple project takes only about 5 mins and is sure to brighten any room. Add them to twigs or branches for an instant bouquet or simply throw them in a bowl. Originally created by Martha Stewart, Wendy from DoziDesign has whipped up a quick tutorial. Head on over there and start making flowers to your heart’s content. Pictures from Dozi & Jen Elisebeth. related posts Yurt Buildng Here is a free copy of my book Build your own yurt, written in 1995, It has been used by a great many people who have built their own yurts. Our designs have progressed enormously since 1995. For a much more comprehensive guide see The Complete Yurt Handbook or see the rest of our website A complete guide to making a Mongolian Ger by P.R. Third Edition Fully revised and expanded for 1998 Internet Edition Jan 2000 The Yurt The English word Yurt comes from the Russian Yurta describing a circular trellis walled framed tent. The Kirgiz yurt with bent-wood roof poles and crown and a domed overall shape. The two tiered yurt with a pointed roof and two layers of wall section placed one on top of the other. The Mongol or Kalmuk ger with straight roof poles, a heavy timber crown, often supported by two upright poles, and fitted with a wooden door. This proven design is equally well suited to the many uses for moveable dwellings in this country. Figure 1.

String Lanterns Jessica of Wednesday Inc shows us how to make those gorgeous twine chandeliers from the inspiration shoot she shared with us this morning. Using balloons, glue and twine, you can also make these lanterns for your wedding – and then bring it home and use it as your very own mid century lampshade. What you will need are: balloons, glue, yarn, tray for glue, corn starch 1/2 cup of Corn starch, 1/4 cup of Warm water, clear fast drying spray paint, hanging lamp cord or fishing line (depending on your desired final product), and a lighting kit if you’re looking for a fully functional lantern. Jessica recommends using a sharpie to mark on the inflated balloon how much room you need to leave for the lighting cord. Are you getting excited to try to do this at home as much I am? Instructions: 1.

brenna’s paper capiz shell chandelier i love wax paper for packing lunches; i wrap sandwiches in a piece of wax paper and tie it like a present with a little cotton string. it’s so much better looking than a plastic bag. wax paper comes in handy for more things than i realized, like rolling it up to use for a funnel, or how about rubbing a piece of wax paper on the top of your shower curtain rod to cut down on that terrible screeching in the morning…problem solved. but who knew that if you iron layers of wax paper together it looks remarkably similar to a capiz shell? this discovery brought me to today’s project: the faux capiz chandelier. hung over your dining table, or outside at an outdoor dinner party, it is an easy solution to a dramatic light fixture and will look phenomenal in either setting. i hope you enjoy making your own as much i did! -brenna CLICK HERE for the full how-to after the jump! Materials: Instructions: 1. spray paint your planter basket. let dry. 8. once you cover the hanging basket you are done!

Kodachrome Curtains - Updated! Now with lampy goodness! So, it's been a while since I've made anything Craftster-worthy, but my husband and I busted out the Dremel tool a few days ago and we made this: It's a pair of curtains made out of old Kodachrome slides! I'm really interested in photography, and will buy old cameras in antique and thrift stores in order to develop film that's inside of it. From time to time, I'll find collections of old slides and will buy those, too. Last fall, driving back from vacation, we stopped at an antique store outside of Kansas City and I found a box of a ton of old slides, mostly Kodachrome, from the 50s and 60s. I hate the idea that these pictures would just be resigned to the garbage or something, and wanted to display them (besides just scanning them in and putting them on Flickr - here's a link to my old found negative/slide collection, though, if you want to check that out: ). Then I connected them all together with chainmail rings.

Hair Flower 29 May 2010 These elegant fabric flowers are very simple to make . . . and only take a few basic supplies. The finished product is delightfully lovely, and at times can look like a real flower! Every flower will turn out differently and that is part of the beauty! If you haven’t used those tea lights in a while, now’s the time! Supplies: · Synthetic Silky Fabric · Scissors · Candle (preferably a tea light) Additional supplies: · Needle and Thread, Glue Dots or Glue Gun · Buttons and/or Beads Directions: 1. Make the largest one’s diameter about half an inch larger than you want the diameter of the flower, as the petals will end up shrinking a bit. 2. You can also cut around the pattern and skip the drawing part, it just might not be as uniform . . . but with these, uniform isn’t necessary. 3. Cut just inside the drawn lines to make a circle out of the fabric. 4. Be very careful (please have adult supervision, this is rather dangerous), as it is very easy to get burnt. 5.

Reese Dixon: Motherhood and other Creative Endeavors Bear had a great Aunt who made us a couple of handmade washcloths as a wedding present, and I have to confess, back then I could not understand why you’d go to that much trouble for a washcloth when paper towels are so cheap. Ten years later, I always smile to myself when I pull that washcloth out to wash the dishes with. Oh younger me, how silly you were to not appreciate the indestructible glories of a handknit. Those first washcloths have finally given up the ghost, so I thought it was time for a whole new batch of them. They are hands down the very very best things to use to wash dishes or wipe counters. The yarn makes all these lovely ridges that are great scrubbers, they are tougher than any sponge out there, they’ll never scratch anything delicate, and they just get tossed in the wash so no nasty little germ factories like what normally sits by the sink, and no dead trees. I also really prefer the process of crochet to the process of knitting. I used Lily Sugar ‘n Cream cotton.

you knew i was going to make one. they are all over pinterest....(i still am not signed up for pinterest because i don't have time for one more thing but browsing is fun!) so we made one. i took a box of 64 crayons and took out the blacks and browns.i used another small box and doubled up on the good colors i liked and hot glued them to the top of our canvas. then we turned our blow dryer to hot on high. not long after you set the hair dryer by the crayons they get shiny and then the wax starts to melt! and it dries really quickly too. seriously. what could be happier than this?? GREAT project. loved it today is the first FULL day with ALL my kids in ALL day school.yeah...i am smiling as i type that. it's good. it's quiet. i am rockin' it. removing wallpaper.....making code for craft weekend stuff.....doing my hair....going to lunch..... it's all good. hooray for school!

Recycle Tutorial: Woven Rag Rug Thank you for all the great feedback for liking my Braided Rag Rug. I understand that not everyone has a sewing machine or/and able to sew, so I created this no-sew version for the non-sewer who like to recycle their bed sheets or de-stash their fabrics to make this feet cozy Woven Rag Rug. This tutorial doesn’t require any loom for weaving; just use a sturdy corrugated carton box from your recycle pile. I hope everyone can do their part on greening the Earth again and reduce the rubbish that loaded the landfill. By the way, I gave the braided rag rug to my mum and she loves it so much, she is going to dig more old bed sheets out from her storage, which means I will have another bunch of supply to recycle. {Get full details on next page.} Pages: 1 2 Get all updates via email: Highlights from Our Partners

Kool-Aid Dyed Playsilks – Tried and True A couple months ago I came upon a tutorial on The Artful Parent for Kool-Aid Dyed Playsilks. I hadn’t really heard about playsilks before that but upon further investigation found out that they’re awesome. They can be pretty much anything your child wants them to be: capes, dresses, blankets, scenery, tents and the list goes on and on. So, seven of us got together with our seven toddlers (all under 2 years) and dyed 42 playsilks in total. We started around 11 am and didn’t finish until about 5 pm. We did six scarves at a time, with the other mothers pitching in to watch the child of whoever was working on their playsilks. After we did the first batch of Kool-Aid packets, some of the mothers decided to get a bit creative with color combination and as a result we ended up with 14 different color at the end of the day. Edit: Here are a few answers to some of the more popular questions posted in the comments. Where did you get your scarves/What size were they? Will these bleed?

Origami Flower Japanese Kusudama, this tutorial is featured on Craftuts Anyone can do that, I assure you. The proof: I can, just take a quick look at my result below. Below you can see my very first attempt to create paper flowers. What you will need to make your own Kusudama paper ball? 1. 3. 4. (optionally) I prefer torn paper instead of cut. You have to start with a single petal. Now you have to glue your 5 petals into a flower. Apply the glue to only one side of each petal, except for the last one, in this case cover both sides with glue. Your first flower is done. Don’t glue every petal right after you make it. When all 12 flowers are finished you have to glue them together. When two halves of Kusudama Flower Ball are ready you have to glue them together.

Fuzzy Thoughts: mini alien pattern Okay, I decided to post the pattern a day early, since you seem so impatient to knit them! There are directions for both circular knitting and flat knitting. I've tried both and the aliens look just the same. Knit with sport weight yarn, they turn out about 1.5" tall. You could knit them with other weight yarn, with appropriate needles, but I'm not sure what size they would be. Materials: small amount of sport weight or DK yarn; pair of 8 mm safety eyes, buttons or yarn to embroider face; stuffing; darning needle. Knit Circular: 3 mm (US size 2.5) circular needle, knit with magic loop method. Cast on 20 sts. Break off yarn and thread end though remaining sts. Finishing Turn alien inside out and secure this yarn end. Knit Flat: 3 mm (US size 2.5) straight knitting needles Cast on 22 sts. Break off yarn and thread end though remaining sts.

Tiny Polaroid Magnets | { Ambrosia Girl } Hi there! It’s felt like forever since I’ve last blogged, and has felt like an eternity since I’ve done anything crafty and nifty. Since my morning sickness has gone into full speed (yes, we’re expecting our third this fall!) I came across these DIY Pantone chip magnets on How About Orange and wanted to do something similar. You will need: Cardboard (mine was the backing of a sketchbook — much thicker than the back of a regular spiral bound notebook) or 2-3 sheets of white cardstock or poster board spray-mounted together to use as a sturdy backing to the magnetsOpaque white marker (necessary only if your cardboard is not white) Craft knife Metal straight edge/ruler Clear packing tape or frisk film. Step 1: Download a Photoshop file of the Polaroid frames below. Step 2: Print out photos onto photo paper. Step 3: Spray the back of your sheet of photos and also the cardboard with spray mount. Step 4: Trim out photos with craft knife. 487 Comments

Tutorial: Homemade Sidewalk Chalk by Michelle Vackar, Modern Handmade Child One of our favorite outside activities at our home is drawing with chalk on the driveway. You can play hopscotch, four-square, and of course draw and create silly stories. What you will need: • Toilet paper or paper towel tubes • Scissors • Duct tape • Wax paper • Small bucket or disposable container to make the recipe • ¾ cup of warm water • 1 ½ cups Plaster of Paris • 2-3 tablespoons of tempera paint • Paper bag or a “mess mat” ** we made six tubes of chalk – we simply doubled the above recipe Step 1: If you are using paper towel tubes, cut each tube in half, so it is roughly the length of a toilet paper roll tube. Step 2: Cover one end of each tube with duct table to hold the contents within. Step 3: Cut as many pieces of wax paper as you have tubes. Step 4: Pour the warm water into your bucket. Step 5: Next you will want to pour the tempera paint into the Plaster of Paris mixture and stir so that it is mixed thoroughly.

Related: