
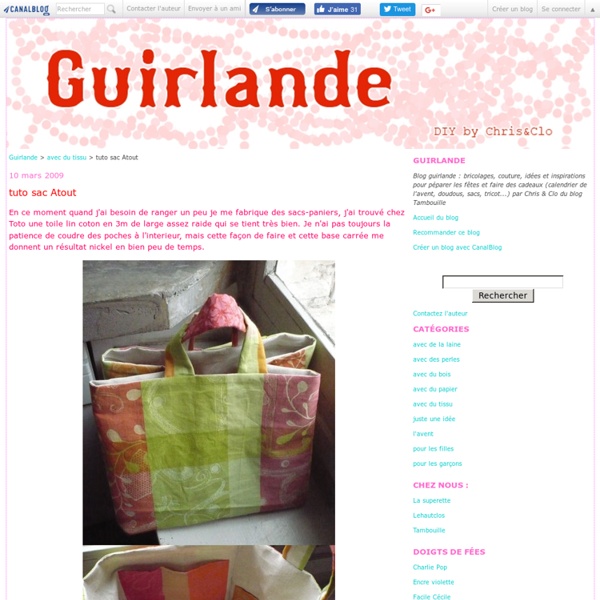
【复古包包DIY】喜欢这款包包吗???自己动…_来自張-綨-綨的图片分享 堆糖网 分类 首页 热门 最新 良品购 特卖惠 家居生活 美食菜谱 手工DIY 时尚搭配 美妆造型 婚纱婚礼 设计 古风 插画绘画 壁纸 头像 文字句子 旅行 摄影 人文艺术 影音书 人物明星 动画漫画 植物多肉 生活百科 搞笑萌宠 搜索含 的内容 搜索含 的商品 搜索含 的专辑 搜索含 的糖友 新浪微博腾讯 QQ 淘宝腾讯微博豆瓣 关联账号登录: 登录 注册 張-綨-綨 发布到 布藝DIY 专辑中 2012-01-15 21:13:49 【复古包包DIY】喜欢这款包包吗??? 关注 查看完整专辑169627 来自:用户上传 收集 腾讯微博 豆瓣 人人网 赞30 评论 31 添加评论... 评论 Mischen_06-15 Ding回复 巧妈蜜乐儿05-30 可以试试、回复 歪歪扭扭05-03 好经典的包包! By-accident04-21 好难做的! 爱欣欣04-14 太喜欢了回复 靠谱的萌子03-29 求翻译,韩文看不懂回复 duofeinan03-28 很喜欢回复 an-安pejic03-25 喜欢啊~! 幸福-点点03-25 稀饭回复 barefoot03-19 皮带钉子哪里买哟? 介么迷你? 怀抱没温暖03-08 大爱回复 逗乐03-06 小妖娆03-06 太强悍了~ 喜欢回复 cathrine8703-03 牛人啊回复 爱上眼睛看世界03-03 现收起,得闲的时候做一个。 Roof03-01 强的啊回复 lydiat02-24 不错的包包回复 蒜苗02-22 关键是木有材料回复 图书馆里的猫咪02-12 好可爱~~回复 你可能感兴趣 还被收集在 > 手工20制作包包类15115默认专辑164617 标签 设计手工 活动 哇塞! 截止日期:2014年04月23日 标签集帮助中心关于我们加入我们免责声明堆糖收集工具 ©Copyright by 堆糖 2010-2013 duitang.com, all rights reserved 备案 沪ICP备10038086号-1 确定要删除? 确定取消
Imagine Fabric Blog: How To Make a FABRIC BOWL Imagine Fabric Making a Fabric Bowl is as easy as ABC and it is a lot of fun. Just follow our step-by-step instructions and within an hour, you will be awarded with your very own Fabric Bowl. Let's get started. Select your fabric of choice - I picked some beautiful Joel Dewberry Fabric for my Fabric Bowl project. Used the size of your favorite bowl. Cut two fabric circles , put the two fabric circles left side together and use a thick interfacing that has glue on both side to iron the two fabric circles together. Now draw a circle in the center of one of your fabric circles. Now divide the fabric circle into eights. Continue to do so all along the "eights" lines you have previous drawn. You should end up with 8 triangles. Now choose a zig zag stitch of your liking and stitch all along the circle in the center of your fabric circle. Now it is time to zig zag stitch the triangles you have cut. Start to zig zag stitch from the inner circle. Continue to do so with all the triangles you have cut.
How to Make an Artful Scarf from Scraps April 30th, 2009 Email 97 users recommend Kayte Terry After dissolving the stabilizer, you are left with a beautiful, one-of-a-kind scarf. Choose ribbons that are similar in shades, or you can try complementary shades, too! Photo: Kayte Terry A couple of days ago, a friend was wearing a beautiful scarf that she had gotten from a museum shop. For this project, you can use any fabric scrap or ribbons, lace, or doilies. What you'll need: One 18-inch x 60-inch piece of water-soluble stabilizerScraps of ribbons and/or fabricsIronFabric scissorsSewing machine and thread in desired colors 1. 2. 3. 4. 5. 6. 7. 8. 9.
Magnetic Bookmarks with Louise from I'm Feelin' Crafty. - thesoutherninstitute.com Welcome to The Southern Institute, I'm so glad you're here! Make sure you stay in the know... subscribe to our newsletter! Today we have a guest who’s new to The Southern Institute, although she’s not new to me! You might have followed me over to I’m Feelin’ Crafty awhile back for the Charlie’s Soap Container project. Today I wanted to share my tutorial on a magnetic bookmark. Step 1: Materials:Scrap FabricSew-In Magnets (or any magnets will work really, but I like the sew-in ones)Scissors and/or Rotary CutterThread Step 2: Make the front and/or back. Step 3: Cut the front and back sides to both be 2.5” by 6”. Step 4: Sew pieces together, right sides together, leaving about a 1” hole. Step 5: Trim the corners and pull the ends through. Step 6: Now that it’s right side out, iron the seams flat. Step 7: Insert the magnet. Step 8: Topstitch. Step 9: wahlah!
A Purse Thingy So, how was your weekend? Mine was fun, but exhausting. I decided to go and visit TheSecondChild on Saturday. It’s a six hour drive, so I got up early and I was down there by noon. I made a quick fabric shop stop and then TheSecondChild and I had a little lunch. Then we had a fun-filled afternoon of cleaning the house he lives in with 2 other 22-yr. old pigs guys. Anyway, last week. before all that excitement, I had fun making some little keychain cell phone id coin whatever-else-you-want-to-throw-in-there purses. They’re pretty easy to make and I thought you might like to make some too, so I took some pictures of the process and thought I’d write a little tutorial. Here’s a shot of the back of the purse with my cell phone tucked into the little pocket. So, shall we start? Some scraps of fabric — I used three different prints. Purse Back: Cut a 7″ long x 5 1/2″ wide piece of fabric. Quilt this little sandwich however you would like — stipple, straight lines, or make up your own. Oops!
Insulated Lunch Tote Tutorial Due to a large number of requests, I've updated the tutorial with the finished dimensions and a few clarifications. Enjoy! I designed this insulated lunch tote for Sandra's Handmade Christmas in July series. All the materials are machine washable, which for me, is what makes this worthwhile. I hate not being able to really wash my coolers. Here's what you need: 2 pieces of medium weight fabric, main part of tote (16 in. Take the contrasting pieces of fabric and fold over 1/2inch along the long side, toward the wrong side of fabric. Now, we're going to shape the bag a little. Here's what it should look like. A little more shaping. Draw a line from the corner of the bottom cutout. Cut on your line, for all layers (2 main panels, 2 PUL and Insul-Bright layers) Now that we've got our bag shaped, here's some quick instructions if you want to make your own straps. Fold in half lengthwise, iron. Topstich all the way around strap to finish. OK, back to our lunch tote. Almost done!
THE SHRUG Saks Fifth Avenue features this season’s trendy cover up, the shrug by Vince. The shrug pattern is an ideal project with which to experiment with fashion design for several reasons — it is knitted or sewn in one piece, there is minimal finishing, it is easy to wear, and relatively quick to make. The Vince version is an angora knit but can be made up in any stretch fabric. Cuff-to-cuff: 45 ½ (46 ½, 47 ½)” Width at back: 16 ½ (17 ½, 18 ½)” Top-to-hem: 21 (22 ½, 24)” NOTE: The greatest stretch of the knit fabric runs around the girth of the body (usually the crosswise grain from selvedge to selvedge). Measure a rectangle 21″ by 45½” (length X width) for a size SMALL. Measure 14½” in from each short end of the rectangle and mark as A,B,C, & D according to the diagram. Measure 4½ inches down from the top & up from the bottom of each long end of the rectangle and mark as E, F, G, & H. Measure 2½ inches down from A, B & up from C, D. Blend a gentle arc between AF, BH, CE, & DG. Like this:
sewing Featured: Stefano Pilati for YVES SAINT LAURENT Explore volume and proportion by challenging conventional principles of tailoring for your Autumn wardrobe. Here is a great example by Stefano Pilati for YVES SAINT LAURENT, a ‘zoot’ trouser balancing a fitted cropped top. The pattern draft is a bit more advanced for those daring to try pleated trousers yet it is an easy project to construct. You will need: Bottom-weight fashion fabric, 54” [137cm] wide **¼ yd. [0.25 m] of fusible interfacing, 45” [114cm] wide.⅓ yd. [0.30 m] of pocketing fabric, 45” [114 cm] wide1 zipper, 7” [18 cm] long.1 set of pant hook & barKraft paper ** A minimum of 3 yards of fabric is required for pleated trousers – for an average sized person. Waist – measure around narrowest part of torso just above the navel. Hip – measure around fullest part of seat, about 9” [23cm] below waistline. Body Rise – measure vertically from waistline to top of chair seat, while seated. Outseam – measure vertically from waist to heels. 1.
Sew A Clean Sweep Apron! A cleaning apron? What, me? Yes, you! Forget those '50's images of housewifely frou-frou and ruffles: a cleaning apron has a place in the modern home manager's toolkit. A cleaning apron speeds cleaning chores. Stockpile a stack of cleaning cloths in one pocket, a cleaning sponge in another. The pros know! But there's a small problem. Add the cost! We've got the solution: our Clean Sweep Apron. Just for fun, we've included a decorative graphic. Yes, you'll need to sew this apron yourself, but our Clean Sweep Apron requires minimal sewing skill. You won't need a full-featured sewing room for this project; you can make the Clean Sweep Apron with nothing more than a straight-stitch sewing machine, an iron and a few pins. Ready? Materials: 1 1/2 yard cotton fabric (select medium-weight, tightly-woven, 100% cotton fabric for best washability and wear)1 1/2 yard waistband interfacing3 inches Velcro brand hook-and-loop fastenerthread Tools: sewing machinecutting toolsiron and ironing boardpins
Weekend Wonders with Fabric.com: Outdoor Placemats with Flatware Pockets Outdoor dining takes a little creativity in order to keep everything from blowin' in the wind. Our darling, durable placemats have built-in pockets to hold flatware and/or napkins. Dining in? Hooray for the reversible! Normally, outdoor fabrics are not meant to be machine washable. If you're new to working with outdoor fabrics, take a look at the tutorial we did awhile back: How To Work With And Select Outdoor-Safe Fabric. We created a set of four mix and match placemats; the supply list below is for the same. ¾ yard of FOUR coordinating 54" wide indoor/outdoor fabric. Placemat One: Placemat Two: Placemat Three: Placemat Four: Supplies needed for all placemats Coats Outdoor Living thread to match fabricNOTE: This thread is profiled in the Outdoor Fabric article. Prepare and place the pocket Find the four fussy cut 6" wide x 8½" high rectangles. Using a Quarter Inch Seam foot (if possible), stitch along both sides and across the bottom, leaving the top open ('cause, yeah, it's a pocket).