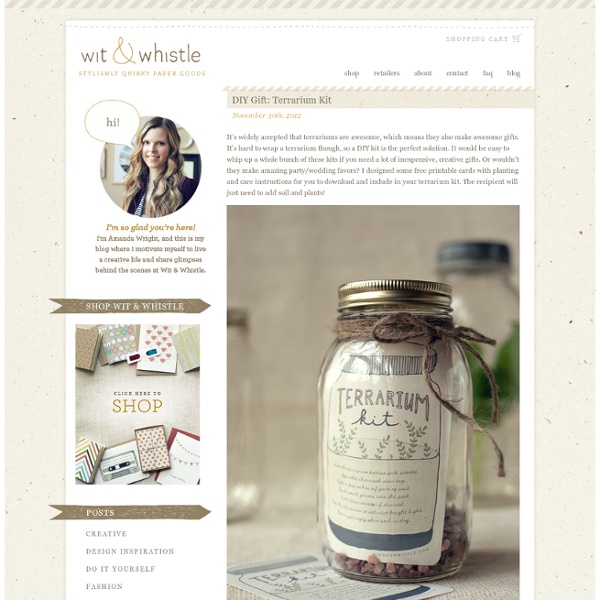
20 Fascinating And Cool DIY Ideas To Add More Beauty To Your Sweet Home
Now a days DIY projects are very famous all over the world, everyone tries to build something new and different which can be a easy way to turn your old things into useful stuff. Thanks to all the designers who are working hard in DIY section and giving us something very creative, cheap and handy products. In this post we have collected 20 more DIY ideas for you to try and I am sure these will add more beauty to your beautiful homes. We all wants to decorate our homes and some time our budget doesn’t allow us to do so, well no worries that’s why these DIY ideas are for us, and these DIY would not need special skills.
Gift bags made from envelopes
The event for which I needed that non-Satanic craft was this past weekend. In addition to little demon-free booklets, we also made these mini gift bags. "Baglets," as one participant christened them. (Or maybe you'd spell it "Baglette"? Looks more elegant than spelling it like "piglet." Beats me.)
25 Handmade Gifts Under $5
If your gift list is long and your budget is small here are some great Handmade Gifts that you can make. Keep in mind that handmade items are not just beautiful but special… I love to give them and I love to receive them. In my opinion they are the best! Jersey Knit Bracelet
Sugar Scrubs Recipes
*December 13, 2012 Update: I have had many of you wanting the labels to download…Great News! They are now available and you can get them by clicking on this link: Peppermint Candy Cane Sugar Scrub Labels You will notice that you have to Like my Face Book page to get it. This is now where I will be placing all my free downloads so that they are free and accessible to my fans.
Cool Mint Lip Balm
On Tuesday I showed you the sparkly strawberry lip balms I made for my Christmas cracker gifts. They'd be great for the gals, but I also needed something for the lads so I made cool mint lip balms with a white leaf atop. Christmas gift : Cool mint lip balmIngredients 2 tablespoons of white beeswax pellets (1/2 tsp for leaves)4 tablespoons sunflower oil (1/2 tsp for leaves)Few drops of cool mint flavour oilTeal food colouringPackagingEquipmentMini leaf mouldPipettesMicrowavable glass jugMicrowavable small glass jarMetal spoonScissorsSharp knife Cool mint lip balm, How-to step by step Start by placing the beeswax pellets and oil in a glass jug and heating in the microwave on low to medium power until the beeswax pellets have melted.
Citrus Facial Refresher
In a small sauce pan, bring water to a boil. Add vitamin C tablet and stir until dissolved. In a medium glass bowl, add the lemon peel. Pour the hot water over the lemon peel and cover with plastic wrap. Allow to steep overnight on the counter.
Chalkboard Mason Jar Magnetic Jars
Longest title ever for a craft? I just couldn't decide what to call it, so it;s a little long-winded.... But, here's a tutorial on how to make Chalkboard Mason Jar Magnetic Jars: I was sent some products to try out from Plaid, along with a gift card to Walmart for any other supplies I may need. First off, did you know that Walmart has expanded their craft department??
Canvas Project
To all of your coming over from Pinterest:Thanks so much for stopping by! Who knew such a simple project could become so popular? If you have any questions please ask! You can also check the comments because many people have shared tips and tricks they discovered as they've tried this project. Also, there's a misconception going around Pinterest that you can use glue for this project. Several people have told me that glue does not work.
DIY home decor
Ever since I moved to New York, one of my favorite things to do is create things for our apartment. I love adding dramatic things that change the whole vibe of the room-- and nothing is more dramatic than a chandelier. A couple months back we moved from a teeny tiny apartment around the corner to the one we're in now. Since I think we'll be in this apartment for a couple years, it's been SO fun to be more aggressive with the decorating.
Put your stuff up in the air! Hanging DIY ideas & tutorials
Posted by ScrapHacker.com on onsdag, juni 27, 2012 · 9 Comments To heck with both feet on the ground! Now’s the time to put your ideas up in the air! I’ve gathered a bunch of supafly D.I.Y to give wings to anything you’ve got around the house (well, almost!). By showing you a bunch of different applications (from chunky sofas to delicate D.I.Y hanging planters) I hope you’ll all find a little something to get your DIY juices flowin’ in the mix – Enjoy! pics via here
Pumpkin-Sugar Body Scrub
Years ago when I managed a day spa, one of my favorite facials included a Pumpkin Enzyme Peel. That Pumpkin mask was so magically transforming that it inspired me to try working with at-home pumpkin treatments. Raw pumpkin has natural enzymes that eat away layers of dead skin cells and rejuvenate skin texture. In my kitchen I don’t have a whole lot of raw pumpkin on hand but I sure do have the canned stuff. Cooked pumpkin may be missing those potent enzymes but happens to be jam-packed with other good stuff like Vitamin-A, Vitamin-C, and lots of antioxidants that help in fighting free radicals. Not bad for a little can of pumpkin!
Baby Rose Sugar Scrub
Have you ever received roses that were stunningly gorgeous, only to be sad when they age? Well, I found the perfect solution to making our favorite rose bouquet last a little longer! Introducing: Baby Rose Sugar Scrub (my 5th sugar baby creation!).
100 Ways to Repurpose Everything (Happy Earth Day!)
Think this title is a tall order? Well, you’re in for a post of epic eco-tastic proportions. So epic that you may need to give your computer or mobile device an extra moment to load all of our pretty pictures.