background preloader

Git Basics

Git Basics
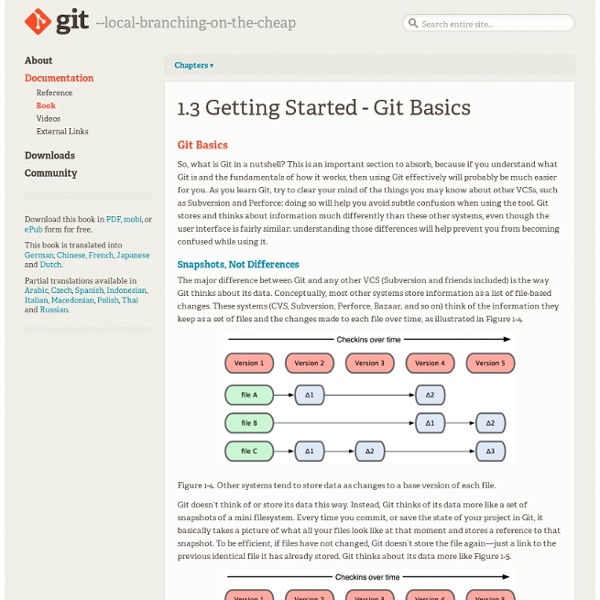
So, what is Git in a nutshell? This is an important section to absorb, because if you understand what Git is and the fundamentals of how it works, then using Git effectively will probably be much easier for you. As you learn Git, try to clear your mind of the things you may know about other VCSs, such as Subversion and Perforce; doing so will help you avoid subtle confusion when using the tool. Git stores and thinks about information much differently than these other systems, even though the user interface is fairly similar; understanding those differences will help prevent you from becoming confused while using it. Snapshots, Not Differences The major difference between Git and any other VCS (Subversion and friends included) is the way Git thinks about its data. Figure 1-4. Git doesn’t think of or store its data this way. Figure 1-5. This is an important distinction between Git and nearly all other VCSs. Nearly Every Operation Is Local Git Has Integrity Git Generally Only Adds Data

What a Branch Is To really understand the way Git does branching, we need to take a step back and examine how Git stores its data. As you may remember from Chapter 1, Git doesn’t store data as a series of changesets or deltas, but instead as a series of snapshots. When you commit in Git, Git stores a commit object that contains a pointer to the snapshot of the content you staged, the author and message metadata, and zero or more pointers to the commit or commits that were the direct parents of this commit: zero parents for the first commit, one parent for a normal commit, and multiple parents for a commit that results from a merge of two or more branches. To visualize this, let’s assume that you have a directory containing three files, and you stage them all and commit. Staging the files checksums each one (the SHA-1 hash we mentioned in Chapter 1), stores that version of the file in the Git repository (Git refers to them as blobs), and adds that checksum to the staging area: Figure 3-1. Figure 3-2.

A Visual Git Reference If the images do not work, you can try the Non-SVG version of this page. SVG images have been disabled. (Re-enable SVG) This page gives brief, visual reference for the most common commands in git. Once you know a bit about how git works, this site may solidify your understanding. Also recommended: Visualizing Git Concepts with D3 Contents Basic Usage The four commands above copy files between the working directory, the stage (also called the index), and the history (in the form of commits). git add files copies files (at their current state) to the stage. git commit saves a snapshot of the stage as a commit. git reset -- files unstages files; that is, it copies files from the latest commit to the stage. You can use git reset -p, git checkout -p, or git add -p instead of (or in addition to) specifying particular files to interactively choose which hunks copy. It is also possible to jump over the stage and check out files directly from the history or commit files without staging first. Diff Reset

tortoisegit - Where are git database files stored on windows index • Git Cheatsheet • NDP Software stash workspace index local repository upstream repository status Displays paths that have differences between the index file and the current HEAD commit, paths that have differences between the workspace and the index file, and paths in the workspace that are not tracked by git. diff Displays the differences not added to the index. diff commit or branch View the changes you have in your workspace relative to the named <em>commit</em>. add file... or dir... Adds the current content of new or modified files to the index, thus staging that content for inclusion in the next commit. add -u Adds the current content of modified (NOT NEW) files to the index. rm file(s)... Remove a file from the workspace and the index. mv file(s)... Move file in the workspace and the index. commit -a -m 'msg' Commit all files changed since your last commit, except untracked files (ie. all files that are already listed in the index). checkout files(s)... or dir Updates the file or directory in the workspace. reset --soft HEAD^

Learning · Normal Workflow Make and view changes made, then stage and commit them. So you have a Git repository and everything is all setup. What now? Generally, it is not going to be much different than working with any other source control system. The only real difference should be the staging process. The workflow will generally go something like this: modify files see what you’ve changed stage the changes you want to commit commit your staged changes rinse, repeat That is the most complex case. modify files commit your changes repeat Easy peasy. the simple case The first thing we’re going to do is modify some files. $ git clone $ cd simplegit For this first example we’ll modify the README file to add ourselves as an author on the project. First, we simply edit the file. A prompt for a commit message will open in our editor (the $EDITOR environment variable or ‘core.editor’ git config variable - by default it uses ‘vim’) that looks like this: using the staging area

git - the simple guide - no deep shit! git - the simple guide just a simple guide for getting started with git. no deep shit ;) by Roger Dudler credits to @tfnico, @fhd and Namics this guide in deutsch, español, français, indonesian, italiano, nederlands, polski, português, русский, türkçe, မြန်မာ, 日本語, 中文, 한국어 Vietnamese please report issues on github Infuse analytics everywhere with the AI-powered embedded analytics platform. Start your free trial.ads via Carbon setup Download git for OSX Download git for Windows Download git for Linux create a new repository create a new directory, open it and perform a git init to create a new git repository. checkout a repository create a working copy of a local repository by running the command git clone /path/to/repository when using a remote server, your command will be git clone username@host:/path/to/repository workflow add & commit You can propose changes (add it to the Index) using git add <filename> git add * This is the first step in the basic git workflow. pushing changes branching log

git - 간편 안내서 - 어렵지 않아요! git - 간편 안내서 git을 시작하기 위한 간편 안내서. 어렵지 않아요 ;) Roger Dudler가 만들었어요. 설치 OS X용 git 다운로드 Windows용 git 다운로드 Linux용 git 다운로드 새로운 저장소 만들기 폴더를 하나 만들고, 그 안에서 아래 명령을 실행하세요. git init 새로운 git 저장소가 만들어집니다. 저장소 받아오기 로컬 저장소를 복제(clone)하려면 아래 명령을 실행하세요. git clone /로컬/저장소/경로 원격 서버의 저장소를 복제하려면 아래 명령을 실행하세요. git clone 사용자명@호스트:/원격/저장소/경로 작업의 흐름 여러분의 로컬 저장소는 git이 관리하는 세 그루의 나무로 구성돼있어요. 추가와 확정(commit) 변경된 파일은 아래 명령어로 (인덱스에) 추가할 수 있어요. git add <파일 이름> git add * 이것이 바로 git의 기본 작업 흐름에서 첫 단계에 해당돼요. 변경 내용 발행(push)하기 현재의 변경 내용은 아직 로컬 저장소의 HEAD 안에 머물고 있어요. 가지(branch)치기 가지는 안전하게 격리된 상태에서 무언가를 만들 때 사용해요. 아래 명령으로 "feature_x"라는 이름의 가지를 만들고 갈아탑니다. git checkout -b feature_x 아래 명령으로 master 가지로 돌아올 수 있어요. git checkout master 아래 명령으로는 가지를 삭제할 수 있어요. git branch -d feature_x 여러분이 새로 만든 가지를 원격 저장소로 전송하기 전까지는 다른 사람들이 접근할 수 없어요. git push origin <가지 이름> 갱신과 병합(merge) 여러분의 로컬 저장소를 원격 저장소에 맞춰 갱신하려면 아래 명령을 실행하세요. git pull 이렇게 하면 원격 저장소의 변경 내용이 로컬 작업 디렉토리에 받아지고(fetch), 병합(merge)된답니다. 꼬리표(tag) 달기 소프트웨어의 새 버전을 발표할 때마다 꼬리표를 달아놓으면 좋아요. 로컬 변경 내용 되돌리기 댓글

Nick Farina - Git Is Simpler Than You Think It was about one year ago that we switched to Git. Previously, we used Subversion, through the Mac app Versions, which (rightly) holds an Apple Design Award. I made the executive decision to leave our comfy world of Versions because it seemed clear that Git was winning the Internet. There was much grumbling from my teammates, who were busy enough doing actual work thank you very much. But I pressed forward. It might as well have printed PC LOAD LETTER. “Not currently on any branch?!” Maintenance Required Git is not a Prius. By now we all know how to drive Git. Did you know the top result for “git tutorial” is this manpage on kernel.org? So instead let’s pull over, open the hood up, and poke around. The Basics We’ll run through some basic commands to make a repository for our examples: ~$ mkdir mysite ~$ cd mysite ~/mysite$ echo "<title>All About Cats</title>" > index.html ~/mysite$ git init ~/mysite$ git add index.html ~/mysite$ git commit -m "First commit, added a title." With me so far?

A successful Git branching model » nvie.com Note of reflection (March 5, 2020)This model was conceived in 2010, now more than 10 years ago, and not very long after Git itself came into being. In those 10 years, git-flow (the branching model laid out in this article) has become hugely popular in many a software team to the point where people have started treating it like a standard of sorts — but unfortunately also as a dogma or panacea.During those 10 years, Git itself has taken the world by a storm, and the most popular type of software that is being developed with Git is shifting more towards web apps — at least in my filter bubble. Web apps are typically continuously delivered, not rolled back, and you don't have to support multiple versions of the software running in the wild.This is not the class of software that I had in mind when I wrote the blog post 10 years ago. Why git? ¶ For a thorough discussion on the pros and cons of Git compared to centralized source code control systems, see the web. The main branches ¶ develop

gitglossary(7) alternate object database Via the alternates mechanism, a repository can inherit part of its object database from another object database, which is called "alternate". bare repository A bare repository is normally an appropriately named directory with a .git suffix that does not have a locally checked-out copy of any of the files under revision control. blob object Untyped object, e.g. the contents of a file. branch A "branch" is an active line of development. cache Obsolete for: index. chain A list of objects, where each object in the list contains a reference to its successor (for example, the successor of a commit could be one of its parents). changeset BitKeeper/cvsps speak for "commit". checkout The action of updating all or part of the working tree with a tree object or blob from the object database, and updating the index and HEAD if the whole working tree has been pointed at a new branch. cherry-picking clean commit commit object core git Fundamental data structures and utilities of git. dirty

First-Time Git Setup Now that you have Git on your system, you’ll want to do a few things to customize your Git environment. You should have to do these things only once; they’ll stick around between upgrades. You can also change them at any time by running through the commands again. Git comes with a tool called git config that lets you get and set configuration variables that control all aspects of how Git looks and operates. These variables can be stored in three different places: /etc/gitconfig file: Contains values for every user on the system and all their repositories. On Windows systems, Git looks for the .gitconfig file in the $HOME directory (%USERPROFILE% in Windows’ environment), which is C:\Documents and Settings\$USER or C:\Users\$USER for most people, depending on version ($USER is %USERNAME% in Windows’ environment). Your Identity The first thing you should do when you install Git is to set your user name and e-mail address. Your Editor $ git config --global core.editor emacs Your Diff Tool

GIT commands Here you will find a list with the major commands, their short descriptions and exemplary usage. For a detailed description of all the GIT commands please visit git config Sets configuration values for your user name, email, gpg key, preferred diff algorithm, file formats and more. Example: git config --global user.name "My Name" git config --global user.email "user@domain.com" cat ~/.gitconfig [user] name = My Name email = user@domain.com git init Initializes a git repository – creates the initial ‘.git’ directory in a new or in an existing project. Example: cd /home/user/my_new_git_folder/ git init git clone Makes a Git repository copy from a remote source. Also adds the original location as a remote so you can fetch from it again and push to it if you have permissions.

Fork A Repo If you've found yourself on this page, we're assuming you're brand new to Git and GitHub. This guide will walk you through the basics and explain a little bit about how everything works along the way. Contributing to a project At some point you may find yourself wanting to contribute to someone else's project, or would like to use someone's project as the starting point for your own. Step 1: Fork the "Spoon-Knife" repository To fork this project, click the "Fork" button in the GitHub.com repository. Step 2: Clone your fork You've successfully forked the Spoon-Knife repository, but so far it only exists on GitHub. Run the following code: git clone Clones your fork of the repository into the current directory in terminal Step 3: Configure remotes When a repository is cloned, it has a default remote called origin that points to your fork on GitHub, not the original repository it was forked from. More about remotes Git supports multiple remotes. Pull

git - how to add files and folder to github repo

Related: