
paper flowers | Talk Crafty To Me Why not brighten up your gloomy winter day, by making your own paper flowers. This super simple project takes only about 5 mins and is sure to brighten any room. Add them to twigs or branches for an instant bouquet or simply throw them in a bowl. Originally created by Martha Stewart, Wendy from DoziDesign has whipped up a quick tutorial. Head on over there and start making flowers to your heart’s content. Pictures from Dozi & Jen Elisebeth. related posts
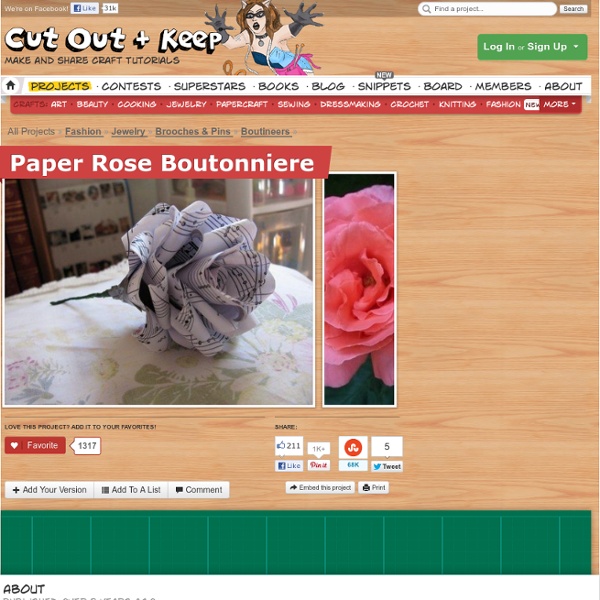
Easy Origami Envelope | If you’d like to make these cute little “Flap Lock” Origami Envelopes–all you’ll need is a piece of square paper…any size. I used Christmas scrapbook paper. 1. Make sure your edges are even. 2. 3. fold the right corner about 1/3 of the way to the left. 4. 5. 6. 6. 7. 8. 9. And there you have it! Now scurry off and make a million of these–or at least 24 if you’re using them for the Family Advent Countdown Calendar. Not in the mood to fold your own? DIY Project: Paper Flower Boutonnieres Paper flower boutonnieres are fun and easy to make. They'll add a touch of charm to any wedding. Don't feel limited to paper though! Use feathers, beads, seashells, whatever strikes your fancy! • Tissue paper (in similar colors) $.99 pack of 10 sheets• 18-guage cloth covered stem wire (pack of 12) $1.49• Artificial stamens (pearl topped flower sprays) $1.99 Optional Moss-Wrapped Boutonniere:• Green Floral Tape $1.49• Sphagnum Moss $2.49• Crochet floss/thread $1.60• Craft Glue $.99• Succulents, interesting leaves and foliage Free (or purchase for approx. $1 each)• Scissors Quick Tip: For a masculine touch, use slow-wilting succulents, sticks and leaves from the garden to embellish the rustic boutonniere. All materials were purchased at Michael’s with the exception of tissue paper from a local art store and live plants are from the backyard. For Paper Flower Boutonniere:Step 1: Secure 12 stamens (or 6 pairs) onto stem wire using green floral tape. Step 3: Fluff out petals.
Gift Ideas for poor creative souls (6) You know how it goes, a friend calls you and invites you to dinner at the last minute. OMG! What gift can you take?! You scrabble around the cupboards trying to find a box of chocolates or a bottle of wine but find that most of the chocolates have been eaten and the wine has gone. I thought this was a wonderful idea. Supplies: Patterned paper-one 12 x 12" sheet. These directions will give you one flower. 1. 4. 5. Tip: For single sided paper. 6. Note: Florist tape is stretchy, just play with it and pull gently but firmly as you move down the stem. 7. Note, you will have to play around with the height of the petals, and where on the petal you start your tape. 8. 9. 10. 11. 12. For tutorials on how to market yourself online, go here.
Whimsical Paper Flowers! Posted May 24, 2010 | 8 Comments Who knew paper could be so cute? We love these paper flowers that are blooming up all over the web! Recycled + re-purposed paper flowers are eco-friendly and will not wilt. Plus, they add a touch of whimsy to your wedding! Walk down the aisle with a bouquet, or use these stylish stems as your centerpieces! Here are some of our favorite hand-picked blooms: { source } { source } { source } { source } { source } { source } { source } { source } Paper Flowers – Anyone Can Do That | FindInspirations.com Japanese Kusudama, this tutorial is featured on Craftuts Anyone can do that, I assure you. The proof: I can, just take a quick look at my result below. And, believe me, I am neither meticulous nor particularly patient. Below you can see my very first attempt to create paper flowers. What you will need to make your own Kusudama paper ball? 1. 3. 4. (optionally) I prefer torn paper instead of cut. You have to start with a single petal. Now you have to glue your 5 petals into a flower. Apply the glue to only one side of each petal, except for the last one, in this case cover both sides with glue. Your first flower is done. Don’t glue every petal right after you make it. When all 12 flowers are finished you have to glue them together. When two halves of Kusudama Flower Ball are ready you have to glue them together.
DIY Vintage Bottle Hanging Manzanita Branch Centerpiece Next up is Ashley’s DIY suspending glass centerpiece. Using small vintage bottles and manzanita branches, she created a gorgeous centerpiece that could be used to decorate escort card or guest book tables. The first place winner will receive $500 and second place a $100 gift certificate to Wendy Mink Jewelry, so this is huge. Voting won’t start till all selected entries are published, so sit tight! Materials Needed: - A variety of vintage glass bottles in all sizes, such as old medicine & perfume bottles, and lonely salt-shakers that have lost their companion along the way. Prep work: Wash and clean off old glass bottles. Instructions: Step 1: Take wire and measure across the neck of the bottle, add a little slack, cut the wire Step 2: Wrap the wire around the bottle just below the rim, and loosely fasten it.
recycle project no. 7 - magazine bowl This project took me so much longer than I thought it would. I may not be finished yet (I'll explain in a minute) but I want to move on to other ideas so I decided to post about it now. I certainly didn't reinvent the wheel with this one but it was something fun and super easy to make. Materials:- a magazine (I didn't use more than half of a magazine)- glue gun I started by making a tight little roll and making the flat circle that I showed you the other day. Each strip that I used is made from one page of the magazine. I added each strip to my piece by keeping the folded edge outside and the open side toward the inside. As you place each strip down only do so a short piece at a time because the glue dries really fast. I glued each strip of paper down, leaving a small piece unglued so that I could tuck in the following strip under it. Here's my unfinished bowl. A photo just to show the scale of the bowl.
Bridesmaid Gift Idea: Thoughtful Jewelry We saw this idea for a sweet and thoughtful bridesmaid gift over on 100 Layer Cake and just had to share it with our readers. The idea was for a vintage locket with a personal message written inside. It’s a very simple gift to put together … all you need to do is write a personal note, saying or quote on a strip of pretty paper, fold it up and place it into the locket. It will pop out when the locket is opened. This is a wonderful bridesmaid gift because it’s not a major expense, but can be very personal with the message inside – a perfect way to thank your ladies for being an important part of your life and your wedding day. Photo Credit: 100 Layer CakePin it Depending on your wedding and your bridesmaid’s taste, you can buy vintage lockets or new ones – both can be purchased at a reasonable price. Vintage Lockets: Photo Credit: Stephanie Stanger’s ShopPin it Photo Credit: Anechka’s Jewelry shop Pin it Photo Credit: Envisage’s shop Pin it New Lockets: Photo Credit: Overstock.comPin it
Folded Paper German Star Video Tutorial I made a tutorial for folded paper German Stars. Sometimes they are called Moravian Stars or Froebel Stars. You may want to make some for decorating a Christmas tree, gifts, wreaths or to display in a pretty bowl. My favorite are the pure white... so pristine and elegant. They are very pretty in bright colors too. A popular shade of blue... cool and wintry. My tutorial is in two parts Part 1 Part 2 (Note: Traditionally these German Stars were dipped in paraffin to help protect them from the outdoor elements. In response to some questions I have received about the paper and the wax: I have used paper like the kind you use for the computer and taped the strips together for the length I needed. I have ordered paper strips from the Starcraft Etsy Shop and really like them. I LOVE the metallic paper ~ it is easy to work with and makes gorgeous stars. Construction paper does not work. Click link below for How-to for dipping stars in wax