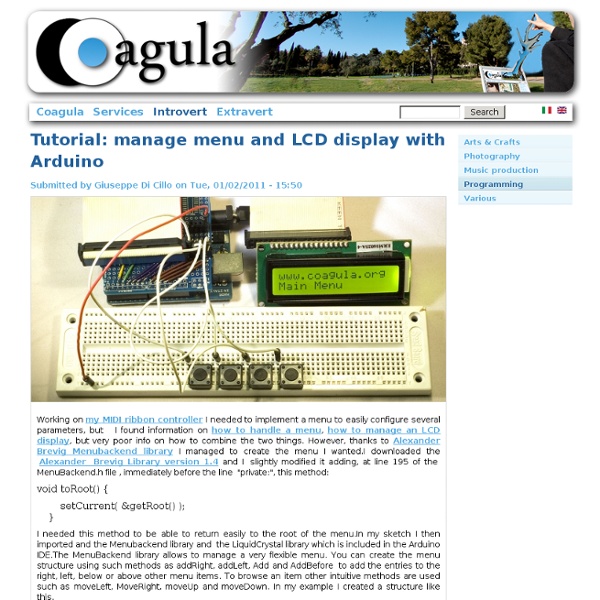
Tutorial: manage menu and LCD display with Arduino
Arduino avanzado T03AA - LCD 16x2 Menú
Creado en Viernes, 30 Diciembre 2011 Escrito por Mauricio Velandia Este tutorial tiene la finalidad de explicar la aplicación de una pantalla LCD en nuestros proyectos, además profundizaremos en la manipulación de datos en la LCD y crearemos un menú para ampliar el control!!!! y como practica vamos a realizar un menú para leer entradas, encender salidas e imprimir mensajes, Aspiramos que esta información te sirva para futuros proyectos :D Lista de materiales Estructuras de programación Para comprender este código es recomendable que estemos familiarizados con programación estructurada ya que nos facilita la organización del programa, este tipo de programación nos trae muchas ventajas en cuanto a depuración organización y comprensión de un código. delay(contador) { while (contador interno < contador) { contador interno = cantador interno+1; return; y como puedes ver con la programación estructurada podemos omitir algunos detalles y acortar el programa principal (void loop).
MenuBackend, new menu managment library
I just created a new library for menu managment.It has no limits as to what kind of logical layout you want. [size=14]MenuBackend 1.0[/size] Every item can be thought of as a cross with directional connections in these direcitons: above, right, belov, left. You can add an item to another item at these locations. Say you have two items, called A and B.If you want these to be ordered as a horizontal menu with A being the first item, you simply add B to a at the right position.A.addRight(B);Now your menu support these actions (if you have added the A item to the menu): menu.moveRight(); //now menu.getCurrent() == Bmenu.moveLeft(); //now menu.getCurrent() == A Both menu setup and menu navigation is demonstrated in the example below. This menu also support backstepping. #include <MenuBackend.h> /* This program demonstrates a menu modeled after the menubar in the Arduino IDE +root +file +edit +sketch +tools +help +new +cut +verify (V) +autoformat +environment +open +examples +ArduinoISP*/
Arduino 5 Minute Tutorials: Lesson 2 – Basic Code & Blink LED - GoRobotics
Lessons Menu: Lesson 2 Hardware: Computer / Laptop or Netbook Arduino MicrocontrollerUSB to Serial Adapter (if your microcontroller does not have a USB port)Appropriate USB cable (Arduino boards draw power from the USB port – no batteries yet) The Arduino language is CASE SENSITIVE: a capital letter is not the same as a lower case letter. The “void setup()” section is widely used to initialize variables, pin modes, set the serial baud rate and related. The “void loop()” section is the part of the code that loops back onto itself and is the main part of the code. void subroutinename() {} Almost every line of code needs to end with a semicolon ‘;’ (there are a few exceptions which we will see later). //comments are overlooked when compiling your program To write multi-line comments, start the comment with /* and end with */ /* This is a multi-line comment and saves you having to always use double slashes at the beginning of every line. Serial Communication void setup() {Serial.begin(9600);}
Viajes con Arduino
S1D15G10NokiaLCD
Interfacing the Arduino to the 128x128 12bit color 3V Epson Nokia Knock-Off LCD. This is the first color, graphic LCD display I worked with. I made some assumptions when I first began working with it. After wiring everything up, I desperately wanted some sign of life from the LCD, to know if it was wired correctly. Speaking of noise, this project has had the worst problems of any I've ever done. Requires 5V to 3V conversion. Sparkfun's part# LCD-08600 does not work properly with the old original source code from this page. Using Thomas J's library with Phokur's edits, the resulting library can be downloaded A newer edit to the fonts in the above library (removed - see above)
Related:
Related:
