
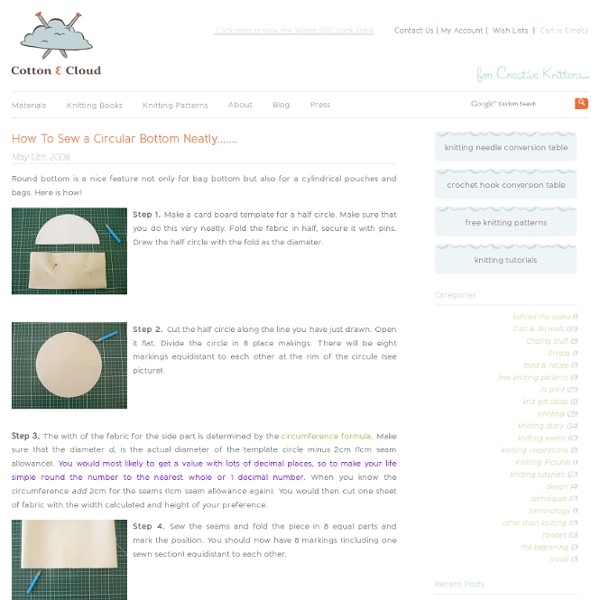
Make. Life. Beautiful.: Flex Frame Purse Tutorial Hi, I'm Juliet and its an honour to be visiting from Tartankiwi. Firstly can I say a huge thank you to Nin, for inviting me to share this tutorial on her blog. I'm fairly new to writing sewing tutorials, so if anything is unclear please do not hesitate to ask. A few wee notes before we get started: Several people have asked me where I bought my flex frames. These came from an Etsy store. This tutorial is for the basic purse, I have not included instructions on how to appliqué the bird outline, but I have included the template with the pattern if you wish to use it. Unless otherwise stated, all seams in this tutorial are 1/4 inch. To make a Flex Frame Purse, you will need: Take the small rectangles which will form the sleeve for the flex frame. Ensure that all the short ends are lined up and sew the other end. Turn it right side out. Repeat for the other leg of the flex frame cover. Now take the fusible fleece and the outer fabric for the body of the purse. Turn the purse the right way out.
Make Your Own Clothing Labels This is part 2 of my 3 part label tutorial for textiles like clothing and bedding. Here are the 3 chapters: part 1 – what to say (or what the FTC wants you to put on your labels) part 2 – how to make them (DIY process of printing & cutting the labels on fabric) [you are here] part 3 – how to attach them (considerations for comfortable labels) This photo tutorial will walk you through how to print your own fabric labels and some lessons I’ve learned along the way. Step 1 – choose your treated fabric for your labels. In order for your printer ink to stain the fibers and last, you must use 100% natural fibers. If you don’t want to treat the fabric yourself, you can buy pretreated fabric sheets for your printer at craft stores or google them. And here is why picking your own fabric is important: you want your clothing labels to be comfortable when the garment is worn, and you don’t want them to unravel. I’ve got 2 fabric options for making your own labels that are comfortable: Done!
Patchwork bolso pequeño .. Comentarios: LiveInternet - Russian servicios en línea Diaries Суббота, 24 Сентября 2011 г. 00:46 + в цитатник Процитировано 108 раз Понравилось: 19 пользователям Fabric Labels Tutorial Many people have asked me how I make my labels so I have decided to make this little tutorial including pictures and any little tips that I have learned along the way. You will find that making your own labels is quite simple and much cheaper than purchasing custom labels. Pour yourself a cup of tea and enjoy. Materials needed:computer, graphics program (I used photoshop) & inkjet printerregular printer paperiron-on transfer paperutility knife, cutting mat & metal rulerribbon (I used 1/2 inch natural cotton twill tape)iron & ironing boardscissors Step 1: Design your image using your program of choice working with a resolution of 300ppi for a clear image. Step 2: Print your labels. Step 3: Cut out the images preferably into long strips using your utility knife, cutting mat and ruler. Step 4: Iron the transfer onto the ribbon. Step 5: Peel off the backing paper. Step 6: Use them! You could also make laundering instruction labels, and quilt labels using this same method!
ОЧЕНЬ НУЖНАЯ СУМКА. Среда, 24 Августа 2011 г. 12:42 + в цитатник Процитировано 416 раз Понравилось: 30 пользователям DIY Custom Fabric Labels Custom clothing labels using iron-on transfers (©2005, www.grumperina.com. Updated September 13th, 2010. Information and images contained within this tutorial are copyrighted and cannot be used for any unintended purposes without my explicit permission. E-mail me.) Many people have asked how I make these adorable and completely customized labels for my handknits: It's simple, cheap, creative, and allows me to put the recipient's name, fabric content, care instructions, and even a little cartoon on the label! Click here to proceed with the tutorial: You will need: - inkjet printer - iron (no steam!) - satin ribbon, 5/8" - 1/2" wide, or whatever is suitable for your project - anti-fraying liquid (Fray Check , Fray Block, etc.) - iron-on transfers, whichever are suitable for your printer. Let's get started! You will need to design your label using graphic software. Follow the instructions on your iron-on transfers. You can reuse the same iron-on transfer paper over and over again. Ta da! All done!
КАК ВШИТЬ МОЛНИЮ В СУМКУ. Вторник, 23 Августа 2011 г. 02:13 + в цитатник Процитировано 623 раз Понравилось: 40 пользователям Fabric Cutting Techniques & Tricks I had a run in with a piece of rayon spandex jersey this past week. I ended up cutting it with an underlay to keep it from moving around. It reminded me that an underlay is useful for other things besides chiffon, georgette, and charmeuse. WHAT IS AN UNDERLAY? WHY DO I NEED TO DO THIS? If you are cutting pairs, like 2 sleeves or 2 fronts, make sure you lay your fabrics face to face so that you don’t end up with 2 left sleeves. ESTABLISH A STRAIGHT GRAIN If it’s a fabric you can tear, like chiffon, that’s the easiest way to establish the straight grain. Use weights to hold the start of the fabric at the line you have drawn at a right angle from the edge, across your paper underlay. LAY OUT YOUR FABRIC ON THE UNDERLAY Once your fabric is laid out on the starting grain, smooth it out absolutely flat ( a c-thru ruler brushed lightly across the surface to eliminate bumps can help); make sure to place weights on the fabric to keep it that way. Do not use pins! Pinning will distort the fabric.
СУПЕР ПОДРОБНЫЙ МАСТЕР КЛАСС ПО ШИТЬЮ КЛАССИЧЕСКОГО КОШЕЛЬКА. Суббота, 06 Августа 2011 г. 04:16 + в цитатник Gather A Ruffle Without Pulling A Thread I enjoy using center-gathered strips to use as a ruffle embellishment (often called a "Euro-Ruffle"). The ruffled strip on the top pictured above is for my little friend Julianna, age 3, but I have used this same technique with narrow ruffles around necklines or sleeves on adult garments. The ways to use this embellishment are limited only by your imagination. In this tutorial, I will show you how to make a center ruffled strip, without having to pull any gathering threads! You can click each photo to enlarge it, then click the << BACK button of your browser to return to this page. First, start with a strip of woven or knit fabric. The top pictured above was embellished with 1-3/4" strips of woven fabric that have been finished like this-- Since the strips will be gathered, you may need to start with more than one strip so that it will be long enough. After stitching them together as shown above, trim off the the excess "triangle", leaving a 1/4" seam allowance. Labels: Sewing Tutorials