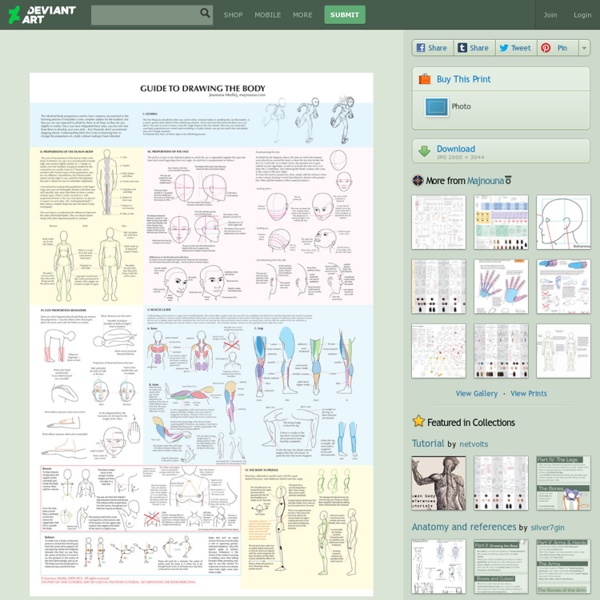
Big Guide to Drawing the Body by `Cedarseed on deviantART
This is the revised and final version of this tutorial, though some details are not included – I'm including them exclusively in the book Hands have their own tutorial here: And feet here: All my tutorials are listed here: [link] Get all of my human anatomy tutorials in one convenient book or e-book! Some advice to use this tutorial:
http://majnouna.deviantart.com/art/Big-Guide-to-Drawing-the-Body-15014442
Art Anatomy
by Franklin Einspruch Copyright Franklin Einspruch. Please see License for permitted usage. Please note that the view below is in a provisional state.
Proportions du corps humain
Publié le 07 février 2010 par Masmoulin Léonard de Vinci, au milieu du XVème siècle, a repris les théories des anciens selon lesquelles le corps est soumis aux lois de la mathématique. Il a illustre un ouvrage du 1er siècle de notre ère, réédité à la renaissance, avec son dessin célèbre dessin “Etude des proportions du corps humain selon Vitruve” vitruve-iii_1-a.1265004846.pdf Pour lui, le corps humain peut être perfection, puisqu’il s’inscrit dans des formes géométriques parfaites, le carré et le cercle. Le corps est proportionné.
Drawing Hands
This short tutorial is a just a small taste of a larger and much more in-depth book I wrote called The Mad Art of Caricature! The book is 175 full-color pages, lavishly illustrated and contains greatly expanded explanations of the concepts presented in this tutorials, as well and a great deal of additional material on caricaturing other facial features, posture, hands, expression and more, techniques on drawing from live models, doing caricature for freelance illustration and for MAD Magazine. This is a must have book for anyone interested in caricature, cartooning or humorous illustration. You can order it online here. How to Draw Hands Easily the most asked question I get is “how do you draw caricatures?”.
Types humains 3
Types humains 2
Types humains 1
Dessiner un personnage
Catalogue des caractères humains
Related: