
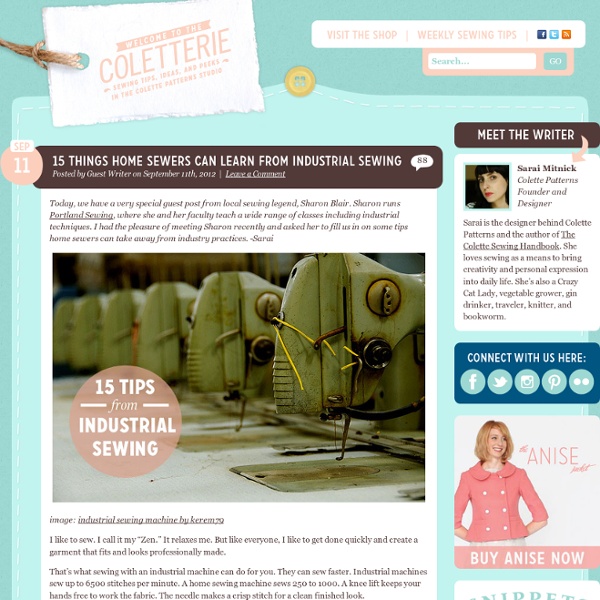
Binding Basics Tutorial BINDING LESSON - Photo Tutorial Printer Friendly Instructions Deonn Stott of Quiltscapes *French double-fold cross-grain binding is my favorite method to bind a quilt. I use 2" strips cut the width of fabric, and join with mitered seams to distribute bulk. The folded binding is stitched to the front side of the quilt using a 1/4" seam allowance, with raw edges aligned (greatest invention ever: 1/4" sewing machine foot!) PLEASE NOTE: This method may be applied to ANY width of binding strip. 1) JOIN BINDING STRIPS. lay binding strips end to end, right sides together at a 45-degree angle, overlapping slightly. STITCH from valley to valley. 1/4" then PRESS seams open to distribute bulk of seams. 3) ALIGN raw edges of binding with edges of quilt front. 1/4" seam allowance. 4) Place a PIN 1/4" away from first corner to indicate stopping point. 5) STOP stitching about one stitch away from pin, BACKSTITCH. 6) FOLD the binding strip at a 45-degree angle to create miter. edge of the quilt. continue sewing.
Seam Finishes Today, I’ll be covering some basic seam finishes. Tomorrow, gear up for self-finished seams. Friday, I’ll be back with some decorative seams which are going to be really fun and I think you’ll have a ball dreaming up where to put those in your next garment. Let’s jump right in – shall we? Machine Zigzag or Straight Stitch Let’s start with one that most people know and do – Machine Zigzag. Use for: lightweight to heavy & bulky fabrics. Pinked For this next seam finish, you’ll need a pair of pinking shears. Use for: firmly woven fabrics. Hand Overcast This next seam finish is done in part with your machine and part by hand. Use for: lightweight to heavyweight fabrics Application: apply this seam finish after you’ve stitched a seam allowance and/or before you insert a zipper Turned Under Seam Finish A turned under seam allowance is also a great option and looks really nice on the inside. Serged Seam Finish Bound Edge & Hong Kong Finish Press the bias strip over towards the seam allowance edge.
Free Hat Knitting Patterns" Knitting hats is a great way to learn new knitting techniques -- hat patterns range from quick and easy to intricate and detailed. Beginners can hone their skills on basic hat patterns, while more advanced crafters can tackle complex stitch patterns and color work. These free knitting patterns will let you create colorful and fun hats for all different skill levels. Daisy-top HatThe daisy-top hat will look adorable on the little lady in your life. Gull Stitch ToqueThis faux-cable stitch pattern looks complex and beautiful. Mohair-Look HatThe mohair-look hat has a warm, thick texture and shape that fits most adult heads. Penguin Pal HatThe penguin pal hat will keep your little one warm, and you'll be a master at knitting colorful patterns. Our first hat is sweet and pretty, the perfect way to keep any little girl's head warm. For more helpful knitting tips and interesting patterns, try:
How to Sew (using a sewing machine) If you already have a machine, it's imperative to make sure it's been recently serviced. Doing this will ensure your mechanics (such as the Bobbin Tension and Feed Dog - the mechanism that moves the fabric when sewing) are in proper working order and any abnormality in sewing will be "pilot error", which can be corrected through practice. If you haven't been gifted a machine and are looking to purchase your first machine, here are some hints to help you choose the right one. a. b. c.
Cheap screen printing tutorial Alright, I've finally had the time to "screen print" another shirt, so here's the tutorial... Materials needed: a t-shirt, yucky/cheap paint brushes, an embroidery hoop, screen printing ink (I use Speedball brand), a glue that isn't water-soluble (I use Mod Podge), curtain sheer material/tulle/old nylons, and a computer with a printer (or a good hand for drawing things). Find an image you like and that has good contrast. My cow needed to be "cut out," and I've only got Microsoft Paint on this computer and it worked fine. Save the image as a Monochrome Bitmap file and it will turn it black and white. Print it out so the image is the size you want it on the t-shirt (and also so it's not bigger than the embroidery hoop you spent ¢67 on). After pulling the sheer curtain material/tulle/old nylons tight across the embroidery hoop (and screwing it shut real good), trace the image onto the material with a pencil with the material close to the paper, not upside down so it's far away. What paint?
Glossary of sewing terms This glossary contains terms used in sewing, tailoring and related crafts. For terms used in the creation or manufacturing of textiles, including spinning, knitting, weaving, and individual fabrics and finishing processes, see Glossary of textile manufacturing. For terms used in dyeing, see Glossary of dyeing terms. A[edit] armscye The armscye is the opening in the bodice to which the sleeve is attached to. B[edit] bias Bias or cross-grain bias tape binding C[edit] cord Cord is twisted fibre, usually intermediate between rope and string. casing A casing is a fabric tunnel through which elastic or a drawstring can be threaded to pull in or draw up the fabric. D[edit] dart darning 1. 2. darning mushroom A darning mushroom is a tool used for darning clothes, particularly socks. dressmaker 1. E[edit] embroidery Embroidery is an ancient variety of decorative needlework in which designs and pictures are created by stitching strands of some material on to a layer of another material. eyelet F[edit] face facing gather
Put Up Your Dukes: braided scarf tutorial I have a tutorial that is forty thrillionty times easier and better than my previous (ahem, first ever...give me some grace!) tutorial. It is accessible to infinitely more people (you dont have to have a baby, OR a dress to start out with). And it is really simple. there are only 4 lines of stitching total. Oh, did I mention it's mega cute and chic also? 5 weeks ago I saw this scarf on pinterest. it was pinned by a VERY popular pinner that I follow under her DIY board. LOVE these colors. must make a yellow and gray one for me. source The more I thought about it, the more I wanted this, and wanted it CHEAP. Then I got busy. the hardest part was figuring out the knot/braid, but Jesse jumped down and took charge like a freaking Eagle Scout. High on our success and planning the tutorial that would certainly be "my big break," I tweeted the following: And then naturally I got sidetracked with sewing orders and running and sleeping and life and never followed through on sharing this with anyone.
Embroidery Tips Here are some basic Embroidery Tips that we use all the time here at Flamingo Toes! These are great beginner stitches – if you are just learning Embroidery they are a great place to start! Bring your needle up about 1/8″ from the beginning of your line. That is your “A” point. For the next stitch, you’ll repeat the process – up at “A”, down at “B”, up at “C”. When you get to a point, just make your “C” point across the point. You can find the Backstitch in these Projects: For the Stem Stitch, the point where your thread comes up is “A”. The distance between A, B, & C should be the equal. Keep your loose thread above the stitch, and repeat, following the picture below. Continue stitching this way following all lines and curves. You can find the Stem Stitch in these Projects: Close to the point that the thread comes out of the fabric, hold your needle and wrap the thread around the needle 3 times. You can find the French Knot in these Projects: You can find the Lazy Daisy Stitch in these Projects
Sewing Tips: Practicing your Sewing Stitches (including the back-stitch) Ooooh, okay, so many more of you told me that you received a new sewing machine for Christmas. Or a serger. Or some new sewing supplies. Yay!! Many of you are very new to this crazy sewing thing so let me give you a really quick pep talk. Okay. One more thing, if you think something is too hard to try, then yep, it’ll always be too hard to try. It surprises me. Okay, enough pep-talking. I know this first tip is so lame and you already know it……but practice. You may not be perfect your first time revving up your machine……but you will get better, I promise. Okay, first real lesson: the Back-Stitch A back-stitch is how you secure the beginning and end of your stitch. Now, sew a few stitches forward, stop, push your back-stitch button (it will be some sort of knob/button/lever) and hold it down and then start sewing again. Now, continue sewing right over that row of stitches and continue on the path that you were wanting to sew. Why Back-Stitch???? Next up? Sewing Around Curves and Corners
What Is Seam? || Classification Of Seam | Textile Fashion Study In apparel manufacturing; fabric parts are joined by various stitching. This stitching is done by sewing machine. Specific sewing machine is used for specific stitch formation. Seam : A stitch line where fabrics are joined together by various fabric arrangements is called a seam. Various types of seam are done in fabric. Classification of Seam : According to British standard 3870; 1991 seams are classified under eight headings. Class 1: Superimposed seam. Above seam types are important for apparel manufacturing. Apparel Seam Sequence Of Thread Path In A Lock Stitch Sewing Machine Features Of Superimposed Seam
Sewing Tips For Beginners I've shared a bunch of sewing project with you guys, but have never gone into much detail about actually sewing. I know that there are all levels of sewers out there, and I want my blog to be a place where all are able to enjoy my projects. This is why I wanted to give some tips for all you beginners out there interested in whipping up some new handmade goodies. I've highlighted what I think are the most important things to know about sewing. Know Your Machine & Read Your User Manual I believe knowing your sewing machine is the most important part of sewing. Google For Reference This tip may sound a bit lame or obvious, but it is still high up on my list. Have The Correct Accessories There are certain accessories, or tools, that every sewer should have. Pressing Did you notice that an iron was in the list of important tools to have? Start With Woven Fabrics Woven fabrics are those that are formed by weaving, and are only stretchy on the bias. Start With A Small Project Pinning
My Photography Tips Hello my friends! Hope you all had a wonderful weekend! Today I’m going to share a few tips that I have learned in the past year to wrap up the Photography series. I look at some of my first blog posts and cringe at my pictures. Sometimes I’m tempted to delete them… but I remember those posts are what brought me where I am today. If you missed the Photography series you can start here: Okay let’s get started… See this picture below? Now this is how I would take it today… See how much more inviting this version looks? One of the things I have learned is to add layers and texture. SO once you have your whole set up outside or by a window (this is key to great pictures) take tons of different angles of the shot. I also love to take a picture from a side or angled view. You can see in this pic I used my Canon 50mm f/1.8 Lens to really focus in on what I’m capturing. Here’s another picture (of the best chocolate chip cookies) taken on wrapping paper.
List of fabric names List of fabric names From Wikipedia, the free encyclopedia Jump to: navigation, search For the definition of 'textiles', see textile. Fabric names in this list include fabrics that are woven, non-woven, as well as knitted fabrics and netting fabrics, and technical fabrics (such as Gore-Tex and Gannex). Contents [hide] A[edit] B[edit] C[edit] D[edit] E[edit] F[edit] G[edit] H[edit] I[edit] J[edit] K[edit] L[edit] M[edit] N[edit] O[edit] P[edit] Q[edit] Quilting R[edit] S[edit] T[edit] U[edit] Ultrasuede V[edit] W[edit] Y[edit] Youghal lace Z[edit] See also[edit] Retrieved from " Categories: Navigation menu Personal tools Namespaces Variants Views Actions Navigation Interaction Tools Print/export Languages This page was last modified on 20 April 2014 at 09:39.