
Wire wrapping free tutorial by ~Aniolek-maly on deviantART African Flowers Bucket Bag I love the African Flower motif and suddenly just had the desire to make a bag for my knitting. Took a bit of playing around to figure out how to make the shape I wanted. I wanted a bucket shaped bag. I ended up breaking the shapes down - I made a tube from the hexagons and then a circle for the base. I used the magic circle technique for the centres and crocheted over the ends of the yarn and connected the hexagons as I went. I managed to find some fabric in my stash that matched the colours of the cotton and used this for the lining. There was a bit of yarn leftover so I made a little drawstring pouch for my stitch markers. Bag Construction Make a tube with the hexagons, eight across and 4 high. Complete a round of sc (UK dc) around the top and bottom of the bag. Using a bit of geometry I worked out how big the base circle wanted to be ( I measured the width of the tube and multiplied it by 2 to find the perimeter - then divide it by pi (3.14) this should give the diameter of the circle)
how to crochet a heart I am so excited to share another how-to video for my current crochet obsession: hearts! Many of you liked our how-to crochet a flower video, so I know I'm not the only one who sometimes learns better by watching. Sometimes just seeing it done makes all the difference! These little sweethearts are simple to make using basic crochet stitches. Crocheted Heart Pattern Supplies used:Size D crochet hookSize 3 crochet thread or embroidery floss(Or use any size hook/yarn you have on hand--it will just change the size) All stitches worked into the first chain. Ch 4. After playing around to create this pattern, I noticed Skip To My Lou has a similar heart pattern. Good luck with your hearts, and let us know if you have any questions.
Baby Gift Box by Inge Groot Hi Ladies, it's my time again to show you how I did it;-) This time I've made a little gift box for a sweet newborn girl. Inside the box there's room for a pair of tiny sox. Now let's start... Take a piece of 12 x 12 Kraft paper (this is the only time I use inches the rest of the tutorial will be in cm. Score the square one at 5,8 and 11,6 cm than turn and do the exact same thing again. Cut the piece in the middle out, where the line is and then it will look like this Now fold all the scored lines of both the square and the rectangle pieces of cardstock You see here that I've cut on both sides a little, this is to make the lit later on. Now fold the square piece to a little box And glue with tape to the other piece of cardstock Tape the lit together Your box is ready, let the fun part begin....start decorating! And open.... Supplies Paper: Kraft cardstock and Daisy D's Accessories: Prima little roses, strass, ribbon. Color Medium: Copic Sketches Inge xx
Turk's Head Knot Ring It's been a while since I posted on my blog but I've tried a new technique inspired by the metal working turk's head knot guru Loren Damewood on It has been a very long journey since I first saw Loren's website and then started searching the internet frantically to find out how to do this elusive knot (see below for where I found tutorials). I made about 4 leather knots to get the feel of the technique before trying it in silver wire. the above photographed ring is 0.8 mm gauge sterling silver wire and is a single strand of wire passed through the knot twice. Here's some things I've learned on the way:1. Gauge of wire discussion. This 0.8 gauge was too thick. 2. 3. 4. 5. 5A. How to do the Knot: Get to know this knot first. First He is the god of doing metal work and turk's knots. Now how a turk's head would transfer to wire. Write down donbscout's instructions. Now refer to
Le millionaire shortbread Ce célèbre gâteau anglais mérite qu'on le nomme par son nom anglais même si de nombreux sourcils d'incompréhension vont se lever quand vous le prononcerez Mille et une fois depuis 3 ans, j'ai croisé ce gourmand sur la blogosphère et j'ai enfin trouvé le bon moment pour l'essayer. Il s'agit donc d'un petit carré qui fera le bonheur des cafés gourmands constitué d'une couche de biscuit, d'un caramel crémeux avec sa petite couche de chocolat : un Twix! Et contrairement à ce que je pensais, il est hyper facile à faire. C'est en Cuisine de Caro que j'ai trouvé mon bonheur pour la recette. J'ai juste fait un biscuit un peu plus épais pour une demi-Flexipan plat ou le nouveau petit format! Ingrédients pour le biscuit : 150g de farine 90g de beurre ramolli 50g de sucre Préchauffez votre four à 180°C. Au batteur équipé de la feuille, j'ai battu le beurre mou avec le sucre, puis ajouté progressivement la farine à petite vitesse. La pâte obtenue est granuleuse, mais s'agglomère très bien à la chaleur des doigts.
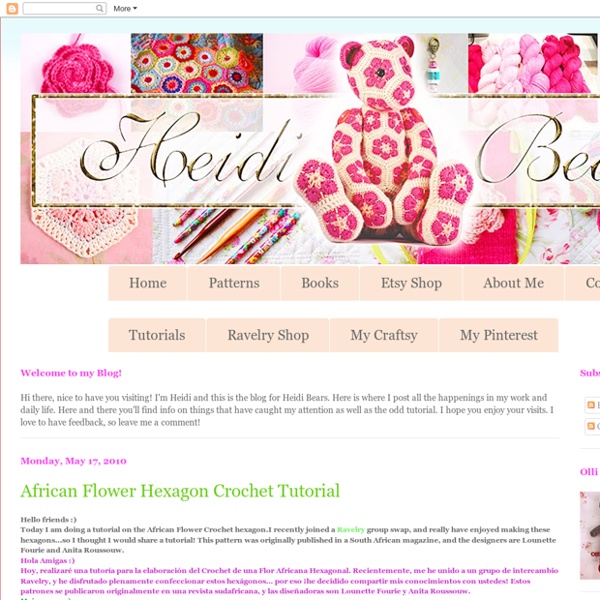
Cobblestone Square Hi All, I have a new design to share with you... Before I get to the new pattern I want to apologise for the lack of posts lately; my last post was 6 weeks ago! I'm afraid I've been a bit disenchanted with the whole blogging and designing experience... Only I kept seeing it pinned on pinterest, and when I saw a couple of pins with the comment "pattern only in german, but with good pictures" I'm afraid my anger bubbled to the surface and I looked at the blog post again and with the help of google translate deciphered the post to find out if she mentioned the original source at all. A couple of days later after not hearing anything from her I checked her blog again and found that she had removed my comment and, again at the bottom of the page after her sign off, she had replaced "Translation in English here" with - This is the original, on this page I found this flower. Something at least I guess... but I still feel that the original creditation should be within the body of her post. Karen xx
doudou bouh* le loup : Peluches, doudous par babysbuddies Statut : Professionnel Nom de la société : Marine RIGLET Siret : 52994083500018 Livraison : entre 4 et 10 jour(s) Modes de paiement : Carte bancaire , PayPal , Porte-monnaie , Chèque Avantages client : 1. Le client reconnaît avoir pris connaissance, au moment de la validation de commande, des conditions générales de vente énoncées sur cette page et déclare expressément les accepter sans réserve. Baby's Buddies se réserve la possibilité d'adapter ou de modifier à tout moment les présentes conditions générales de vente. Les présentes conditions générales de vente s'appliquent à toutes commandes passées sur le site www.babysbuddies.com Le site Baby's Buddies est la propriété de Marine Riglet et Méryl Rousseau en sa totalité, ainsi que l’ensemble des droits y afférents. 2. 3. Les systèmes d’enregistrement automatique sont considérés comme valant preuve, de la nature, du contenu et de la date de la commande. 4. Livraison en France métropolitaine : Pour l'Union Européenne : 5. 6. 7. 8. 9.
Crochet with Wire & Beads I've had so many requests for the instructions for our last Church of Craft project, I decided to post a little tutorial here. I am by no means an expert, though! You can also find great info here. But let's get started . . . . - One spool of 28 gauge wire, silver or another color. - Assorted beads -- about 40 for a choker, or about 20 for a bracelet. - A metal crochet hook, size G. - Wire cutters and needle-nose pliers. - Findings: jumprings and a clasp of some kind. Step One: String your beads onto the wire, leaving it attached to the spool. Step Two: Make a slip-knot with your wire. Make a loop with the end of your wire. This leaves you with a pretzelly-looking thing, like so. Now, put your crochet hook through that slip knot, and tighten it -- but fairly loosely! Step Three: Chain three. Take the end of your wire that's still attached to the spool, and wrap it over your hook. Then, catch that wrapped bit in your hook, and pull it through the slip knot.
Résultats pour Base bois - Page 2 sur 4 - Lou Passion Base bois ronde Boîte à Photo 16 cm, 20 cm , 30 cm Base bois gravée modèle Boîte à Photo Idéal pour réaliser vos couvercles de panières crocheter . Crocheter en trapilho , cotton air , coton épais , corde.... Vous pouvez personnaliser votre base avec de la peinture, coller du papier, stra... Lire la suite Base bois ronde modèle Chat 10 cm, 16 cm , 20 cm , 30 cm Base bois gravée modèle Chat Idéal pour réaliser vos couvercles de panières crocheter . Base bois ronde modèle Licorne 10 cm, 16 cm, 20 cm , 30 cm Base bois gravée modèle Licorne Idéal pour réaliser vos couvercles de panières crocheter . Base bois ronde modèle » Merci Maîtresse » 10 cm , 16 cm , 20 cm , 30 cm Base bois gravée " Merci Maîtresse " Idéal pour réaliser vos couvercles de panières crocheter . Base bois ronde modèle » Mère Veilleuse » 10 cm , 16 cm , 20 cm , 30 cm Base bois gravée " Mère Veilleuse " Idéal pour réaliser vos couvercles de panières crocheter . Base bois ronde modèle » Trucs de Mecs » 10 cm, 16 cm, 20 cm , 30 cm