
puff stitch hat pattern | CANDYPOW puff stitch hat pattern Moved here ♥ at 9:30 AM Labels: crafts, diy, hat pattern, pattern, puff stitch pattern, purple hair Newer PostOlder PostHome DIY Gift: Terrarium Kit November 30th, 2012 It’s widely accepted that terrariums are awesome, which means they also make awesome gifts. It’s hard to wrap a terrarium though, so a DIY kit is the perfect solution. It would be easy to whip up a whole bunch of these kits if you need a lot of inexpensive, creative gifts. Or wouldn’t they make amazing party/wedding favors? To make your kit, first put about an inch of small stones in the bottom of a jar. Print a 3 1/2″ x 5 1/4″ terrarium instruction card on card stock, and cut it out (download printable cards here—for personal use only please). If you’re feeling ambitious you could make a few polymer clay mushrooms to include in your terrarium kit. Tie some twine or ribbon around the jar, and you’re done.
do-it-yourself jewelry storage « Monaluna Okay, yes, I’m on a storage kick these days. Have I mentioned that our house is kind of small? With very few surfaces on which to put stuff? I bought a much-needed jewelry box the other day, and when I got it home I realized there was no place to put it. Seriously. The only real surface is our dresser, which is now in the baby’s room serving as a changing table. I started by measuring out the layout, considering the length of the necklaces I had, how many earring hooks I wanted, and where I wanted the mesh screen placed. Then I screwed in the hooks, staggering the earring hooks and necklace hooks so that they wouldn’t interfere. I made a little box for post earrings and rings out of the scrap molding, and glued it together with gorilla glue and clamps. I glued the plywood backing to the frame using the gorilla glue, and then painted the whole thing white. Labels: there are no tags for this entry
Best Tomato Growing Tips and Tricks: Organic Gardening Plant deep. Bury a tomato plant's stem and the stem will sprout a slew of new roots that help the plant grow sturdy and tall quickly. You can bury just about all of stem--pluck off the branches below the top flush of leaves. Early in the season, when the soil is still cool, dig a trench 4 or 5 inches deep in the soil and set the transplant into it, again burying the stem up to the top leaves. If you're transplanting later in the season, when the soil has warmed or in dry climates, bury the transplant in a straight, deep hole. Cooler, moister soil below 6 inches deep helps tomatoes survive in hot, dry summers. Feed the soil first. Avoid the common mistake of overfeeding your tomatoes. "A lot of organic gardeners overload their soil with manure and get fewer tomatoes for it," notes Will Brinton, Ph.D., president of Woods End Research Laboratory in Mount Vernon, Maine. Homemade compost typically supplies all the phosphorus (P) your tomatoes need for good flowering and fruiting.
Packing Tape Image Transfers I love image transfers. It’s something I’m always using in my journals but there are so many other fun uses for them. All you need to make a transfer is a photocopy of an image or words and packing tape. You can also use printouts from a laser printer or magazine pages. Inkjets will not work because they are not heat based toner. So take some photos to the copy machine or tear some pages out of your favorite magazine to get started. First, take a strip of packing tape and place it over the images you want to transfer: Then use the back of your scissors or the side of your fingernail to make sure the tape is adhered firmly: Next, dip the tape and paper into a bowl of water to wet the back: Using your fingers, start to rub off the paper from the back of the tape: Like magic….your image is left behind on the tape! I like to use the transfers to wrap special letters before I mail them. It’s like having custom tape: Another idea is to take a small canvas and use the images for artwork: P.S.
Top 10: Greatest Bonsai trees Details Written by Oscar3 Though growing Bonsai trees is a hobby practiced by many people around the world, its Asian origin is still obvious. Not surprisingly, the most impressive trees are to be found in collections of famous Japanese masters. We have put together a list of ten stunning trees that are unique in their beauty, balance and realism. These trees will help you appreciate this ancient and fascinating art! The ten trees are not ordered in any way. (#1) An 800 year-old Bonsai tree at Shunkaen, by Kunio Kobayashi A remarkable tree which is well known for its extremely high age; the tree is reported to be over 800 years old, one of the most expensive bonsai trees! (#2) Goshin "protector of the spirits", by John Naka Goshin ("protector of the spirit") is a bonsai created by John Y. (#3) Small Bonsai; a Shohin tree by Morten Albek A gorgeous Rockspray Cotoneaster (Cotoneaster horisontalis). (#4) Pinus Silvestris, by Stefano Frisoni (#6) Flowering Bonsai, by Wolfgang Putz Links
Embroidery Thread Hair Clip A big thanks to According to Kelly for inviting me to share a craft tutorial for the Holiday Bake, Craft, & Sew Along 2011. Stop on by to see what others are sharing! I never seem to have enough hair clips, especially now that Peaches often dips hers into mud, food or other stuff. Besides, I think these clips will make for great stocking stuffers for the coming holidays. Materials: Embroidery threadHair clipHot glue and gunScissors Cut a length of embroidery thread about 3 feet long. Tie the two ends of the thread in a knot on the underside of the clip. To create the "bun" on the end just twist a bunch of embroidery thread around and hot glue in place. These hair clips make for great stocking stuffers. Go and be pretty – Sara
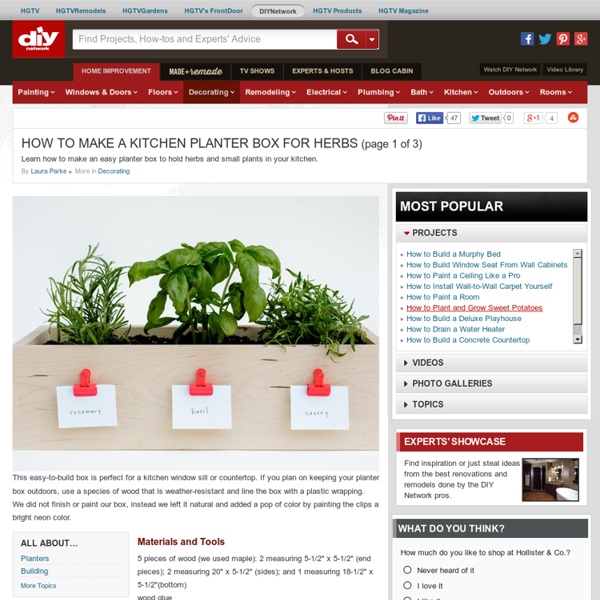
40 Inspiring DIY Herb Gardens If you love to cook you most likely can’t live without fresh herbs. You can buy them when you need them but it would be much better if you will always have them in pots near by. This way it’s much easier to mix them in small doses and add in all meals you’re cooking. Of course to have them on your kitchen or right outside your kitchen door you need to organize a thoughtful herb garden that also looks great. We’ve gathered for you a bunch of cool ideas that might inspire you to do that. Enjoy! Herbs And Vegetables In Modern Planters Of Different Heights (via bhg) DIY Herbal Window Box (via bhg) DIY Colorful Vertical Garden On A Fence (via shelterness) DIY Recycled Seed Pots from Newspapers and Magazines (via shelterness) Container Herb Garden (via bhg) How to Turn Coffee Tins into a Hanging Herb Garden (via curbly) DIY Flower Pot Herb Tower (via curbly) Herb Garden With A Bentwood Trellis (via bhg) DIY Small Space Vertical Garden Of A Pallet (via shelterness)
diy: Braided Bead Necklace I couldn't have predicted so many jewelry posts. What can I say? I get on kicks. I saw a necklace like this in a store but it was shorter and the braid contained different kinds of beads. I wanted it longer with one type of bead. An amount of beads, it's hard to say how many, I used about 4 more beads than this jar holds. Next, take two strands of beads and thread the two threads through one bead tip. Repeat for each pair and then repeat on the opposite end, making sure to get the knot as close to the bead tip as possible. Clamp three of the ends to one large jump ring. The braiding part is a little tricky if you don't secure your beads strands to something. *Finally, the note about the clasp.
Growing Ginger: Gardening Do you love Asian foods, ginger ale and pumpkin pie? It’s the taste of ginger that’s won you over. Zingiber officinale is easy to grow and makes for a great project with kids. And with its attractive foliage, this plant will add beauty to your home and garden, as well. Just pick up a root from your grocery store’s produce section and get growing! Because ginger root tubers grow right near the soil surface, don’t bury them when you transplant them to your garden. Photo Credit: John Buettner Simply lay the ginger root on the top of the potting soil to “plant” it. Pull the roots from the ground and allow them to dry in the open air before removing the stalks and harvesting. Ginger root is sold in a clump that’s often called a “hand.” Planting is easy as pie: Simply pick a pot that’s at least twice the diameter as the length of your root section. Studies say ginger’s peak flavor arrives at 265 days. With proper care, your ginger can reach 2-4 feet tall. Candied Ginger
Double Wrap Bracelet If you read here often, you know my affinity for bracelets. I have been on a bit of a jewelry-withdrawal lately, so I figured I was due for a new bracelet. ;) This is a fun one just in time to go with your holiday sparkles because it has a bit of shine. I got most of my supplies from consumercrafts.com. (They have some amazing sales coming up this weekend - I blogged about them here!) What you will need: Hemp or Cotton twine – I used a black waxed linenBeads you love – I used not quite 2 strands of 6x8mm silver crystal rondelle beadsNeedle and threadButton for your closureScissorsOptional but helpful – clipboard to hold your bracelet while you work. Cut 48″ of cord. Double your cord. Now, secure your cord somehow. To add your first bead, begin moving to the right – go over the left strand, and thread on a bead. Now, work in the other direction, moving left. Just continue this motion. At some point (or 2 or 3 points), you will run out of thread. Continue on! Then, knot it underneath.