
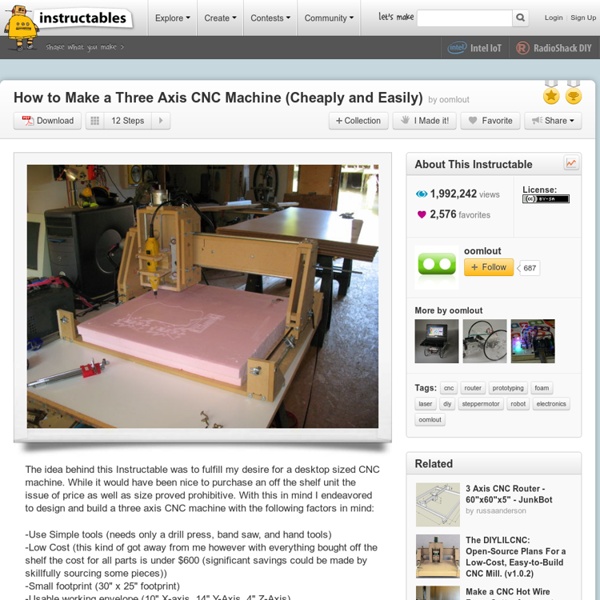
DIY CNC Router Plans : How to Build NOTE: I originally posted this on my arts and crafts blog, Make It With Jason, and you're welcome to go visit and check out my other tutorials, reviews, and step by step drawing and painting lessons. Ever since I saw my first CNC, I knew I wanted to own one. I'm a realist though, and I also knew that I wouldn't own a REAL $20,000 one. So, on a whim this spring, I decided to design and build a homemade 3-axis Computer Numerical Controlled milling machine myself. I looked all over the web and decided to build one using drawer slides as my rails, an arduino as my microcontroller, and try to keep everything within the $300 mark. So far so good. So, without much ado, I am going to show you the steps I took to build my diy cnc router project (please realize, as of April 16th, 2013, this project isn't quite finished--in fact, it's at the halfway mark). Onto the Instructable!
Morovian style hinges For the live auction at the conference Al Olson made a sturdy wooden tool box and I got to make the hinges, hasp and bale handles. I took some in-process shots of the tops of the hinges and figured I would share them here. Attachment: Image resized to 20% of its original size [2448 x 3264] Morovian hinge design.JPG [ 2.29 MiB | Viewed 327 times ] This is the design I came up with. Morovian hinge tops split.JPG [ 2.48 MiB | Viewed 327 times ] After some quick napkin math I split about 3 1/4" of a 1 1/4" by 1/8" stock . Morovian hinge one side forged.JPG [ 2.24 MiB | Viewed 327 times ] I then turned and welded the barrel, finished splitting the little horns, and roughly shaped the first side of the hinge. Morovian hinge tops shaped.JPG [ 2.25 MiB | Viewed 327 times ] I shaped the second side of the hinge and went back to tweak the other side getting them to match and to fit within the 2" strip it was going to have to mount on. Morovian hinge tops and bottoms.JPG [ 2.29 MiB | Viewed 327 times ]
Quadcopter build log 1. Introduction This page will be a walktrough on the creation of my quadcopter. It will be a quick tour as most basiscs are explained in the 'multicopter basics' document as listed on the right. A list of the items I acquired for the project is in on the bottom of this document. 2. Should you decide to build your own frame, start with drawings as every engineer does. Cross (aluminium square tubes from the local DIY shop) For the Dutch, Hornbach is your next stop ;-) Lower level of the "Hamburger", with light switch, power plug, Spektrum satellite receiver and LiPo low battery warner. 3. I decided to make a 'power ring' to provide the ESC's and other equipment with power. After supplying your ESC's with power, you have to program each ESC to let it function properly for a Quadcopter. Typical programming card Quadcopter setup. 4. Before you make your control board unreachable by wiring etc, be sure it's programmed with the latest firmware. Pin 1 on the KK board is located here: 5. 6. !! 7.
Free projects The Free projects category is dedicated to people who find pleasure in making various useful things from wood or metal. Every single man that has done something with his own hands knows what a great satisfaction it is to look at a finished assembly. That satisfaction comes out from the quality time he spent, applying of knowledge and experience, overcoming many challenges and obstacles that emerge during the manufacture and also from the fact that he made some useful thing with his own hands and does not have to buy it. We made an effort to make free metalworking and woodworking plans for manufacturing versatile items for you, but we have to emphasize that the most attractive objects for us have always been the kinds of objects that can be rarely found on the market offering, the antique items that we bring out of oblivion, because they were pushed out from usage by modern industry, educative children toys and puzzles...
How to Make a Three-Pendulum Rotary Harmonograph A harmonograph is a mechanical device that uses swinging pendulums to draw pictures, believed to be originally invented in 1844 by Scottish mathematician Hugh Blackburn. This 3-pendulum rotary type of harmonograph gives a wide variety of pleasant results, and is fairly easy to build once you've settled on a design and have acquired the appropriate materials and tools. This is a great project to do with kids and can result in endless experiments creating new types of geometric designs. Skip to More Results and Movie Two lateral pendulums swing back and forth at right angles to each other with arms connecting to a pen.
3D printers DIY plans and build instructions 1. Darwin RepRap 3D printer - The first RepRap RepRap 1.0 "Darwin" is a rapid prototyping machine that is capable of making the majority of its own component parts. Instructions and all necessary data are available completely free under the GNU General Public Licence from this website to everyone. As RepRap 1.0 "Darwin" can copy itself, once you have one you can make others for your friends; or if they have one you can ask them to make one for you. Darwin consists of a frame made from rods and printed parts. How to build RepRap 1.0 "Darwin" 2. It's the second, improved version of RepRap: small enough to fit on your desk, but with a print volume large enough for you to make big things. The machine is made up of bits bought in from local suppliers or online, and parts which it can make for itself - all the translucent structural components you can see. Mendel RepRap 3D printer build manual 3. The Prusa Mendel 3D printer improves on a previous design by being more streamlined for manufacture.
'Drone It Yourself' Lets You Create a Drone from Any Object Have you ever wished for a flying book? A flying keyboard? Or, perhaps, a flying bodyboard? Well, it's your lucky day, because thanks to "Drone It Yourself," you can turn pretty much any object into a quadrocopter. The drone kit, created by Dutch independent designer Jasper Van Loenen, is comprised of pieces that can be 3D printed, and then clamped to any object you so desire. All that's needed are the control unit and four propellers, and then you can make virtually anything airborne. On his website, Van Loenen points out that the parts can be custom-designed, and that other DIY enthusiasts can modify them to make new add-ons for the quadrocopter drone. To find out more, check out the video, above. Image courtesy of Vimeo, Jasper Van Loenen
Do It 101.com, Carpentry for Boys Chapter 4 - How To Design Articles Fundamentals of Designing.—A great deal of the pleasure in making articles consists in creative work. This means, not that you shall design some entirely new article, but that its general form, or arrangement of parts, shall have some new or striking feature. A new design in any art does not require a change in all its parts. It is sufficient that there shall be an improvement, either in some particular point, as a matter of utility, or some change in an artistic direction. The Commercial Instinct. It would be impossible, in a book of this kind, to do more than to give the fundamental principles necessary in designing, and to direct the mind solely to essentials, leaving the individual to build tip for himself. First Requirements for Designing. Assuming it to be the ordinary table, and the dimensions fixed, we may conclude to use soft pine, birch or poplar, because of ease in working. Conventional Styles. Mission Style. Cabinets. Harmony of Parts. Harmonizing Wood.
Build a Touchless 3D Tracking Interface with Everyday Materials Combine low-tech materials with some high-tech components and build a completely Touchless 3D Tracking Interface. Explore capacitive sensing by using several panels of cardboard lined with aluminum foil. These panels, when charged, create electric fields that correspond to X, Y, and Z axes to create a 3D cube. With the aid of an Arduino microcontroller and some supplied code, movements inside the cube are tracked as your hand moves around inside the field. For Weekend Projects makers looking for an introduction to Arduino, this is a great project to learn from. Once your touchless 3D tracker is up and running, what you do with it is only limited by your own imagination! Make an RGB or HSB color pickerControl video or music parameters; sequence a beat or melodyLarge, slightly bent surface with multiple plates + a projector = “Minority Report” interface More: See all of the Weekend Projects posts Related