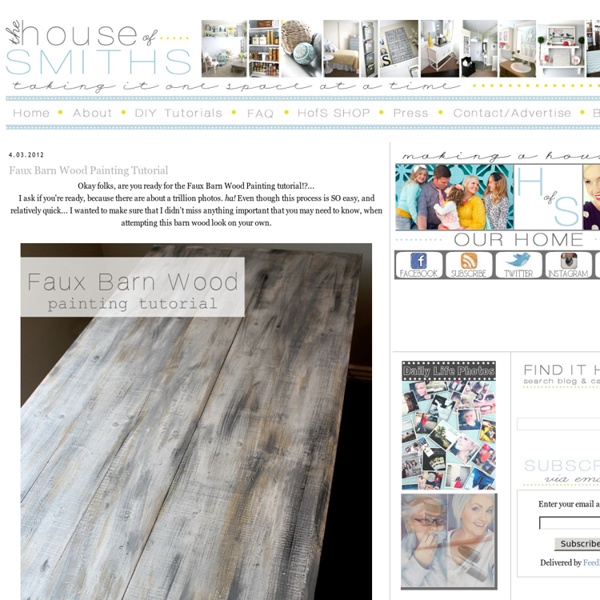
background preloader

The House of Smiths - Home DIY Blog - Interior Decorating Blog - Decorating on a Budget Blog

The House of Smiths - Home DIY Blog - Interior Decorating Blog - Decorating on a Budget Blog
Okay folks, are you ready for the Faux Barn Wood Painting tutorial!?... I ask if you're ready, because there are about a trillion photos. ha! Even though this process is SO easy, and relatively quick... I wanted to make sure that I didn't miss anything important that you may need to know, when attempting this barn wood look on your own. At this point, if you're not into the whole "barn wood look", then you can just stain it, or paint it whatever color you want! I'm admitting right now, I am NOT a furniture refinisher/painter. I tell you this because there is NOTHING technical about how I came up with this finish. I've broken this tutorial down into 4 main steps, so it's easier to follow. * Sand your wood surface well * Wipe it down to remove any dust or debris * Use a cheap $1 paint brush to apply a generous coat of Olympic brand Weathered Barnboard stain. * Do not wipe any off. You can see here all the different types of grooves and dents that the different tools and objects made.

Kitchen Kapers: DIY Fruit & Veggie Wash Thank you for being here! This DIY Fruit & Veggie Wash post has far exceeded my expectations, for which I am most grateful! So many have enjoyed, shared and pinned this post! Amazing! If you share this post, please do not alter or change my photos in any way. And please give credit where credit is due. We all work hard. ;) Also, please note that I have turned off the comments on this post. No worries, I scoured the net and discovered you could make your own! Well doesn’t that just sound handy…not to mention cheaper! Here’s How-To Make a DIY Fruit & Veggie Wash: (I came up with my own ratio that works for me) Make sure your sink is very clean. (UPDATE: I have been getting a lot of comments about sinks being so dirty. Fill a sink halfway with lukewarm water. Add 1 cup of white vinegar. Mix. Add your fruit. Soak for about 10 minutes (shorter for berries – about 2 – 5 minutes). Rinse well. The Result: Clean. And how did I know they were clean? And if you rinse well, there is no vinegar taste. Clean.

How to Antique Paper I saw Martha "antique" paper a few years ago, and although I don’t remember her technique, I do remember that it was complicated. I played around with the general idea, though, and came up with an easy way to get the same aged look. What You'll Need A piece of paper you want to age. (I used regular 24lb laser paper. How To Do It 1. 2. 3. 4. 5. 6. 7. 8. What To Do With It Frame your antiqued poem or passage for a great-looking piece of cheap art; or use it to make your sweetie a heart-felt Valentine. Speaking of paper... have you seen this fun oak leaf garland tutorial? Tagged : paper, antiqued, aged, DIY

La Revue du Design Organization blogger home tour… Welcome to day #4 of our Organization blogger home tour event & link party. Today I am sharing my organized kitchen, mail station, and filing system. Here on my blog, there are tons of other organizing ideas for you to see. I hope you’ll stay a while. My organized kitchen… Our (Lunch Station). Here is our drink box. My cleaners go on the cabinet door, under the kitchen sink. Baking sheets, muffin pans, etc… Oven mitts hanging on command hook. My (organized spices) go neatly into baskets. Cookbooks go in a basket on the counter. Cooking utensils go in a crock. Organized coffee mugs in a vintage wire basket. For more kitchen organization, you can visit my blog posts (here), (here), and (here). My (mail station). As soon as we check the mail, we sort through it right away. Lastly I am sharing my organized files. Paint swatch organization. Thanks for visiting my organized home. The next house on the tour is… If you have missed any homes, or want to start back to house #1, here you go…

How to Make a DIY Wall Clock | Decorating Your Small Space Wall clocks are a great addition to any decorating style and any size room. They add a classic element, but can be quirky and full of personality as well. Large clocks, like any larger wall art, make great decorative elements for small rooms by adding a major focal point, but keeping down on the clutter. Clocks are easy and inexpensive to make, and simply require a base and a purchased clock kit. Here are easy three step instructions on making your DIY wall clock, and some terrific inspiration to get your creative juices flowing as well. Step One: Choose a base. Painted plywood round or squareOld round saw bladesWooden musical instrumentHalf an old world globeBook or paintingChalkboardBicycle wheel Step Two: Drill a hole large enough for your clock makings “shaft” to pass through. Decorate your clock base, if necessary. Step Three: Assemble your clock kit according to manufacturers directions. Check out these three wonderful tutorials below: And here are more ideas to inspire you!

Make Room! Cool Color-Changing Walls for Your Home « Dornob This may be the best room-changing design idea since interior house paint: forget your white living room walls, green bedroom or brown kitchen and bring your favorite rooms to life with these incredible, changeable and colorful do-it-yourself pixelated wall displays. Feeling dark? Switch from colorful rainbow patterns to a pitch black surface in seconds. Amirkhan Abdurakhmanov (better known as Amirko) has come up with this simple but dynamic wall decor idea for transforming an ordinary surface into a do-it-yourself design canvas that lets you set the tone (or tones) depending on your mood.

Uses for vinegar Unleash the power of white vinegar―an all-purpose cleaner, brightener, herbicide and more. Just a bit of this multitasker, straight up or mixed with water, can replace many pricier products huddled under your sink. Try these tips to see how vinegar can make your life cheaper and easier. 1. Freshen up the fridge. 2. 3. 4. 5. 6. 7. 8. 9. 10. Cool Interior Tree Home: Best Kids Bedroom Design Ever? There are a lot of ways to make a nice bedroom, but for kids there is an element of excitement that is just as important as bedroom size and style. As these pictures illustrate, a cool bedroom for children can be a virtual fantasy world in itself – in this case by making the outdoors the driving interior design idea and central concept of the bedroom space. Complete with climbing ropes, ladders, swings and all kinds of hidden storage spaces, this bedroom brings all of the elements of an outdoor play space inside and makes the room feel like a self-sufficient home at the same time. Though this kind of cool bedroom design for kids can of course be contracted out to someone else like Kidtropolis, it is also perhaps an opportunity for a fun do-it-yourself project that engages children in the activity of designing and building their own space.

Recipe: Health Benefits of Lemon Water Photographer: Linda Wagner I love me a glass of piping hot lemon water with ginger and stevia. Besides being absolutely delicious, it has a whole BOAT LOAD of health benefits. Here are 10 health benefits of lemon water that you may not have known! For more stories about Health and Wellness, see our full list here. Good for stomachLemon can help relieve many digestion problems when mixed with hot water. Lemon is not the only power player in this recipe. So try a nice hot glass of Lemon water with Ginger and Stevia, it’s delicious and good for you in so many ways!! You’ll need: 1/2 inch knob of ginger sliced thinly or gratedlemonStevia to taste Simply pour boiling water over the ginger, let steep for about 5mins then add lemon juice and stevia to taste.

Tips and Tricks Ive been working on this post for awhile now, as I find these neat tips and tricks I wanted to keep them all together and be able to share them with all of you lovelies! I have tried all of these, so I know they work. Just call me Martha Stewart- you know, sans the jail time. If there is no picture, then I have no idea where I heard it- or I would cite it! 1. HOLY CRAP. 2. 3. 4. 5. 6. 7. 8. 9. 10. 11. If youre into nails, you have to check the awesomness out that is her blog. 12. via 13. 14. 15. 16. 17. 18. 19. 20. 21. via 22. 23. Head on over to I {heart} Nap Time and see some awesome recipies, craft ideas and overall awesomeness. 24. via 25. 26. 27. 28. via 29. 30. via 31. 32. 33. 34. 35. via That's all for now, lovelies, if you have any tips and ticks please feel free to pass them on! Tips and Tricks Part 2 is up and running- check it out here!!

Cut it out!! ......canvas tutorial I love a wall I can read! Take your favorite quotes and put them up on the walls with this easy, inexpensive idea! Supplies: Canvas (found mine at Hobby Lobby in a 2 pack for $7.99) Fabric contact paper spray paint staple gun printer and exacto knife or a cricut machine Step 1: Cover your canvas in the fabric you selected and secure it with a staple gun on the backside of the wood frame. Step 2: Using contact paper cut out the letters of your saying on a circut machine. Position the letters on the canvas. Step 3: When all the letters have been placed, spray a thick layer of spray paint over the entire canvas. Step 4: When it is dry, peel the letters off. Hang it on your wall and enjoy! another design option: Instead of covering the canvas with fabric, just place your letters onto the canvas, spray and peel. **edited to add: I get several emails asking about how to get the letters to stick better and prevent the paint from bleeding underneath.

Vinegar Uses: Adding Vinegar to Laundry, Day 2 #1 Shrunken Wool ClothesWash shrunken clothing items “in a solution of 1 part white wine vinegarto 2 parts water for 25 minutes.” After washing the item(s) stretch it back to it’s original size. After stretching it let it “air-dry”. Let me tell you, I have a very long torso so throughout my life I have given away a lot of clothes that shrunk in the wash! I can’t wait to try this! #2 Whitening Sports ClothesDo you have a drawer full of dingy sports socks like we do? #3 Removing odors Vinegar is great for getting odors out of clothes! Here’s another great tip for getting rid of odors. #4 Stain Removal There are lots of ways to remove stains from clothes but today I want to tell you specifically how to get stains out that have already dried. See you tomorrow for tips on how to use vinegar as a natural pesticide!

Make Your Own Crackle Finish (for CHEAP!) Home » $1 and Free, cheap crafts, Decor, Headline, supplies 12 May 2010 96,713 views 12 Comments by heather Wow! Let me take a moment to tell you where I found this link. And now, back to the discussion about crackle glaze. Crackle Glaze on Prints: Well, when making art reproductions (like if you download art from the Feed Your Soul project), you can print them on canvas art paper, and then cover them with a layer of crackle medium, and then a very light antiquing glaze. Project Estimate: White school glue, $.25/bottle (during back to school sales) -- you probably have this on handAcrylic paint, $.50/bottle or on hand Total: FREE and up Disclosure: this article may contain affiliate links or other forms of sponsored content.

Related: