Non-Destructive Lens Flare Effect In Photoshop
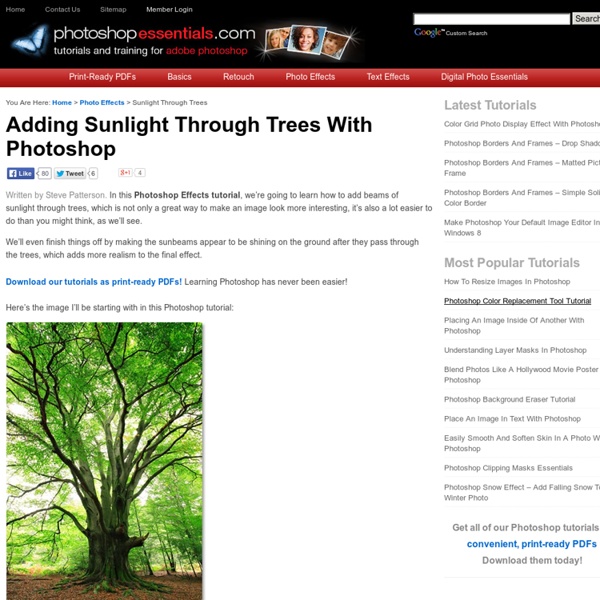
Written by Steve Patterson. In this Photoshop Effects tutorial, we'll learn how layer blend modes make it easy to add a popular lens flare effect to a photo without making any permanent changes to our image. We'll start by adding the lens flare normally to position it exactly where we want it, then we'll undo the effect, add a new layer, re-apply the lens flare instantly using a handy keyboard shortcut, and finally, we'll blend the lens flare into the image using one of Photoshop's most common and widely used blend modes. Here's the image I'll be working with: The original image. Here's how it will look after we've added the lens flare effect. The final lens flare effect. Let's get started! Step 1: Apply The Lens Blur Filter With our image open in Photoshop, the first thing we need to do is add a lens flare the way we normally would if we were applying it directly to the image. Go to Filter > Render > Lens Flare. This opens the Lens Flare dialog box. The initial lens flare effect. Space.
Lighting effects for vintage photo looks - Tutorials
Mobile apps that lend a vintage styling to photos and videos have been in vogue, emulating the recent craze for simple film cameras from the likes of Lomography (lomography.com). Among these apps are the all-conquering Hipstamatic and Plastic Bullet Camera – the latter based on colour-correction technology developed for Red Giant’s Hollywood-quality video and Photoshop plug-ins. Both have won favour with designers and hipsters from Shoreditch to Sunderland. In this tutorial, Fabio Sasso will show you how you can create retro lighting effects in Photoshop without resorting to plug-ins – and with a degree of control that means you get the look you want without the trial-and-error aspect of the iPhone apps. Step 1 To start off we will need an image that evokes the era we’re attempting to emulate: a photo that’s been stuck to the wall of a VW Camper ever since it trundled out of the first Glastonbury Festival packed with hippies hallucinating the arrival of UFOs.
Psd to Html Tips, Tutorials and Resources
Celebrating 100K Likes on Facebook – Win a Copy of Photoshop CS6 Extended
Facebook is one of our favorite ways to communicate. We have used it successfully for several years to share our favorite content and inspiration. Recently, Psdtuts+ crossed a major milestone on Facebook, our 100,000th like. We are so proud and humbled that so many of you appreciate what we do on Facebook that we have decided to celebrate, as we always do, by giving some things away. If don't already "like" us on Facebook, please feel free to head over to our page and give us a like. What We're Giving Away To celebrate our 100K like on Facebook, we will be giving away: A free copy of Photoshop CS6 Extended to one lucky reader 5 x $50 Envato Marketplace Credit Packages10 x One Month Tuts+ Premium Memberships How to Enter To enter, all you need to do is fill out the form on the following page. Rules Special Thanks
Photoshop
There are essential features that you can incorporate in your web page that can make a difference to its visual appearance and functionality. A particular feature or element is the… Share Aside from textures, there is a design element which a graphic artist or web designer can use to add detail and fill the background layer of a graphic, website or… In this tutorial we’re going to create a nice animation that you can use in your videos as an intro or credits. Graphic user interface elements are essential in enhancing the design of mobile platforms and web-based applications. In this tutorial we’re going to create a 3D video games controller based on the Wii U design. In this article we’re going to focus on how to combine effectively separate shapes (elements) in order to create one complex object/scene. It is just a few days away from the so called Valentine’s Day thus for our season of love treat, we are showcasing several sets of high resolution brushes which…
Learn the secrets of this before and after: A Photoshop Tutorial
Hey darlings! Another Photoshop Tutorial! Finally! I have to say it’s SO REWARDING to hear from you guys that these tutorials are helping you, so YAY. This one is made especially for those of you who want to learn a bit more about editing a “beauty shot”. Want a step by step walk through? 00:00 - Welcome & editing of the photo begins. 19:15 – We start to experiment with the colouring using my Photoshop actions at a variety of opacities. 19:38 – Using Summer Princess. 20:18 - Using Juxtaposition. 20:31 – Using Maracas. 20:39 – Using Pepper and Salt. 20:50 – My friend’s dogs start barking and going crazy in the background. 20:58 – Using Niagara Blue. 21:19 – Using Autumnal Beauty. 21:26 – Using Sweet and Dreamy. 21:40 – Using She’s so lucky. 22:00 – Using Silver Direction. 22:16 – Using Stylish. 23:02 – Use Alex’s Sharpy 24:15 – Use Brighten My Shadows. 24:44 – Choosing my favourite actions to apply to the photo. 26:55 – Edit of the hair. 30:13 – Final conclusion. 31:15 – Buy my actions here! xxx
The Land Of The Dead - > My Photomanipulation Tutorial
1. Откройте фотографию2. Сделайте дубликат оригинального слоя и назовите его "Eyes" (ну это чисто для удобства :)3. Поменяйте режим смешивания (blend mode) нового слоя на Screen 4. 6. 7. 8. 9. 10. 12. 13. 15. Вообщем-то это все :) Автор оригинальной фотографии: jemiko
Medion NAS per WWW erreichbar | Netzwerk (WLAN, Internet-Zugang, Router)
Hallo zusammen, ich habe ein paar Fragen bzgl NAS. Das Thema ist noch sehr neu für mich, weiterführende Links sind willkommen. Vorhandene Hardware: - Medion NAS 89626 ( - D-Link router (DG834G) - Win 7 32 bit laptops - Think Pad Tablet, Android 3.1 - DSL via TPG (wohne in Sydney) Ich würde das NAS gerne als backup verwenden (mit Personal backup), und zudem über das tablet und weitere Rechner über das Internet darauf zugreifen. Fragen: - Auf dem NAS sind einige "Ordner" / Netzlaufwerke vorhanden, die ich über das LAN webinterface erreichen kann, bzw kann ich diese auch auf dem Win rechner mappen. rtfm habe ich bereits hinter mir,...half nicht wirklich. Vielen Dank für eure Hilfe. mfG, erdbrink