
20 Latin Phrases You Should Be Using You’d probably be surprised by how much Latin you actually already know. Hundreds of words—like memo, alibi, agenda, census, veto, alias, via, alumni, affidavit and versus—are all used in everyday English, as are abbreviations like i.e. (id est, "that is") and etc. Besides fairly commonplace examples like these, however, English has adopted a number of much less familiar Latin phrases and expressions that go criminally underused—20 examples of which are listed here. It might seem odd to say that you’re "holding a wolf by the ears," but auribus teneo lupum—a line taken from Phormio (c.161BC), a work by the Roman playwright Terence—was once a popular proverb in Ancient Rome. A man described as barba tenus sapientes is literally said to be "wise as far as his beard"—or, in other words, he might look intelligent but he’s actually far from it. Apparently coined by the Roman scholar Pliny the Elder, a brutum fulmen is a harmless or empty threat. Literally meaning "who benefits?
Create a Crisp Metallic Text Effect in Photoshop In this quick tip tutorial, we will explain how to create a crisp, metallic text effect using just a couple of layer styles in Photoshop. Let's get started! Tutorial Assets The following assets were used during the production of this tutorial. Step 1 Before opening Photoshop, install the font Rothenburg Decorative and these grunge brushes.Open Photoshop and Create a New Document, 1800 x 1300 pixels in RGB mode, 72 DPI and finally then Fill the background with this dark grey color #1f1f1f. Step 2 Create a New Layer, name it 'texture' and using these Grunge Brushes click a couple of times in the center of the document using a white color. Step 3 Double-click on the thumbnail of the Layer 'texture' to open the Layer Style panel. Step 4 Click on the 'Add Layer Mask' icon, then click Command/Ctrl + (I) to invert it. Step 5 Using the 'Type Tool' (T) and these settings, type the word 'Othello' or whatever you want. Step 6 Open the 'Layer Style' of the 'Othello' Text Layer and apply these settings.
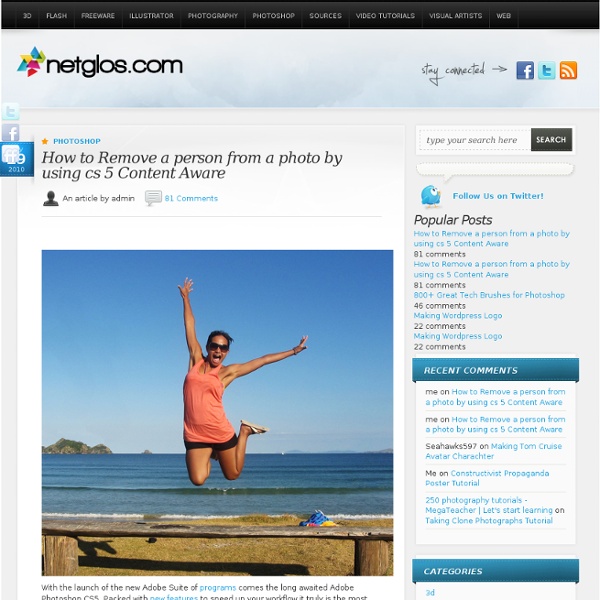
Quick Tip: Remove a Person From a Photo With Photoshop CS5’s Content Aware Feature With the launch of the new Adobe Suite of programs comes the long awaited Adobe Photoshop CS5. Packed with new features to speed up your workflow it truly is the most advanced edition of Photoshop to date. One of the new features we will be looking at today is called Content Aware. This feature allows you to quickly fill in a selection with surrounding content making it look like a part of the original image. In this case we will choose to remove a person from a photo, this can be done in less than five minutes. Original Image Before we begin, download the image that we will be working with. Step 1 Using the content aware tool on different images produces different results. Step 2 We are extracting the person on the left from this photo. Notice in the image below how far I am drawing the path from the subject. Step 3 Once you complete the path around the subject, turn it into a selection. A dialog box will pop-up, make sure the feathering is set to 0px. Step 4 Step 5 Step 6 (Optional)
Create a "Two-Faced" Digital Painting in Photoshop Creating a nice character painting in Photoshop can be a difficult but rewarding task. In this tutorial, we will explain how to create a classic Batman villain in Photoshop. Let's get started! Tutorial Assets The following assets were used during the production of this tutorial. Brush File Step 1 Go to 'File' > New. Step 2 The next step is to decide on the dimensions of the canvas you'd like to work with. Step 3 We now have our canvas! Step 4 This is where we handle the line work. To draw in the sketch, I used a fairly small brush (around 8 pixels) with an opacity of 25%. Step 5 With our sketch completed, we can now begin painting! I use the Gradient tool (G) to quickly fill in the background color. Step 6 Now that I have the main color theme decided, I decide to quickly paint in the general lighting theme of the image. I paint in lighter tones as well, this time coming from the bottom of the image to represent the light source. Step 7 Step 8 Here is where we establish values. Step 9 Step 10 Step 11
Latin Phrases It’s a matter of taste and style, but not long ago American writers attempted to demonstrate their credentials to the world by including Latin and French phrases within works. A dash of Latin was expected of the moderately educated throughout the Western world. annus mirabilis - wonderful year arbiter elegantiae - judge of the elegant; one who knows the good things in life bona fides - good faith; credentials carpe diem - sieze the day; enjoy the present casus belli - cause justifying a war caveat emptor - buyer beware cui bono? caeteris paribus - all things being equal de facto - of fact; it is de gustibus non est disputandum - no disputing tastes; there is no accounting for taste Dei gratia - by the grace of God Deo gratias - thanks to God Deo volente - God willing dis aliter visum - it seemed otherwise to the gods Dominus vobiscum - Lord be with you dulce et decorum est pro patria mori - sweet and seemly it is to die for one’s country ecce homo - behold man ex cathedra - with authority
How to Create an Awesome Splashing Sneaker in Photoshop Preview of Final Results Download the PSD Splashing Sneakers.zip | 8.72 MB Download from Website Splashing Sneaker Photoshop Tutorial Tutorial Resources Step 1 Create a new document 1289×1000 px and fill the background with #adadad color. Step 2 Duplicate the texture layer and change it’s blend mode to normal. Step 3 Make a new layer (Ctrl + Alt + Shift + N) and lower the opacity to 11%. Step 4 Open file “Shoe” and using your favorite selection tool copy and paste the shoe into our document. Step 5 Unzip the “Paint Tossing Pack” and open file 15. Step 6 Add a clipped Gradient Map adjustment layer and Curves adjustment layer to darken the splash. I sampled colors from the place the splash is supposed to be coming and used them as dark and white colors in the Gradient Map adjustment layer. Step 7 Repeat the instructions from step 5 but this time use file “9″. Step 8 Add a clipped Gradient Map adjustment layer and use the settings shown below. Step 9 Repeat the instructions from step 5 with file “14″.
Super Easy Typographic Portrait in Photoshop Last year we posted on Abduzeedo a very cool post about typographic portraits, the 45 Amazing Type Faces - Typographic Portraits became one of the most popular posts on Abduzeedo, and a lot of people asked me how to create that effect in Photoshop. We have also posted a little tutorial showing how to do that using, Flash Photoshop Quick Tips #5 - Typographic Portrait, however I decided to create a nice typographic effect using just Photoshop. So in this tutorial I will show you how to create a really cool and super easy typographic portrait in Photoshop. We will use the Displace filter and some Blend Modes to achieve the effect. The whole process is quite simple but it might take you some time to add the texts and elements, but once you do that the rest is very straight forward. Step 1 Open Photoshop and create a new document. Step 2 Duplicate the layer and go to Image>Adjustment>Desaturate. Step 3 With the Horizontal Type Tool (T) create text boxes and start adding texts. Step 4 Step 5 Step 6
25 Excellent Photoshop Web Design Layout Tutorials By Marcell Purham Photoshop is a popular web design tool. With it, you can create web design mock-ups that can later on be converted to a functional HTML/CSS template. This collection of tutorials features top-notch techniques on how to create web design layouts using Photoshop. 1. Clean Style Portfolio Layout A step-by-step Photoshop web design layout tutorial using basic techniques. 2. Learn how to make a dark-themed blog design layout in this Photoshop tutorial. 3. Discover how to use patterns in website layouts through this Photoshop tutorial. 4. This Photoshop tutorial uses 960 Grid System for laying out the web page. 5. This simple tutorial shows you how to apply background textures in your web designs. 6. Learn to make a dark-themed photo gallery via this excellent Photoshop tutorial. 7. In this Photoshop tutorial, you’ll use layer styles to create great web design elements. 8. Learn techniques for creating elegant web designs in Photoshop through this tutorial. 9. 10. 11. 12. 13. 15. 16.
How To Learn Photoshop In 24 Hrs Quite a bold statement, Learn Photoshop in 24 hours. Its simple and you can. Stepping into Photoshop at first can be quite daunting, were do you start? With these 20 tutorials we have given you some direction, you will start of with some very basic techniques and build towards the more advanced. By the end of it you will be an expert. Tutorial 1:Combining Two Photos for New Effect – Basic Tutorial running time : 10 minutes. We’ll start with something basic. Tutorial 2:Grass Texture – Basic Tutorial running time : 15 minutes. In this tutorial, you will learn how to create a nice-looking grass texture. Tutorial 3:Underwater Effect – Basic In this tutorial, you will learn how to create an underwater scene from scratch, using Gradients, Transform and Filters. Tutorial 4:2d Mirror Effect – Basic In this tutorial you will learn how to Duplicate, Flip Horizontally/Vertically, Feathering and Blending. Tutorial 5:Sony Ericsson Logo – Basic Tutorial running time : 20 minutes.
Creating a Website Template in Photoshop A recommended tip is that you learn the Shortcut keys!Why? To save some time of course! And remember to press CTRL+S (save) very often! Ok! First you need a new document CTRL+N, with the Width: 1024 pixels and the Height: 1174 pixels. Now change the background-color to “#817b74″ Select the “Rectangular Marquee Tool”. Shortcut key: (M). And hold it and drag it to make a rectangular shape, put the shape where you want to put the white. Why is not my layer white like yours? Now, select Stroke, Color overlay, Outer glow and Inner shadow and do the following! [ Download style ] Select the rectagular marquee tool and drag it like this, remember to have the background layer selected! Now copy and paste, so you get the mark into a new layer, then go to FX, layer style once again! Then press “Color Overlay” (#9b948e) And then Inner shadow This is what it should looks now Your probably wondering how I got the flower and the note look so real? Whats the best way to cut out the object out of the image? Now.
Top 40 Useful Sites To Learn New Skills The web is a powerful resource that can easily help you learn new skills. You just have to know where to look. Sure, you can use Google, Yahoo, or Bing to search for sites where you can learn new skills , but I figured I’d save you some time. Here are the top 40 sites I have personally used over the last few years when I want to learn something new. Hack a Day - Hack a Day serves up fresh hacks (short tutorials) every day from around the web and one in-depth ‘How-To hack’ guide each week.eHow - eHow is an online community dedicated to providing visitors the ability to research, share, and discuss solutions and tips for completing day-to-day tasks and projects.Wired How-To Wiki - Collaborate with Wired editors and help them build their extensive library of projects, hacks, tricks and tips.
Create a Picture with Words I love Photoshop techniques that offer all kinds of possibilities for experimentation—and the following tutorial is a perfect example of one of those techniques. In this issue, we’re going to take a portrait and replace the person’s image with text (think 2009 Grammy posters). Pick a portrait that offers good contrast—a photo that’s very dramatic and dark probably won’t work as well. I’ve had the best success with straight-on head and shoulder shots, but again, feel free to experiment with all types of photos. For the best results, choose a photo that has a light background (or select the background around the person and make it lighter). Create a new document (File>New) in a size that’s smaller than your photo: the specifics don’t really matter. Switch back to the photograph. Then, press Command-J (PC: Ctrl-J) to copy the selected pixels onto a new layer. Go back to the Select menu and choose Color Range again. Click the Create a New Layer icon at the bottom of the Layers panel.