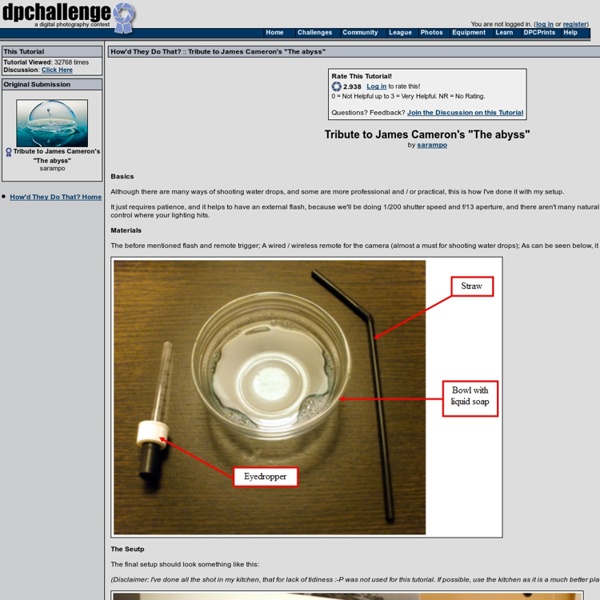
Tribute to James Cameron's "The abyss" - How'd They Do That?
sidewalk chalk guy
sidewalk chalk guy «« back to gprime.net all material copyrighted by its original creator |
Anything Worth Seeing / ANTILIMIT
Still life: Bent objects
UPDATE: The Return of Bent Objects Wires transform these objects from inanimate to hilarious works of art. Little polish girl McDonalds as Sculpture Materials Yeah, this is where those come from Dancing Queens English breakfast Sylvia Muffin put her head in the oven. The introvert Bananas in bed – let’s slip into bed together You Say Tomato, I Say Tomahto. Fruit with life experience Zombies are nuts about brains Modest pear Literary interpretations Paper training our little dog, Frank A little cat doodle Photo Credits: Terry Border at Bent Objects View more In Pictures sets on Owni.eu
Top photographs got massive visitors and impressions
After a long time i have found this interesting idea for readers and lovers of pokkisam blog. In this post I have compiled some best and brilliant photographs which receives more than 50,000 of visitors and impressions. Share this article with your friends and who loves these photos and comment about the photos. To get interesting updates Please subscribe to our RSS feed. Please comment about the photographs and share this article... About the author
36 Pictures That Look Photoshopped – But Are Not
The power of Photoshop is amazing, but still it doesn’t beat the power of imagination. Although many photos taken by professional photographers and enhanced in Photoshop can be absolutely stunning, the photos taken wisely and in a creative manner are even more impressive. Today’s showcase is dedicated to such photos, the ones that make people skeptical about not being manipulated and still they are genuine and impressive. They can be really inspiring and a pride to every photographer’s portofolio, no matter if they are funny, dramatic or just miracles of nature. Salar de Uyuni Water Fairy Burn the Sky Roof Dancers Infinite Possibilities Gelato di Nuvola God’s Canvas Please Don Not Fall, Cloud Lending a Helping Hand Cloud Dragon Falling Up Escape from Fairytale Land Morning Mood Got You Now Playing with Perspective Revenge Hot Dog More than a Mouthful Stool Camel Kisser There Is No Spork In Memoriam Jump from the Ship Rubber Duck Watusi Bull Volcanic Lightning Weather Phenomena Infamous Guatemala Sinkhole Last Drop
Mark Jenkins // Street Installations
Kristiansand, Norway London, England Montreal, Canada Cologne, Germany Besançon Rome Rio de Janeiro Tudela London Dublin Moscow Winston-Salem Seoul Royan Bordeaux Puerto del Rosario Barcelona Malmö Washington DC Washington, DC
Amazingly Creative Drawing Vs Photography
This wonderful work has done by a very talented Belgian painter, illustrator, portraitist, caricaturist and photographer Ben Heine. This creative artist was born in Abidjan, Ivory Coast. He Studied graphic arts and sculpture and I also have a degree in journalism. Lets take a look at some of his awesome works that he calls “Drawing Vs Photography” or “Imagination Vs Reality”.
Related:
Related:
