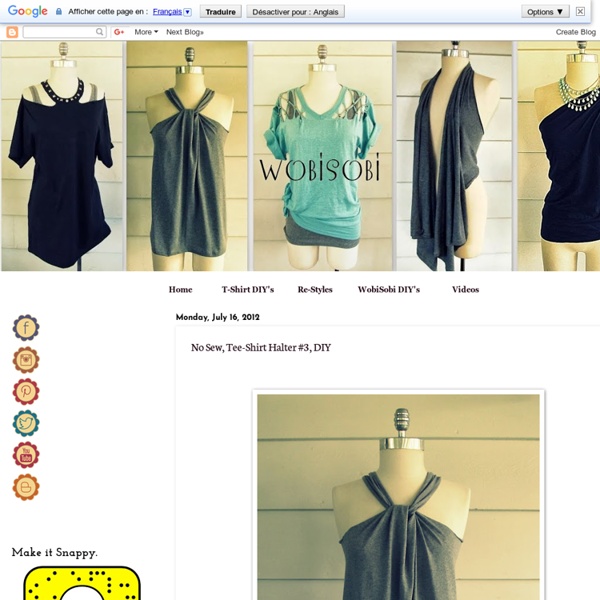
background preloader

No Sew, Tee-Shirt Halter #3, DIY

No Sew, Tee-Shirt Halter #3, DIY
I have the exciting opportunity to head to the beach for a couple of days, to relax and soak up a little of that beautiful Florida sunshine. I wanted to do one more halter top to take to wear with my jeans and this is what I came up with. It can be changed in so many ways let's just say this is a 3 in one shirt. Video Tutorial Things You Need. Tee-Shirt~ mine is a mens mediumScissorsChalk Front Cut where the red lines are. The back cut the red lines Back Cut down the middle of the back cut out.. Front after cutting NOTE* you cut one continuous line from the front to the back. Back After cutting now tie the front wrap around your neck and tie to the two straps in the back. If you want to trim off the excess off the straps. I am leaving mine so I can play and change it up some more.. or tie them into a bow. For those of you who need to watch it being made Like me Here is a video just for you:)Click me>VIDEO Just one more way to change up a Tee Shirt.. Happy Monday. Lots of <3,

Made my own Mod Cloth dress I saw this dress on Mod Cloth months ago, way before it was warm enough to wear, and thought, "Wow, that's a unique design. What a weird combination, actually. But it's cute! I could make that!" So I bought some grey cotton for like $3/yard at JoAnn, used some ivory lace I already had, and added four (weird, in my opinion) two-hole buttons with the metal hole grommets. I did not have the right pattern at all, so I had to modify one (Butterick B4915, now out of print). I've had this problem twice before and both times ended up just sort of modifying this pattern, I think, when cutting. That piece would be the top, gathered into the bottom and neckline, and I also cut a smaller piece for the lining. I added some vertical tucks to my bodice as well as the gathers over the cups. What's funny is, I thought this was a weird color combination, but shortly after I had cut this dress out I saw another, very similar one from Lulu's: How megasimilar is that? Update: seen here in our engagement pics!

diykawaii | Be Creative and Have Fun! Ten minute no-sew recycled t-shirt bag! Tutorial time! I got a gig teaching a recycled t-shirt project at the library a few months ago, with a request for a recycled tee bag – the only bags I’d made from tees in the past had required sturdy sewing, and I didn’t want hand-sewing to be the only thing holding the bottom closed in a class version of the bags, so I started brainstorming about some kind of hand-sewing-friendly or no-sew bag idea…. and here’s what I came up with! The simplest version of these bags is great for smaller tees, or the more light-weight kind of girl-tees – just turn the bottom of the shirt into a drawstring and tie it closed! As you can see, even with a not huge tee, this will still leave a significant hole in the bottom of your bag, but for purposes like grocery shopping, this size hole shouldn’t really matter… But to make smaller holes, just make more than one of them! And now for the actual tutorial – for this one, with the step-by-step, I will be making the bottom with 3 holes. My finished Sonic bag!

Neon Tshirt Reconstruction I actually made this last summer, and just had never made a tutorial for it. I love this dress, it is sooooo bright!!! 1. You will need a very large tshirt. Cut off the sleeves, and then cut a straight line right below the neckline. The sleeves will become the top of the dress, and the large chunk will become the body of the dress. 2. 3. 4. 5. 6. Please excuse my lazy summer hair. Follow Can Can Dancer via Bloglovin for more DIY tutorials. Dudu Couture Tuto # 2 robe à encolure froncée et nouéeTaille 36/38 1. Matos : - coupon de 1m40 x 1m90 (en comptant large !) - fil assorti - une grosse épingle à nourrice Le tissu utilisé est du satin de coton (en fait c'est un drap que j'ai acheté à la R*doute). 2. - Pour ajuster le patron à votre taille : pour la longueur sous les emmanchures (24 cm), calculez votre tour de poitrine + 8 cm (dont 4 cm de marges de couture). - Pour la longueur de la robe : Je n'ai pas défini de longueur... Les mesures en dessous des emmanchures servent à définir la forme évasée de la robe. - Marges de couture : les coutures de 1 cm sont comprises dans le schéma. 3. Coupez en double sur la pliure le devant puis le dos Coupez un rectangle de 16 cm x 190 cm pour le noeud. 4. Superposez le dos et le devant endroit contre endroit et piquez et surfilez les côtés. Attention !!! 5. 6. A l'aide de fer à repasser, pliez à 1 cm du bord, puis pliez de nouveau à 8 cm de la première pliure (soit 9cm du bord) 7. 8. ou

Green...Easy Knit Produce Bag Green…can mean more than one thing. There is green the color. And green, as in environmentally friendly. Today I am combining those two meanings into one with the: I made my reusable produce bag out of an old knit T-shirt. And then I went crazy! It is really easy and requires very little sewing. So let’s get started shall we? 1.)You just take an old T-shirt and turn it inside out. I made some small, some large. Some using the existing T-shirt hem and some not. 2.)Sew with a straight stitch or a narrow zig zag all the way around. Or you can finish the edge with: A French seam. A zig-zag stitch or serged edge - my favorite way. Make the seam allowance much smaller - like 1/8 of an inch. Or fold the seam allowance over to one side and stitch all the way around. 3. )You can do this next part 2 ways: Option 1: Draw lines to help guide you when you cut slits. and snip, snip, snip…with the tips of your scissors. You want to stagger the cuts like so… Option 2: Using your rotary cutter… 4.) 5.) That’s it!

Day 349: From Sleepshirt to Sassy Dress | ReFashionista A lot of you guys have told me how much you loved my T-shirt refash from Day 210, and have asked to see more. Well…today is your lucky day, friends! :) I started off with this khaki tee from the Dollar-a-Pound Goodwill. It’s actually really comfy. I made a cut down the middle of each sleeve, like so: Just a little snip! Then, I pulled the neck hole down under my arms and tied the sleeve sections together in the front! Now that Tee has gone from sleepshirt to sassy! It’s still really comfy, too! Thrift stores are crammed full of plain ol’ tees. It’s that easy! Cheers! style=”display:inline-block;width:336px;height:280px” data-ad-client=”ca-pub-5202441266816777″ data-ad-slot=”9369005640″>

The Pinwheel Skirt Many of you have probably already seen this tutorial on Ucreate, but for those of you who haven't seen it, here is a tutorial for my Pinwheel Skirt. Enjoy! The Pinwheel Skirt Lets get started…. You will need: 2 yards of fabric (make sure you chose fabric that hangs nicely. I’ll give you the step-by-step instructions using my measurements, but just remember to substitute your own measurements. (*note: s.a = seam allowance) Waistband: 1. 2. 3. 4. My waistband measured: 3” X 31” + Seam Allowance (1” X 1”) = 4” W x 32” LBack: 1. 2. 3. 4. 5. My 2 back panels each measured: 18”W x 22 ½”L Width- 9” + 8” (for pleat) + 1” (for ½” s.a. per side) = 18” Length- 21” + ½” (for top s.a.) + 1” (for bottom hem) = 22 ½”Front: 1. 2. 3. 4. My front piece measured: 16” top width, 21” bottom width x 22 ½” L Top width- 15” + 1” (for ½” s.a. per side) = 16” Bottom width- 15” + 5” + 1” (for ½” s.a. per side) = 21” Length- 21” + ½” (for top s.a.) + 1” (for bottom hem) = 22 ½”Side Triangles: For my triangles: 1. 2. 3. 4. 5. 6.

Revamp old T-shirt into Cute Bra Strap! Yay! I saw a lot of T-shirt yarn projects in the blog land recently, So, Why not? T-shirt yarn for bracelet and necklace are some really cute projects, But I prefer something more useful that I can wear everyday! So, this is what I made them into... A cute bra strap...So, fun especially during summer time! Jojo helps me with the photo shooting session... Screen down for the tutorial... Ooops...more photos...can't help it Jojo take more than 50 shots... This is a really easy DIY, just simple 4 steps... Step one : Use 3 strand of the T-shirt yarn to create this strap Slot in the bra clip ... Cut and tidy up the end of the strap, and secure them with few stitches or run a stitch using the sewing machine Tie a knot at the other end Make two piece of these and you are done!!! Visit again later... I'm going to show you how to make another sweet easy bra strap it's only in super simple 2 steps!!! Love PC * Jojo I'm featured!!!

Jumpsuit | Kiind Dit pakje uit één stuk is super handig en comfortabel. Met dit patroon kun je een jumpsuit maken met lange of korte mouwen en pijpen. Nodig • Patroon | download: 50, 56, 62, 68, 74, 80 of 86• tricot (140/150 cm breed), ik gebruik tricot van dekkersstoffen.nl• (rib)tricot, ik gebruik een oud T-shirt• machinegaren• drukknoopjes• naaimachine• lockmachine• tweelingnaald + stretchnaald• hamer Fotohandleiding Print en knip het patroon uit en speld dit vast op de stof. Stik de halsboord vast. Vouw de boord nu als een biasband om de stof heen. Op dezelfde manier zet je ook de beenboord aan de stof. Knip nu de uitstekende delen van de halsboord af. Maak de schouders van het voor- en achterpand aan elkaar. Zet nu de mouw aan het lijfje met de lockmachine. Leg nu de boorden aan de onderkant van de pijp op elkaar. Stik nu de mouwen en de zijnaden van het lijfje dicht met de lockmachine. Vouw de mouw- en pijpboorden dubbel door de lengte en stik zoals op de foto. Vouw de boord nu dubbel. Zomerversie

Projet couture – la robe portefeuille | Les Lubies de Louise Il y a déjà pas mal de temps que je me suis acheté un mannequin de couture, et il n’a pas encore eu l’occasion de servir. J’ai tellement peu confiance en moi que je n’ai pas encore osé me coudre un vêtement, de peur que se soit raté et complétement immettable. La peur de l’échec me paralyse… C’est nul, mais c’est tout moi !! Heureusement, j’ai un amoureux exemplaire ! Burda Style J’adore les robes !! Mais d’abord, il y a l’étape « décalquage de patron » qui n’est vraiment pas simple !! * Concentration maximale* Ensuite, il y aura un essai sur du vieux drap afin d’ajuster le patron à ma morphologie. Il y a encore pas mal de boulot avant d’y arriver… J’espère que j’aurai le temps d’y avancer ce week-end ! WordPress: J'aime chargement…

Flip-Flop Refashion: Part 1 (Braided Straps Summer is great. And warm. And full of outdoor activities and trips to the pool and random walks around the neighborhood. I love it. And my shoe of choice for these warmer months?? Sandals, of course. So, I saw a tutorial for this flip-flop makeover (great work Mother Huddle), floating around the web…….and the wheels started turning. I decided to just string all of the ideas together and create a whole series. First up? A quick and easy flip flop…….made with some braided knit fabric scraps, using the 5 strand braiding technique, shown here. These soft braided straps streeeeeetch the perfect amount, right around the back of my heel……..keeping the flip-flop snug and in place. I added little loops of fabric to the sides, to keep the braided straps in place. These little sandals are so light, they’re soft and stretchy, and my favorite part……..they’re inexpensive. ($2.50 to be exact) These flip-flops make me think of the beach……and make me miss GA. I guess I better find a sandy spot at the lake.

Welcome to the gOOd life: DIY: a thrift find dress to a peplum dress I got this dress at a thrift store for $4. I liked the color and knew it had potential. I tend to go through "obsessions" with clothes, like two years ago, it was ruffles. Starting last year, it's been peplum. I already own 9 items of peplum clothing but it's just not enough! So I had to make this into a peplum dress. My favorite part? Directions: *with the peplum design, I used a pattern similar to this one, except I didn't round the edges of the fabric. After: What you'll need: -bigger/longer dress -hook & eye closure -matching thread -scissors -a sewing machine/needle & thread Estimated time: 1.5-2 hrs. Budget: $4 Skill level: intermediate

Related: