
My Mod Podge Art I know, I know…It has taken me forever to finally post my Mod Podge art project that I’ve been talking about for months. Well, folks, I finally have it finished, on the wall, and photographed! Like Suzanne, I used 12 x 12 canvases. I painted the sides a dark brown, then used Mod Podge to glue scrapbook paper to the front of the canvases. Creating the artwork was the easy part. Happy Mod Podging!!!
The Hipster Home » Blog Archive » How to Make a Tiny Terrarium in a Light Bulb Ahoy there Hipster Homers! I’m Julie and I’m the very first guest blogger on this fine site. Today’s project involves breaking stuff, plants, found objects, and miniatures. Fun, right? Let’s get started! Dos and Don’ts: Do use sand or small pebbles; these are good because water drains through them easily. How To: You’ll need a few tools to make a tiny terrarium but nothing complicated to get started. Needle-nose pliersScissorsLong tweezers or chopsticksFlathead screwdriverGlasses or goggles Let’s start with the light bulb. We will be removing the inside parts of the lightbulb. First, remove the metal tip from the bottom of the bulb. Then, when enough of the sides are raised to get a good grip on them, hold one of the sides with your pliers and yank out the metal tip. Next remove the black glass. Now you will be able to see the interior parts of the light bulb. Using the flathead screwdriver as a sort of lever, snap the interior tube from the side. And now you have an empty light bulb!
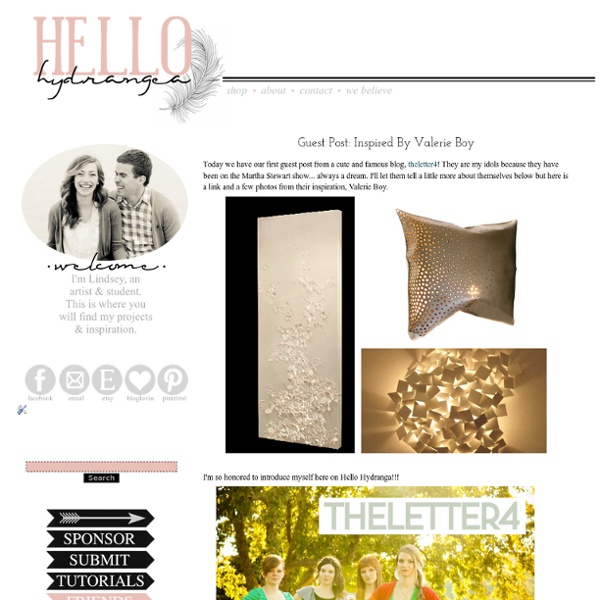
Acrylic Paint Transfer Supplies needed: Acrylic dabbers, photocopy of an image, water spritzer bottle, paintbrush, card stock, craft sheet and heat tool (optional) Take the lid off the dabbers and brush the paint onto the card stock, ensure you get a good coverage Take your photocopied image ( remember that you will get a reverse of the image, so don't use bold words), flip it over and place it in the acrylic. Leave to air dry for at least 15 minutes and then if you wish give it a blast with the heat tool Only move onto this step when you are sure your paint is completely dryTake your water filled spritzer bottle, spray the back of the paper no more than two squirts, you don't want it too wet Next start to rub the paper very gently with your finger Keep rubbing and extra spritzing if you need too Eventually you will get rid of all the paper, but it does take a bit of patience as you have to be careful not to wet it too much and rub the image away You can do exactly the same on a canvas
Newspaper Nails A few weeks ago I shared in this post that I learned how to do this amazing thing called "newspaper nails." Since I love words, and reading, and books, it has inevitably become my favorite manicure. Want to learn the how-to? First, gather your supplies. Step one: Grab some newspaper and cut it into pieces big enough to cover your nails. Step two: Paint your nails white. Step three: Dip a piece of newspaper into the rubbing alcohol and saturate them well. Step four: Press the bit of newspaper on your fingernail hard for about three seconds and peel it off. Step five: Top coat time! Now admire your creation; and try not to chip your nails the first day like I all-too-often do.
Bird and Text Collage Wall Art [ Close Privacy Policy ] Privacy Policy / Your California Privacy Rights Revised and posted as of March 4, 2013 Prime Publishing, LLC ("Company," "we" or "us") reserves the right to revise this Privacy Policy at any time simply by posting such revision, so we encourage you to review it periodically. In order to track any changes to this Privacy Policy, we will include a historical reference at the top of this document. This Privacy Policy will tell you, among other things: Your California privacy rights. ACKNOWLEDGEMENT/YOUR AGREEMENT Company websites are not intended for use by individuals under the age of 18 or those who are not legal residents of the United States. HOW DO WE COLLECT INFORMATION AND WHAT INFORMATION DO WE COLLECT? Distribution Partners Website operators that license our ad serving technology pass information to us so that we may serve advertisements to you. Website Registration Forms We collect information about you when you register on one of our websites.
wednes-diy UPDATE: This post originally ran on March 23 2011, but with summer winding down we wanted to bring it back up for some late summer inspiration! a fellow fp girl sent this to me a couple weeks back and i’ve been thinking about it ever since! i can think of a million reasons why these would be awesome… as apartment décor, as outdoor party décor, and – wouldn’t they be the best thing EVER for camping in general or at a festival? just let them sit in the sun all day, and they’ll last all night! i am absolutely going to make some to bring with me to bonnaroo this year. you can buy a sun jar here, but you can make your own for much cheaper! what you need: a mason jar with a clear glass lid like this one from ikea, a solar garden light like the ones pictured above, which i found here, adhesive and glass frosting spray. start by spraying the inside of the jar with the frosting spray – this will help diffuse the light and give it a warm glow. don’t spray the lid though! last image.
How to make a painting in three (or more) easy steps. « Drawn From the Fire 1. Draw some circles. Place them kind of randomly, but kind of in a linear fashion. Whatever. 2. Squeeze three colours onto your plastic lid. 3. 4. 5. 6. 7. 8. 9. If you don’t feel like making your own, then you can purchase this inspirational OOAK (one of a kind) original acrylic painting here! Like this: Like Loading...
inspired ideas Making Memory Candles {A project from the Inspired Ideas Archives} This is such a fun way to display photographs! The technique uses black and white photocopies and transparent contact paper to transfer images to glass votive candleholders. I recommend using the small votive cylinder candleholders found commonly at craft stores. Cut a piece of the transparent contact paper (usually found with the shelf-liner papers at discount stores) to fit over your photo layout. Peel the backing from the contact paper and place the photocopied image ink-side to the sticky side of the contact paper. Burnish or rub the contact paper to the inked parts of the photocopy. Trim the contact-paper-covered print out to size. Next, soak the paper-covered plastic in a sink of warm water for at least 7 minutes. Some of the paper may begin to fall off on its own. Don't rub too hard or the ink will start to come off. Finally, adhere the inked contact paper to a clean and dry glass votive holder.