background preloader

DIY Utility Rope Necklace

DIY Utility Rope Necklace
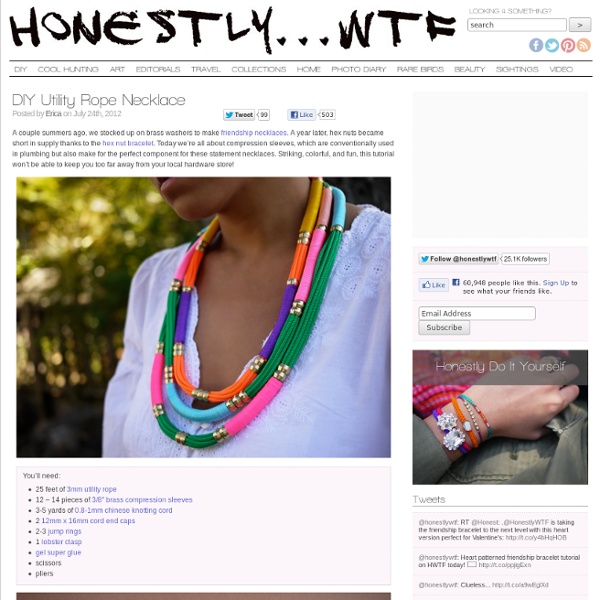
A couple summers ago, we stocked up on brass washers to make friendship necklaces. A year later, hex nuts became short in supply thanks to the hex nut bracelet. Today we’re all about compression sleeves, which are conventionally used in plumbing but also make for the perfect component for these statement necklaces. Striking, colorful, and fun, this tutorial won’t be able to keep you too far away from your local hardware store! You’ll need: Start by cutting the utility rope into 8 32 inch pieces. Keeping the compression sleeves together keep the ropes evenly bound and make sliding them on easier. Decide which sections to wrap and start at the center of the necklace. Continue to wrap the entire section. Allow to dry before trimming any excess cord. When all the sections have been wrapped, trim end ends. Using pliers, attach a larger jump ring to one end and a clasp to the other. And that’s it, your necklace is finished! Make a couple more and layer them on top of each other.

DIY Chainmail Necklace You’ll need: Start by separating the jump rings into two halves: 175 open and 175 closed. Thread three closed jump rings onto an open jump ring. Keeping the rings in place with your forefinger and thumb, take an open jump ring and hook it through the front side of the two rings. Add 2 closed rings to the open ring and close. Spread the two rings apart in the same way as the first set of rings. Add 2 closed rings and close. To add an optional fourth row, lay the necklace flat and hook an open ring through first and second closed rings on the right side. I stopped at 4 rows but you can continue adding rows for a more bib-like necklace. Connect the two ends with a single jump ring or clasp. Fini! (top image from here, rest of images by HonestlyWTF)

The Forge So of course after yesterday's post, things quickly turned around today and Logan decided to be a true toddler again... Oh well, the peace couldn't last forever and I was kind of jinxing it anyway by writing about it, wasn't I? On a different note, I finally found a pair of pants at Target that actually fit me nicely. So far I've never had real luck with their pants so I couldn't resist getting these dark blue ones from Mossimo. It's been so warm and kind of humid here this week that I actually turned the a/c on last night. I know it's way to early for those kinds of shenanigans but as much as I hate the cold and snow, I also have the hardest time going to sleep when it's hot and humid in the house. Now that's enough weather talk for one day. Moving on to this... The couple of things that I just ordered from my wonderful new sponsor Brika, which you may have noticed looking pretty in the sidebar up there.

How To Tuesday: My Sweet Josephine. 28Jun/11 After seeing Kristin's friendship bracelet giveaway on Idle Wife, I've hauled out my old bracelet books and thread from when I was a kid. Naturally I've been furiously making all sorts of bracelets. After making six friendship bracelets in two days I decided I needed a new pattern. Following an extensive google session I found these beautiful recycled t-shirt bracelets and vowed to make them my own. And now you can too! All you need is... 2 pieces of fabric about 18 x 6 inches Scissors Pliers 2 ribbon clamps (found at Michaels) 2 jump rings 1 clasp Cut 2 pieces of fabric from your t-shirt about 18 x 6 inches. Make a loop with the first scrap and lay it over top of the second. Take that end and alternate weaving it under and over the remaining fabric lengths. Pair up the ends of fabric and wrap it snugly around your wrist. And there you have it!

Marsha Golemac Paper installations by Marsha Golemac Illustrated paint cans by Marsha Golemac Paper boxes by Marsha Golemac Melbourne paper artist and designer Marsha Golemac came to our attention in two simultaneous ways. Firstly, we spotted her crafting up a storm at Megan Morton’s School in Sydney, and so inevitably we decided some instagram stalking was in order! Turns out Marsha is a stationery and homewares product developer by trade, having spent many years working with the talented peeps at kikki.K, before going freelance late last year. We were pretty excited when we found out Marsha was based locally (in Collingwood), so we decided to pay her a little visit and learn a little more about her work! Marsha Golemac in her Collingwood home studio. Tell us a little about your background – what did you study and what did you do career wise before going freelance in the events and interiors world? Yes, that was another thing, I had too many interests and I wanted to give them all a go.

DIY Gold Tube Bracelets I have very vivid memories of walking into a bead store for the first time, almost 15 years ago, and being overwhelmed by the million and ten ideas that filled my mind. I was immediately hooked on the concept of transforming simple and unexpected elements into something beautiful and wearable. That moment was the catalyst for my eventual path into jewelry design and craft – my higher calling, if you will. Today’s tutorial takes me back to my first foray into jewelry making, where I’ll show you how to make two delightful bracelets using the same basic component. Get inspired and have fun! For single, adjustable gold tube bracelets, you’ll need: Start by cutting the knotting cord into 2 12 inch pieces. And now, all that’s left is the sliding closure! . . . and bring the top cord under both the bottom and middle overlapping strands through the loop, into a knot. Repeat the same step on the right side. Continue to make 5-6 more knots. Trim away any excess cord. Layer and enjoy.

Et de 100! | Le top des blogs stylés - Mode, Beauté, Saveurs, VIP, Shopping Depuis septembre 2012, le Top des blogs stylés s’attèle chaque semaine à vous faire découvrir ses blogs préférés. Jusqu’à aujourd’hui, 100 blogueurs et blogueuses mode, beauté, food ou maman, se sont prêtés au jeu de l’interview, souvent avec humour, toujours avec sincérité. Un grand merci à vous! Nos Top Blogs féminins Tout à l’égo, par SophieJeune vie algéroise, par MinaMorning by Foley, par AmélieFootaises, par Emmanuelle, Urielle et AnneIvy Mag, par Vivi la ChipieLe blog d’Olive, par TahianaLa liste des jolies choses, par BérangèreOne little Rex Fox, par JulieLa défraîchie, par AlphonseElsaMuse, par ElsaHappy Q, par MylèneMake my Lemonade, par LisaBy Glam, par StéphanieJuliette, blog féminin, par JulietteEt si on ne parlait pas de foot, par Sophie, Charlotte, Marine et LaraPensées by Caro, par CarolineFashionMama, par SalmaFashion & London Life, par OliviaDeedee, par Delphine Nos Top Blogs Mode Nos Top Blogs Mode masculine Nos Top Blogs Beauté Nos Top Blogs Saveurs Nos Top Blogs Evasion

Circle Zip Earbud Pouch Tutorial | Dog Under My Desk I use a little zippered pouch to carry around my earbuds since they are the fancy microphone ones and I don’t want them to break or get tangled. Some of you have commented that you are looking for some small, simple gift ideas. This is definitely simple to make, and a little more fun than the typical rectangular zippered pouch! UPDATE: I have completely re-written this tutorial with twice as many bright, clear photos and more detailed instructions and it is available as a pattern in my pattern shop. First, download the pattern template HERE. Cut from main fabric: 1 circle 2 half circles 1 tab Cut from lining fabric: 1 circle 2 half circles Cut from batting (or medium weight interfacing, if you prefer): 1 circle 2 half circles You will also need a 1″ wide nylon 5″ or longer zipper. Place one lining half circle right side up and place the zipper right side up on top. Place a main fabric half circle wrong side up (right side together with the zipper). Sew with a 1/4″ seam allowance.

Morning by Foley | Blog féminin DIY, déco, mode et photographie DIY Macrame Bracelet Growing up by the beach in Southern California, the ability to knot a macrame bracelet was practically a right of passage. Although those days are long behind us, we’ve never forgotten the ever-so-simple square knot technique. This time, however, we’re replacing hemp and wooden beads for more updated elements like colorful nylon cord and glossy metal charms. You’ll need: Start by cutting the knotting cord into two 30 inch, two 20 inch and one 10 inch lengths. Center the 30 inch cord under the two middle strands. Pull tightly and slide the knot up to the top. Finish the 2nd half of the square knot by folding the left cord over the middle strands and under the right cord. Pull tightly and repeat the steps – left, right, left, right . . . To finish the knots, thread one of the cords onto a needle and sew up the center of 3-4 knots along the backside. Repeat the same step on the other cord. After sewing up both knotting cords, trim away any excess.

a Stamp a Day Jewelry Making Classes Online at Beaducation: The Blog Tutorial ~ Hanging Fabric Baskets Or Pockets I know I say this every time, but I am so excited about this project! The possibilities are endless! And they are so easy – I am going to have baskets hanging all around my house in a weeks time. I am using these above my sewing desk to hold all my notions and patterns. Here is the tutorial for making larger baskets with plexiglass in the bottom for great wall storage. Supplies: Fabric – how much you need depends on how big and how many you make, we’ll go over thisHeavy weight interface lining – you want it stiff enough to hold its shapeAll your sewing stuffCurtain rod or wooden dowel with brackets to hang it on Cutting out fabric: To make one basket you need two pieces identical in size. Large pocket: 12 inches wide and 20 inches long.Smaller basket: 8 inches wide and 14 inches long, one only 12 inches long.Smallest basket: 7 inches wide and 12 inches long.Scrap pieces for the part you will use to hang them from, we’ll talk about these later Now sew the corners shut like shown.

DIY Chan Luu-Style Wrap Bracelet Like this: Like Loading... Filed under Accessories, Bracelets, Jewelry Tagged as Accessories, bracelets, Chan Luu, DIY, DIY Jewelry, do it yourself, Fashion, Fashion DIY, jewelry, Runway, Runway DIY, Wrap Bracelets

Related: