
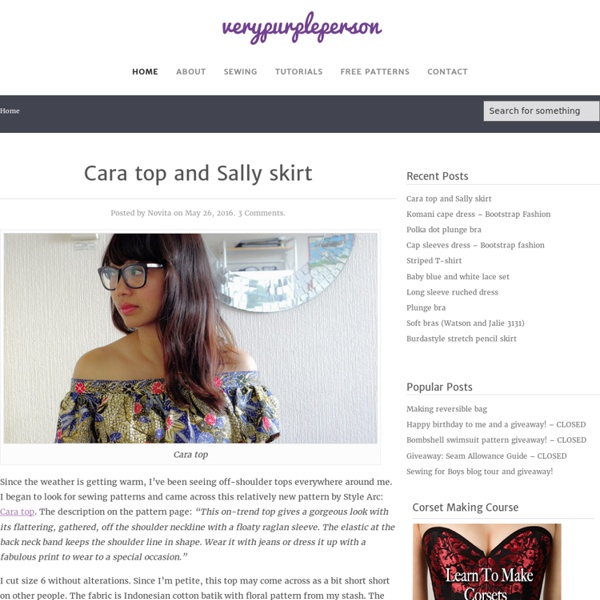
365 days. 365 items of clothing. 365 dollars Easy full skirt (and a little tutorial) | :: verypurpleperson :: This is a super easy skirt I whipped up in literally a few minutes. It is very easy, and I will say it again, very easy! You can make it and you will make it! Err… anyway, the black fabric is Japanese fabric, made of thick cotton with brownish swirly pattern on it. Actually I wasn’t really sure what I was going to make when I bought the fabric, I was thinking of making a bag with it. Then I suddenly had this idea and proceeded to make it. I also had this vintage Tais fabric, it’s a form of traditional weaving from East Timor. The skirt is basically a pair of rectangles with elastic. Disclaimer: You may use the finished products for both personal and commercial use (craft shops or markets only – no mass production). The tutorial I’ve made a simple diagram for making the skirt. Materials: Fabric for skirt. The length of the skirt will be a little bit shorter than half of the fabric width (for hem allowances), so please pay attention to the width of the fabric. Instructions: Some ideas:
diy tutorials All images of my art are copyrighted. Please no copying, stealing, pirating...you get it. Thanks. ...love Maegan: my DIY DIY Spirit Fingers | Sequin & Beaded Rings inspired by Ralph Rucci Spring RTW 2014 After seeing these AMAZING bedazzled fingers created by Max Kibardin for the Ralph Rucci RTW Spring 2014 runway collection, I just had to recreate… DIY Dolce & Gabbana Bejeweled Gold Headband {Crown} I am LOVING everything Dolce & Gabbana is doing right now. DIY Leather Cat Ears Headband | A Lil’ Cute & A Lil’ Meow I know, I know, everyone and their mother has done a DIY cat ears project and tutorial, but none like this {maybe?} My InstaLife Recap | Week 8/25–9/1 in Photos Follow me on Instagram to see these in real time. DIY Leather Butterfly Pins Inspired by Lanvin Fall RTW 2013 Flipping through my September issue of Bazaar from back to front, the way I always read magazines, I quickly spotted this gorgeous deep teal… New Acquisitions | B-day Gifts & Summer Goodies My birthday came and went this year without much fuss, which is mostly how I like it. Thoughts & Things | Loves & Links | Birthday Edition
tutorials Guess what, YOU CAN PRINT ON FABRIC! Without special paper, without special backing, without soaking your fabric in special solution. Here's what I did and what you need to know to..... Before we get started, four things.... First off, this is important, the fabric I used to print on without any backing was like a heavy weight WHITE canvas (not exactly canvas but something like it. Secondly, it did not work perfectly every time. Thirdly, you can print on lighter weight fabrics but you'll have to iron on freezer paper to the back or use something to stabilize it. Fourthly, I recently bought a brand new wide format printer recently, Epson Work Force 7520. I'm going to start by showing you how I printed the fabric on these curtains. Then, I cut a piece of white heavy weight fabric 12.5"x44". That's it! Some tips.... You might have to play around with the color to get a saturated enough look. Cyan, Magenta, Yellow Multipack= $47.49 Black= $18.99
DIY: Crafty Book Binding by Janis Nicolay Hello all! Janis here, from Pinecone Camp. I'd like to share a simple, and fun, crafty project with you. I used to shoot weddings, and my partner and I would also make the albums for our clients. The materials used for this little book. Tools used for this project. Cut and fold paper and cardboard to the size you want the book to be. After scoring the back side of both the front and back covers (about 3/4" from side), clip all pages and covers with bulldog clips. For a 5"x7" book punch three holes with the awl: one in the centre and one on each end about 1" in. Using book binding thread or a sturdy cord or ribbon, start stitching. Cut out shapes with your scrap paper. My niece wanted a place for "secret messages and stickers", so I made an envelope for the inside back cover. You can do so much with a few bits of scrap paper and some book binding tools. All images by Janis Nicolay at Pinecone Camp.
Grosgrain "Teecycle" Dress Tutorial and GIVEAWAY!!!! CLOSED. Are you like me? Do you have a box full of old tee shirts. Some are too sentimental to throw away. Others are just too big, too stained or too tight. First 'Teecycle'- a child's tee-shirt dress tutorial. This idea works well for soiled shirts. Since this was such an easy, simple piece. Step 1. Step 2. Step 3. Step 4. Step 5. Step 6. Step 7. Since this was such an easy, simple piece. Make Your Own Floral Suitcase! Plain vintage suitcases are pretty great but cover them in your favorite coordinating fabrics and your house just got cuter! Not only do they look cute in your home, they're great photo props. Decorate a nursery, stack them high in your living room, stand them up behind other items on a shelf, etc. It's an easy way to add color to your space without investing a lot of money. Keep an eye out for hard cases with stitched seams (for tucking fabric in) and think about using a variety of sizes for great impact. First, gather your supplies. , a paint brush, a pen, scissors, a rotary cutter (or a butter knife). Carefully spread a thin layer of Mod-Podge over one third of your case starting at one side. Your fabric should hang over your edge about 1/4" or more. When you're dealing with corners, apply a little extra Mod-Podge to your fabric and create two little pleats before you tuck the fabric in. This project turned out to be much easier than I thought with fewer complications than expected.
tutorial This one came out of nowhere. Over the long and glorious weekend, I had a crafty and cooking day with Leah of The Content Owl (we hashtagged #craftingncooking! I highly recommend it!). You don't have to buy glitter paint or anything fancy for this tutorial; you can use a combination of the Mod Podge and glitter you've had since 2009 when you started blogging (or is that just me?). You will need:Tee, sweatshirt, sweater, or other garmentFreezer paperGlitterSponge (the smaller the better; the blue one above was too big)ModPodge (highly recommended but not shown--use Fabric Mod Podge for a more durable tee!) My arrow design was I guess loosely inspired by this Old Navy tee, and the crossed arrows motif, although you can do this with any design you can draw and cut out of the freezer paper! Instructions: 1. Cut out the drawing, preserving the outline more than the inside part. (OMG, that's really bugging me now--they look like paddles with arrow points on one side rather than arrows. 3. 4.
Crafty Nest