
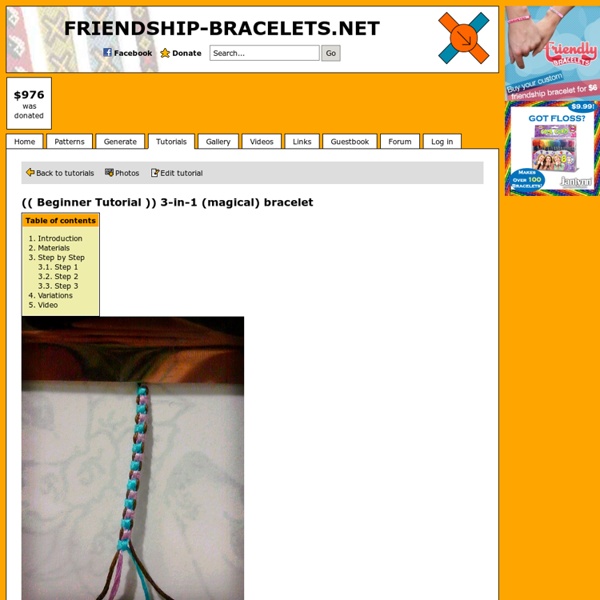
Tutorial This tutorial is dedicated to pattern #5458. This bracelet is easy and quick. Looks just like a real zipper. This bracelet would be easy for beginners learning forward backward knots. HAPPY KNOTTING! 3 strings, all different colors. Order your strings: Red, yellow, blue. There is a pattern for this tutorial: Step 1 Take your red string and tie a forward/backward knot with it onto yellow. Step 2 Take your blue string and tie a backward/forward knot with it onto yellow.Then tie a forward/backward knot onto yellow so that the blue string is back on the left. Step 3 Repeat steps 2 and 3 until the bracelet it as long as you'd like. Try using 2 strings, and doubling them up. The original author of this tutorial is kallum, but it has also been edited by Stefan, Jeckle, Matina, Sareana, happybunny, Becca_roo, tazemaster, Kestrel, Alicat, CandyAce, Danduna2 and mysterytour. Click here to upload photos of your work!
Learn to Make a Pallet Garden In 7 Easy Steps The votes are in! We asked our Facebook fans what type of pallet project they wanted to make and the answer was a pallet garden! Combining the ever-popular pallet with beautiful blossoms is easy, inexpensive and impressive. For awe-inspiring annuals, remember to regularly water your pallet garden. Pay special attention to your bottom two slots – They tend to get the driest! Photo: The Local Spoon We found this easy and comprehensive step-by-step from Life on the Balcony. 1. To find free pallets, call your local garden supply store or any shop that carries large equipment. 2. You’ll need: Your pallet, two large bags of potting soil, 16 six-pack starter plants of annual flowers, a small roll of landscape fabric, a staple gun, staples and sandpaper. Photo: Starter Plants @ The Local Spoon 3. You probably picked the best of the litter, but give your pallet another once-over for chipped wood and loose nails. 4. 5. 6. 7.
Tutorial Arrange your threads symmetrically, as shown Step 1 Step 2 Step 3 Step 4 Step 5 Step 6 Step 7 Step 8 Step 9 Step 10 Repeat the leafs until the bracelet is long enough. The whole bracelet looks like this: I hope this was helpful! Happy knotting!! Video 1 Video 2 The original author of this tutorial is Malin, but it has also been edited by Foz, BeyondBracelets, Kestrel, edicukas, Alicat, MacrameSchool and PRAJITURICA. Click here to upload photos of your work!
Schema Voici un modèle pour réaliser un bracelet de l’amitié avec le motif d’uen vache. Cool! Il ne faut que de dix fils en trois couleurs de 1,5 metres chaque un. Voici un jolie modèle de bracelet brésilien avec des rayures et coeurs, idéale pour faire un present a une amie. Voici un tuto pour apprendre comment réaliser un bracelet avec des fils et perles, très à la mode ce printemps. Voici un modèle de bracelet brésilien avec des losanges ou diamants. Voici un schèma, niveau moyen, pour réaliser des bracelets brésiliens avec un degradé en bleu et des losanges. Voici un joli bracelet de l’amitié nomé Jipijapa. Voici un modèle très joli pour réaliser des bracelets en macramé.
#532 There is a tutorial on how to make this bracelet called "(( Bracelets )) How to Make Pattern #532". Click here to go to the tutorial. There is a video on how to make this bracelet! toilet paper roll binoculars Kirsten ADORES these binoculars, or noculars as she calls them. These were very simple to make and Kirsten loves exploring everything with them. Here’s the instructions: What you’ll need: 2 empty toilet paper rolls wrapping paper tape scissors ribbon Instructions: 1. wrap wrapping paper of your choice around each of the toilet paper rolls 2. tape the two toilet paper rolls together using scotch tape – one piece folded around each opening works really well 3. make two small slits at the top of your binoculars and tie a piece of ribbon through each slit
OPDsearch - Outil de recherche d'Ebooks (¯`·._.·[ Opdsearch ]·._.·´¯) Editeur(s) : Veuillez Remplir SVPOs du logiciel : WindowsCompatibilité (Xp / Vista / etc..) : Framework.NET (pour Windows XP) Mono (pour Linux et mac)Version actuelle : 1.7.1Date de sortie : 01/01/2012 Des milliers d'Ebooks a votre disposition Ce log est un outil de recherche d'Ebooks dans les bibliothèques OPDS. Vous chercher un auteur? Un titre? Il suffit de demander! Outre quelques améliorations depuis la version 1.5 cette version offre la possibilité de lancer un serveur web qui permettra d'accéder à un site mobile pour lancer des recherche directement depuis un smartphone ou une tablette (Android, iOs, etc...voir le mode d'emploi)et quelques petites fonctionnalitées supplémentaires comme la rechercher des derniers livres parus.. Hébergeur : [Mediafire]Nom de la release : Opdsearch.1.7.1 Moteur.De.Recherche.Ebooks.FRENCH.PCFormat : EXEFichier inclus : PatchLangue : Découpage : Nombre de fichiers et tailles : 1 x 2 MoTaille totale : 2,00 Mo
Végétaux | Senbazuru - Vidéos pour apprendre l'Origami Toujours dans une thématique printanière, nous vous proposons ce très joli modèle de jonquille et sa tige créée par Ted Norminton. Attention, ce n'est pas un modèle facile, il y a beaucoup de plis à faire, et les nombreuses épaisseurs de papier vous compliqueront la tâche. Par conséquent, utilisez de préférence un grand carré (d'au moins 20 cm de côté ) de papier pas trop épais. La tige et la fleur se plient avec un carré de même taille. La fleur est réalisée à partir d'un hexagone, suivez simplement les premières étapes qui expliquent comment réaliser un hexagone régulier à partir de votre carré (à l'aide de ciseaux ou d'un massicot). N'oubliez pas de vous entrainer d'abord sur un brouillon avant d'utiliser un papier de qualité. Cet origami traditionnel est simple à faire. Cette fleur magique créée par Ilan Gabiri est un origami modulaire plié avec 8 carrés (de 7,5 cm sur la photo de départ). Le lys est un modèle traditionnel japonais qui peut aussi se trouver sous le nom d'iris. ).
Origami facile : faire des fleurs en papier | La Marmaille Après avoir vu comment débuter en origami, on va voir comment réaliser des fleurs en papier facilement ! ❁ ✿ ✾ ❀ Pour décorer sa chambre, son bureau, sa maison ou en offrir en cadeau, les fleurs en papier sont originales, uniques et peu onéreuses. En effet, avec quelques feuilles de papier et un ciseau, on peut tout réaliser avec l’origami, la seule limite est l’imagination ! A vos papiers et ciseaux pour créer des fleurs belles et éternelles en quelques minutes ! Je vous recommande ces livres pour apprendre le pliage des fleurs sur le site d’Amazon. Et en attendant, voici ma petite sélection de vidéos tutoriels pour créer facilement et rapidement de jolies fleurs, roses ou lotus en papier ! Comment créer une fleur en papier en moins de 5 minutes ? Pour créer une fleur en papier en moins de 5 minutes, munissez-vous de deux feuilles de papier, une carré pour la fleur, et l’autre rectangle pour la tige, ainsi que d’un ciseau. Voir la vidéo pour créer un origami facile d’une fleur
2011.03.01. - 2011.04.01. A Royal fülbevaló volt az első ékszer, amelyet tanfolyamon kívül, teljesen egyedül készítettem. Ekkor még csak néhány hete kezdtem a drótékszer-készítést. Cleotól megtanultam a fogók használatát, az alapelemeket, az alaptechnikákat, továbbá minden órán segített elkészíteni egy-egy ékszert. Ezzel a tudással késznek éreztem magam, hogy egyedül is megpróbálkozzak az ékszerkészítéssel. Az interneten (Zita ékszerei) akadtam rá erre a fülbevalóra, és azonnal megtetszett. Azóta már tucatnyi ékszert készítettem egyedül, amelyek egyre jobban sikerültek. Hozzávalók 2 x hosszúságú 1 mm-es lágy drót 2 x 1 db készen vásárolt füli akasztó vagy 2 x hosszúságú 0,8 mm-es félkemény drót 2 x 5 db készen vásárolt, lapított korongban végződő, hosszúságú szerelőpálca 2 x 1 db átmérőjű ásványgolyó (térképjáspis) 2 x 4 db átmérőjű ásványgolyó (térképjáspis) Szükséges eszközök Oldalcsípőfogó Laposfogó Kúposfogó Reszelő Az elkészítés menete A következő lépés a fülbevaló vázának elkészítése.